Wednesday, June 24, 2015

The Nail School Chronicle: Almost There

Affiliate Links

Nail School Update


Hello Loves.  I know I haven't posted about nail school in a while, so I figured it's about time for an update.  I apologize for dropping the series without notice.  I've actually been dreading writing this post.  Why?  Because there just isn't anything exciting to write about right now.  I'm at that point where all the days blur together.  Well, the days that I was able to go.  I had to take a few days (ok, it added up to a few weeks) off.  But y'all have been so super supportive and deserve an update.  :) 

So much has happened since my last update.  I have now completed and passed both of my mock state board practical exams.  That is a really cool process.  The school sets everything up just like the actual state board exam.  They run through it as if we are taking the actual test and then provide notes on how we can improve.  After taking both mock exams, I feel 100% ready for the real thing.  All of my anxiety over that portion of the test has been relieved.  I don't know if all schools do mock exams like this, but it is freaking awesome and I am super thankful that GCI does them!  I still have some anxiety over the written portion of the state board exam, but I'm sure I'll be fine.  I'll go over all of my notes a hundred times between now and then.  lol

So, where do I stand right now?  I have less than 50 physical hours to go.  During those hours, I have to complete 14 more pedicures and 31 more manicures.  Whew...that number is daunting.  Not as daunting as the original 60 pedicures and 80 manicures we started out with, but still daunting.  Did I mention that those manicures are basic manicures?  Meaning polish, not gel polish?  Yeah...so I've been working on my polishing skills.  A lot.  I'm getting better, I think.  But I still prefer my gel polish.  Anyway, several of my classmates have started helping me find students for manicure and pedicure services.  I can't even begin to express how thankful I am for their help.  Seriously, my heart is overflowing.

Ok, enough with the rambling.  As I mentioned, I've been working on my polishing skills.  Which means I've also been playing with polish nail art techniques.  I finally managed a decent polish gradient!  Woo Hoo!  Wanna see it?  The first picture is a quickie that I snapped with my cell phone while waiting for the polish to dry.  The gradient isn't as smooth as I would like, but it's not bad.  I didn't realize you need to wet the sponge first, so I had issues with the polish getting tacky and pulling up in spots.  Lesson learned!
Bright Summer Gradient with Holographic Top Coat

The colors are three of the bright stripers from a Color Club Nail Art Striper set that I picked up from Cosmo Prof the other day.  I don't know the names...or if they even have names.  They're in my kit downstairs and I'm too lazy to go get it.  I know...I'm awful.  I topped it with Out The Door Northern Lights top coat.

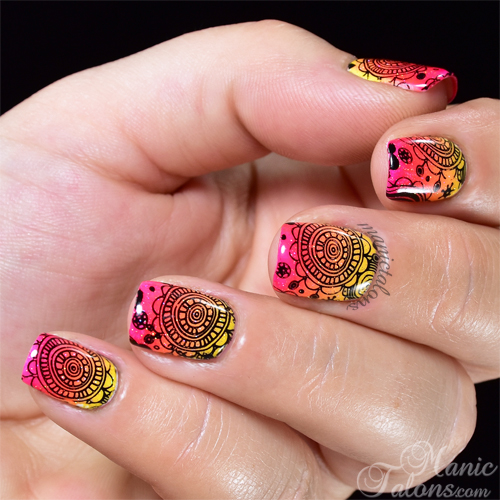
So, once it was dry I decided to stamp over it to hide the flaws.  I used an image from MoYou London Pro Collection XL 14.  Much better!  I actually love how it turned out with the stamping.  Heck, even though the gradient isn't as smooth as I would like, I'm pleased as pie with it anyway.  I mean, hey....it's polish!  Lacquer.  And I did it!  lol
Bright Summer Gradient with Stamping

Bright Summer Gradient with Stamping

I know I have so much more to tell you.  More updates, more details, more thoughts on school.  But honestly, I'm exhausted.  I've been dealing with some personal issues lately that set me back a bit.  I had to take a few weeks off from school to deal with some medical issues.  Don't worry, I'm ok.  Just working through it.  So I'm humping it at school this week to get in as many credits as I can.  Then we're off for summer break the following week.  Hopefully I can come back and hit it hard the week after break and finish this thing!  Then I'm off to join the lovely Brenda Anderson from Tuff Enuff Nails in her booth at the Nail Tech Event of the Smokies July 11-13.  I'm so freaking excited about that - and honored that Brenda asked me to join her and do nail art demos.  :)  If any of you will be there, please come by and see me.  I would love to meet you!

But for now, I'm going to kiss my 4 year old good night for the last time and head to bed.  He'll be 5 years old tomorrow!  I'll try to get in another post this week, but I might not make it.  Between the birthday party tomorrow and school the rest of the week, time for writing just isn't there.  But don't worry, I'll make up for it over the break.  I promise!!!

~Michelle

*This post uses Amazon Affiliate Links.  Purchases through these links generate commissions that help fund this site.

Read more ...

Friday, June 19, 2015

Fun Summer Colors from Pink Gellac

Press Sample Affiliate Links

Fun Summer Shades from Pink Gellac

Hello Loves!  I have six colors from Pink Gellac to show you today.  These are older colors from the Pink Gellac line, but beautiful and fun shades for warmer weather.  :)

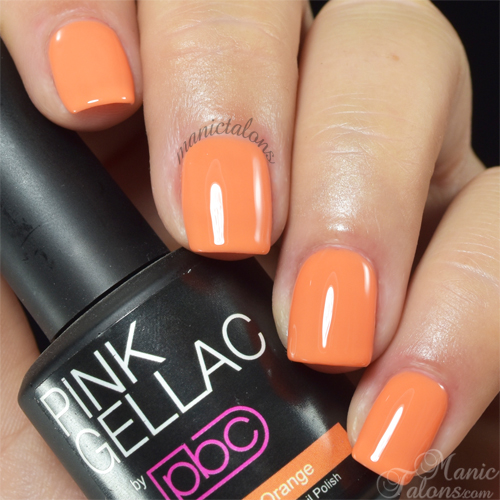
First up is a super bright, neon orange cream called Neon Orange.  Yeah, not the most creative name, but the color is stunning.  Application was a breeze and I found it to be opaque in two coats.
Pink Gellac Neon Orange Swatch

The next shade I have to show you is a gorgeous bright pink shimmer with a purple flash called Extreme Pink.  Extreme Pink also applies beautifully with full coverage in two coats, though the shimmer does show brush strokes if the coats are too thick.
Pink Gellac Extreme Pink Swatch

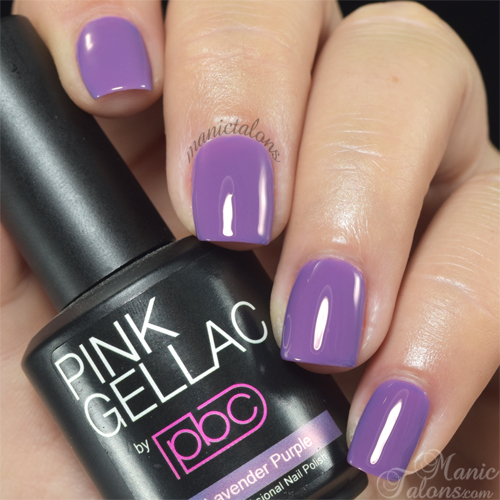
Lavender Purple is a medium purple cream that also applies nicely in two coats.  This purple is a great shade that isn't too bright but is still fun for summer.
Pink Gellac Lavender Purple Swatch

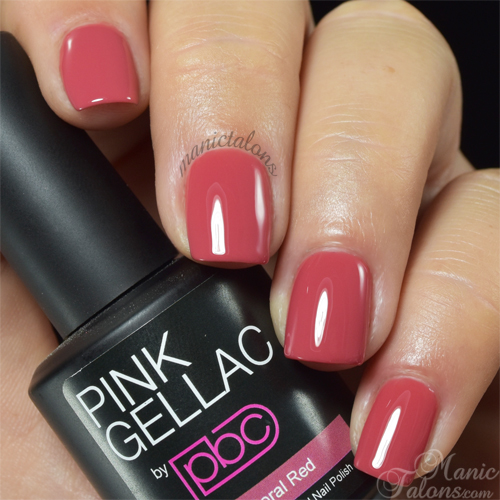
If you're more into playing it safe, Coral Red is the perfect summer shade.  This red toned mauve is more neutral than the others.  Definitely a great shade for the office that won't allow brighter shades.  And yep, she's another easy two coater. 
Pink Gellac Coral Red Swatch

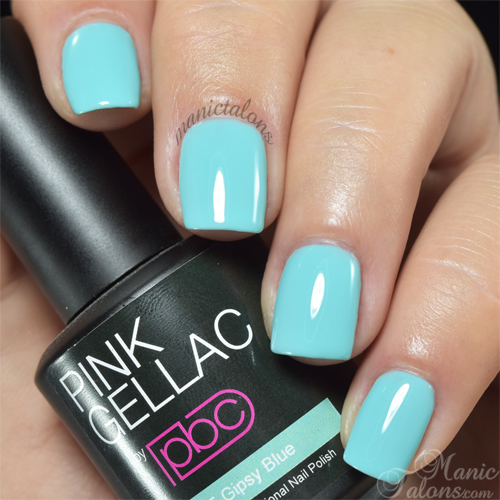
Jumping back to the brights, Gipsy Blue is an incredible bright light blue cream.  I found application on this one to also be a breeze.  The amount of love I have for this polish is beyond words.  So bright...so cheery...and blue!
Pink Gellac Gipsy Blue Swatch

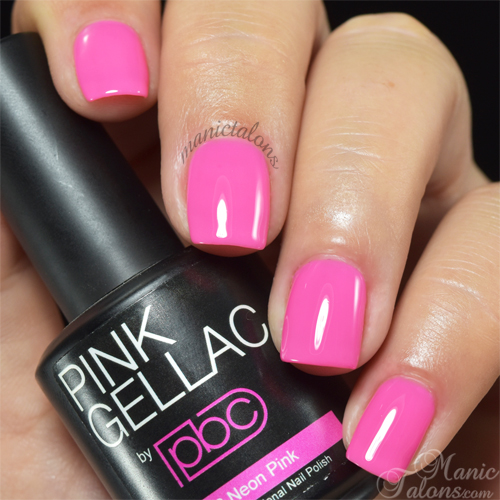
Finally, what summer grouping would be complete without a Neon Pink?  Yep, she's bright and fun and wreaked havoc on my camera.  This beautiful pink is a bright pop against a nice summer tan, which I don't really have...but you get the point.  I could still see vnl after two coats, so I swatched three for this one.
Pink Gellac Neon Pink Swatch

What do you think of these six Pink Gellac shades?  Are any of them calling to you like they called to me?  If so, you can pick up a bottle of these and other Pink Gellac shades from the Chickettes Boutique or via Chickettes on Amazon here.

~Michelle

*The Pink Gellac Gel Polishes featured in this post were provided by Chickettes for my honest review.  This post uses Amazon Affiliate Links.  Purchases through these links generate commissions that help fund this site.  All other links are courtesy links that do not benefit ManicTalons.com. 

Read more ...

Wednesday, June 17, 2015

Neon Dots with Girly Bits Cosmetics

Press Sample Affiliate Links

Neon and Nude with Girly Bits Lacquer

Hello Loves!  I have a simple doticure to show you today.  I know I've mentioned before that I am really NOT great at applying polish.  Gel polish, sure.  But lacquer kicks my tail every time.  So I've been playing with lacquer a little more lately and this is the result.  :)  To create this look, I used three Girly Bits Cosmetics Lacquers and my Out The Door Northern Lights top coat.

Lets take a look at the polishes that went into this simple nail art design, shall we?

The base is this gorgeous nude with golden shimmer called I'm Not As Think As You Drunk I Am.  I adore this nude, even though it might not be the best match for my skin tone.  The golden shimmer make it super fabulous!  Application was easy enough in two coats.
Girly Bits I'm Not as Think as You Drunk I Am Swatch

The orange dots are a beautiful, neon orange cream called Thump Your Melons.  I freaking adore that name!  lol  Application was a little tricky for me on this one.  Neons kill me.  I ended up swatching three coats, but someone who is better at applying lacquer than I am could easily get away with two.
Girly Bits Thump Your Melons Swatch

The green dots are an amazing neon green called It's Hoop To Be Square.  I'm not usually a green fan, but after seeing a few swatches of this one, I just couldn't resist.  Application was actually pretty easy for me this time.  I swatched two coats below.
Girly Bits Its Hoop To Be Square Swatch

Here's one more look at the final design.  So simple, but effective, I think.  I love how the orange and green pop over the nude base.  :)
Neon and Nude with Girly Bits Lacquer

If you're a lacquer fan and haven't tried Girly Bits Nail Polish, I highly recommend it!  This is one of the few brands that I completely love and find easiest to work with as a lacquer novice.  :)  Be sure to check out these and the other awesome polishes available on the Girly Bits Cosmetics website.

~Michelle

*The lacquers featured in this post were provided by Girly Bits Cosmetics for my honest review.  This post uses Amazon Affiliate links.  Purchases through these links generate commissions that help fun this site.  All other links within this post are courtesy links and do not benefit ManicTalons.com.

Read more ...

Monday, June 15, 2015

More One Step Beauties from Purjoi Nail Studio

Press Sample Affiliate Links

Random Purjoi Nail Studio One Step Swatches

Hello Loves!  I have another large swatch post for you today.  I was sitting here looking at my shelf and realized I have a lot of Purjoi One Step Gel Polishes that I haven't shown you yet.  Purjoi Gel Polishes are a one step system, meaning they don't need a separate base or top coat.  Just two easy coats of color and a high gloss shine.  So, let's get to it those swatches.

The first polish I have to show you is a super fun, soft, sheer and shimmery number called Special Day.  Special Day is a discontinued color that is currently on clearance until they're gone.  I'm really sad that this one is leaving the Purjoi lineup.  She's absolutely gorgeous with a rainbow iridescent sparkle.  Sadly, my camera didn't catch the rainbow in the shimmer, but I promise it's there.  Grab this one while you still can from the Final Clearance section!  I swatched two coats below.
Purjoi One Step Special Day Swatch

Next up is a sheer, golden glitter polish called Shine Bright.  Shine Bright is a jelly finished that is packed with multiple sizes of silver glitter.  I swatched two coats below.
Purjoi One Step Shine Bright Swatch

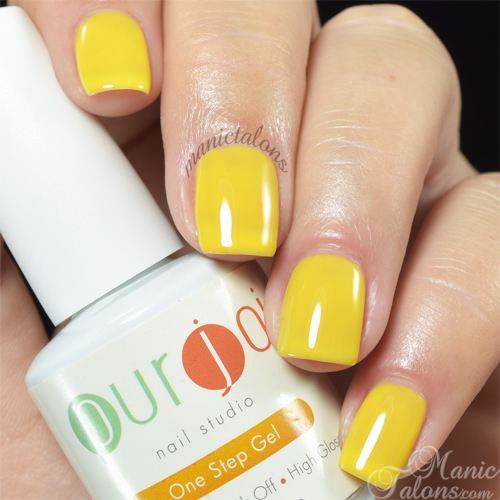
If you prefer your yellows a bit brighter, check out Lemon Candy.  This two coat beauty is a bright, sunshine yellow cream. 
Purjoi One Step Lemon Candy Swatch

This sweet, bright pink is called I'm So Pretty, and I have to agree.  I adore the full coverage in just two easy coats.
Purjoi One Step I'm So Pretty Swatch

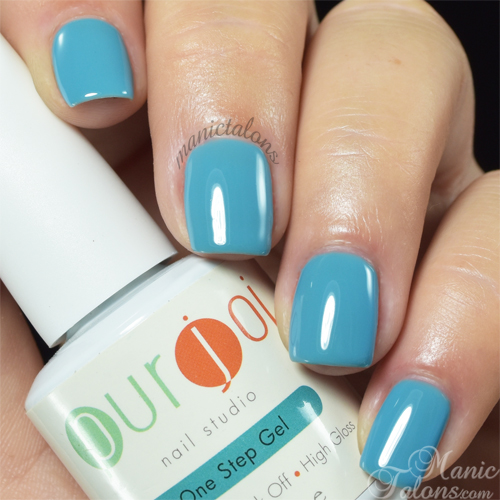
Did someone say blue?  Calm Waters is a medium blue cream.  Calm Waters is also a two coater with great coverage.
Purjoi One Step Calm Waters Swatch

Fairy Dust is an interesting color to me.  It has an awesome scattered holographic effect that is quite beautiful in sunlight.  The base is an earthy pinkish coral.  It is a little more pink in person than it appears here, though I did find that it cures a little darker than it appears in the bottle.  This is the perfect color for summer or fall!  I swatched two coats.
Purjoi One Step Fairy Dust Swatch

I Still Got It is a flawless, classic orange leaning red cream.  This is that red that screams sophistication and pairs beautifully with any outfit.  Well...maybe not with a neon green floral number, but you know what I mean.  I'm personally a big fan of reds, so a no base, no top coat, two coat red is essential to my collection.
Purjoi One Step I Still Got It Swatch

Finally, Juicy is a deep, reddish toned purple that screams summer grapes to me.  She's a little darker and more vampy than the other shades I have featured in this post, but she stands out and really grabs attention when I wear it.  Yes, I've slipped it in a few times unphotographed and always get compliments on the color.  :)  Oh yeah, two coats.
Purjoi One Step Juicy Swatch

There are tons of amazing colors in the Purjoi One Step line.  I'm working my way through them and will show you more soon.  In the mean time, in case you missed my initial review and wear test, you can check it out here.  :)  Be sure to swing by Purjoi Nail Studio to see all of the colors offered.  And follow PurjoiNailStudio on Instagram and facebook for deals and specials!

~Michelle

*The polishes featured in this post were provided by Purjoi Nail Studio for my honest review.  This post uses affiliate links.  Purchases through these links generate commissions that help fund this site.  

Read more ...
Friday, June 12, 2015

Bundle Monster Mosaic Glass Review

Press Sample Affiliate Links

Bundle Monster Mosaic Glass Gel Polish Review

Hello Loves!  You know how sometimes you find yourself stuck in a rut?  Unable to think of anything creative and everything you do just turns out blah?  Yeah, well I've been in that rut for a while now.  Don't get me wrong, I'm surrounded by bottle after bottle of gorgeous color, but my inspiration has been zapped.  Then something comes along that just gets your creative mind rolling again.  That something for me was the Bundle Monster Mosaic Glass Gel Polishes!  As soon as I saw these, the wheels started turning in my wee little brain and ideas started popping out left and right.  lol

So what are the Mosaic Glass Gel Polishes?  The collection consists of two sets of crystal clear gel polishes.  In other words, perfect jellies.  Yeah, I know...I'm not a fan of jellies.  But these are different.  They open up a world of layering and art possibilities.  Think about the sheer tints rnp from OPI.  Yeah, these are similar to those but in gel polish!  I received both sets to play with, and boy did I play!  But first, lets take a look at the colors.

Set 1 consists of Smoke + Mirrors (sheer black), Sea You Clearly (sheer blue) and Locked in Secrets (sheer purple).  Set 2 consists of Sunny Disposition (sheer yellow), Apricot Beauty (sheer orange) and Peony Blush (sheer Pink).  I have shown them below as two coats over both white and black backgrounds.  Excuse the clarity of the set over the black background - it is a little blurred due to the required shutter speed.
Bundle Monster Mosaic Glass Gel Polish Sets 1 & 2

I also did full swatches to show you how they build in three coats.  But let's save that for last, shall we?  First, let's take a look at some of the nail art pieces I put together using the Mosaic Glass gel polishes.

The first look was a no brainer.  I've wanted to do a sheer black look for a while but never got around to it.  I don't know...mixing black with clear to make the perfect sheer can get messy so I put it off.  Smoke + Mirrors takes away the guess work, so here we go!  I started with a black gel polish tip and freehanded a few dots and roses.  Then I topped it with two thin coats of Smoke + Mirrors.  Sheer black couldn't be easier!
Sheer Black Nail Art with BMC Smoke + Mirrors

The next look also uses colors from Set 1.  This time, I started with a champagne gold glitter base.  I added a thin layer of Sea You Clearly and Locked in Secrets to the respective nails.  I then removed the tacky layer and stamped each nail in white with the bubble and shell images from BM505 from the Sun Kissed Stamping Plate Collection.  I finished the design by applying another thin coat of Sea You Clearly and Locked in Secrets.  I adore the final result!  The sheer layers really turn this simple beachy mani into a fun masterpiece with tons of depth.  :)
Beachy Nail Art with BMC Mosaic Glass Sea You Clearly and Locked in Secrets

For this next look, I used the three shades in Set 2 of the Mosaic Glass gel polish set.  I started with a shimmery white gel polish base.  I then added random blobs of Apricot Beauty, Peony Blush and Sunny Disposition over the base and marbled them together with a dotting tool.  After curing, it looked like this.
BMC Mosaic Glass Apricot Beauty, Sunny Disposition and Peony Blush Marbled over a shimmery white base

I'm kind of in love with that base!  But I decided it needed something more.  I've actually been avoiding this image for a while now...the butterfly wing thing has been done so many times by so many people...but I couldn't imagine a better image for this shimmery marbled base.  So it just had to happen.  I stamped over the base in black with the butterfly wing image from BM424 from the 2013 Create Your Own stamping collection.  Here's the final result.  Yep, I love it.  I hated to take it off!  I think I might have to recreate this one at some point.
Butterfly Wing Nail Art with BMC Mosaic Glass Set 2

The final look I have to show you is my absolute favorite of the four.  I mean, come on...if you give a girl two sets of sheer gel polishes, you KNOW she's going to use them for the leadlight stamping technique, right?  I started with a black gel polish base and then stamped in white with the BM 318 from the 2012 Stamping Plate Collection.  I then mixed a dot of Sea You Clearly with Sunny Disposition to create a green.  Using a fine detail brush, I layered this green over the stems and leaves of the image.  I filled in the flowers with Locked in Secrets, Sunny Disposition, Apricot Beauty and Peony Blush.  Love, love, love how it turned out! Whoo Hoo!  I finally have the perfect gel polishes for the leadlight technique!  (Ok, technically this is reverse leadlighting - leadlight was originally a white base stamped in black with sheer colors to fill in the negative spaces...but you know what I mean.)
Leadlight Flowers Nail Art with BMC Mosaic Glass Gel Polish

Now that you've seen my creative side go wild, how about those pure swatches I promised?  As I mentioned above, I wanted to see how well these sheer glass gel polishes build.  So I swatched three coats of each to show you.

First up is Smoke + Mirrors.  This one is definitely the most opaque of the six after three coats.
BMC Mosaic Glass Smoke + Mirrors Swatch

Sea You Clearly remains fairly sheer even after three coats, but it builds to a beautiful jelly finish if that's your thing.  It also shows the staining on my nails a little more than I'm comfortable with.  lol
BMC Mosaic Glass Sea You Clearly Swatch

Locked in Secrets also builds to a nice, but sheer jelly. 
BMC Mosaic Glass Locked In Secrets Swatch

The colors in Set 2 are a bit more sheer than those in Set 1.  Here's Peony Blush.  As you can see, this one is very sheer even after three coats.  I suspect she would make a very pretty base for an American style french manicure in one coat.  ;)
BMC Mosaic Glass Peony Blush Swatch

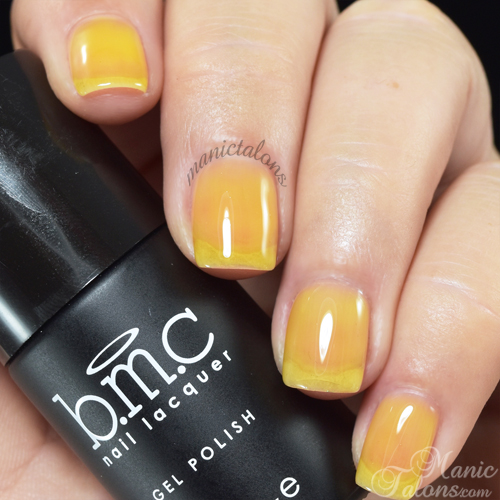
Sunny Disposition is also quite sheer after three coats.  It reminds me of when I used to color my nails with a highlighter in grade school.  lol
BMC Mosaic Glass Sunny Disposition Swatch

Finally, Apricot Beauty offers a little more coverage in three coats than Peony Blush and Sunny Disposition, but is still very jelly.
BMC Mosaic Glass Apricot Beauty Swatch

There you have it - the Bundle Monster Mosaic Glass gel polish collection - sets 1 and 2.  What do you think?  I'm not a fan of them on their own, but they are amazing for art.  Seriously, the possibilities are endless!  Layer them, mix them, use them for leadlighting...whatever your heart desires! 

You can pick up some of these beauties for your own collection on Bundle Monster's website here or on Amazon here.  If you do, be sure to share your creations with me on my facebook page!  I would love to see what you create with them.  :)

~Michelle

*The Mosaic Glass Gel Polishes featured in this post were provided by Bundle Monster for my honest review.  This post includes Amazon Affiliate links.  Purchases through those links generate commissions that help fund this site.  All other links are courtesy links and do not benefit ManicTalons.com. 

Read more ...