Friday, November 20, 2015

One Stroke Nail Art At Last

One Stroke Nail Art Designs

Hello Loves!  So I finally broke down and took a One Move Nail Art class (aka One Stroke).  This technique has been defeating me for years now.  I got pretty close once, but I still wasn't happy with the results.  At first I thought it was my paint.  Bought new paints.  Then I thought it was my brush.  Bought new brushes.  Then I realized it was me.  Paid for a class.  lol  I should have taken a class sooner.  Would have saved me a ton of headaches!  Let me start by talking about the class a little.  Then I'll talk a little about the tips and tricks I learned that made all the difference for me and show you some closer shots of the art above.

So, the class was One Move Nail Art by Crystal Nails Educator DeeDee Desbiens.  I woke up Monday morning with a killer migraine and drove 2 hours in heavy traffic to attend this class.  I wasn't about to miss it.  Y'all, I can't even begin to tell you how amazing DeeDee is as an instructor.  Just Wow.  She broke everything down to the basics - from how to hold the brush to how wet your brush should be.  She showed us basic strokes and moves along with a few designs.  I was then able to use those moves to create all of these looks!  Squee!  If you ever have a chance to attend a class with DeeDee, do it!  Trust me.  Just do it.

The class was hosted by another well known Educator - Michele Baker with American International Industries (the makers of IBD, EZFlow, Supernail, China Glaze and many more).  Michele is also a licensed instructor in GA and a nail art competitor in the 3D Acrylic area.  Not only did I have the pleasure of attending the course with DeeDee, but I sat at the table across from Michele.  Needless to say, I learned a lot from both of them.  Here's a picture of the three of us.  Michele is on the left, DeeDee in the middle, and I'm on the right.  Michele is teaching a 3D Acrylic class at the Nail Tech Event of the Smokies in 2016.  If you're planning to attend, you won't want to miss her class.  I'll share more details on that when they are published.  :)

Ok, so let's talk about One Move Nail Art.  I tried it several times before taking the class.  More than I ever shared here.  This is the last attempt that I shared and my best result prior to taking this class.

Ok, so it isn't horrible...but you can see where the colors didn't blend very well and the the strokes aren't smooth at all.  That brings me to several points I learned in the class that changed the game for me.
  1. The Surface Matters!  Paint doesn't stick to a smooth surface.  So if you're doing one stroke over regular lacquer, try a matte topcoat first.  If you're doing it over gel polish, apply your top coat, cure it, then buff the shine off of the nail.  Don't worry, it will restore beautifully when you top coat at the end.  For those who have had issues with the top coat chipping over acrylic paint, buffing helps with that too since it gives the top coat something to grab.
  2. The Paint Matters!  I tried several brands of craft and nail acrylic paint.  With most of them, you have to go over your design twice for it to be opaque.  The risk there is that you can accidentally pull up the first layer when trying to add the second.  Introducing Crystal Nails One Move Acrylic Paints.  These babies are super pigmented and are opaque in one coat!  I love love love them.  I only have 5 right now but will be buying more very soon.
  3. The Brushes Matter!  Ok, I bought one of these brushes several months ago thinking it would solve my problems.  It didn't.  But once I paired it with the others tips in this list, it made all the difference in the world.  The Crystal Nails One Move brushes are awesome.  I used the 2 and 4 with the slanted tips.  The slant makes things so much easier!  Especially when it comes to loading paint.  Dark on the short side, light on the long side.
  4. Keep your brush wet!  If the brush dries out, the paint won't flow and you'll get the skipping like I had in the photo above.  This is the hardest part for me.  My brush ends up drying out quickly.  Or I get it too wet an the water down the paint.  But practice makes perfect.  :)
  5. Color Selection Matters!  For One Move to work, you need a dark and a light color.  If the colors are too close, you won't see the gradient effect that makes the one move technique so freaking awesome.
  6. One Move doesn't mean you only use one brush stroke.  The name is completely misleading.  You have to pick your brush up several times for many of the strokes that make the flower petals and leaves.  Yeah, that one seems like a no brainer, but I wish someone had mentioned it to me!  lol
  7. Finally, Don't Judge Until You Topcoat.  The topcoat makes a world of difference when it comes to working with acrylic paint.  Things that don't look smooth magically blend when you add the top coat to the design.  So if things don't quite look right, the top coat will probably smooth it out.
Alright, so here's a shot of my tools.
Crystal Nails One Move Tools

As you can see, these brushes are quite small.  These are the size that you'll use most for nail art.  I also have the Crystal Nails 1 brush, but it is really for larger flowers and doesn't fit well on most nails.  I took a shot of the brushes with a quarter so you can get a better idea of the size.  The brush on the left is the #4 brush and is used for small flowers, buds and leaves.  The brush on the right is the #2 brush and is used for most flower petals.  As you can imagine, loading the brush with paint can be a challenge since they are so small, but it didn't take me long to get the hang of it.  Just a tiny dip on each corner, then blend the colors by stroking them on a flat surface or the back of your hand.
Crystal Nails One Move Brushes sizes 2 and 4

Ready for a closer look at my swatches?  This first one uses the daisy design that DeeDee taught in class.  This is one of the hardest for me since the petals require the slightest movement to form them.  Oh, and can I just say that macro photography is cruel?!?!  You can see every little mistake in my strokes.  I promise, they look much better when they aren't blown up.  lol
One Stroke Nail Art Daisies

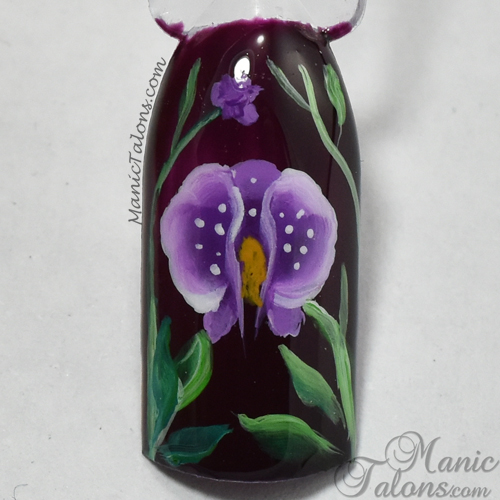
This next one is one I found on YouTube.  It's supposed to be an orchid.  I think I need to practice this one a little (or a lottle) more.
One Stroke Nail Art Orchid

I have been attempting this next design for over a year, so I'm super thrilled with how it turned out.  The calla lily on the side needs a little refining, but the main flower turned out great.  Note, the green I used here is not a Crystal Nails One Move paint.  You can see the difference between the opacity of the green and the white, which is a CN One Move paint.
One Stroke Nail Art Calla Lilies

DeeDee focused mostly on fantasy flowers during class- meaning flowers that are obviously flowers but not actually a flower that exists in nature.  This is a combination of two of the fantasy style flowers she showed us.
One Stroke Nail Art Fantasy Flowers

Of course we learned to do roses.  I mean, no one move class would be complete without them right?  I really like how this one turned out, but there isn't enough contrast between the white and the yellow in the middle of the rose.  This is what I mentioned in point 5 above.
One Stroke Nail Art Roses

Ah yes, much better.  This pink rose was created using red and white.  My brush started to dry out in the middle of the large rose.
One Stroke Nail Art Roses

I absolutely LOVE this poppy design.  I should have used a lighter background color, but the poppies turned out so freaking cute!  I created them with black and red and then added a little yellow to the centers.
One Stroke Nail Art Poppies

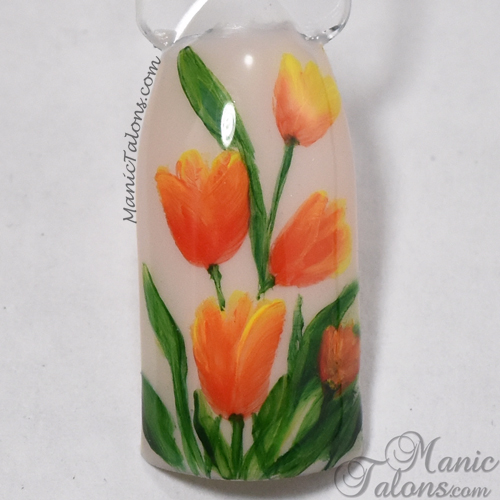
Tulips anyone?  The colors in this one make my heart smile.  The only thing I wish I had done differently is I should have painted the small blossom on the bottom right before I added the leaves.  Painting over them made it darker and my paint started pulling up.
One Stroke Nail Art Tulips

Finally, I have these sweet little roses with a butterfly.  On this one, I forgot to buff the swatch before painting.  You can see where I had problems with my brush sliding around a little and the paint getting out of control.  So remember to buff that surface!  But I adore the overall design and that butterfly was so freaking easy!
One Stroke Nail Art Roses with Butterfly

Ok, so I think it's safe to say that I finally "get" the concept behind One Move or One Stroke Painting thanks to spending a few hours in class with DeeDee.  Don't be surprised if you see a lot of One Move art from me in the future.  I can't get enough of this technique!  Practice makes perfect, and I'm a practicing fool over here.  lol

To see more nail art from the master herself, be sure to follow Crystal Nails DeeDee on Facebook and @CrystalNailsDeeDee on Instagram.  I'm telling you, she's amazing.  Her gel art is incredible too, but I couldn't afford both classes.  Next time!  If you want to pick up any of the brushes or paints I featured here, you can find them in DeeDee's Crystal Nails webshop here.

~Michelle

*All products featured in this post were purchased by me.  All links within this post are courtesy links and do not benefit ManicTalons.com.
 
Read more ...

Friday, November 13, 2015

IBD Just Gel Urban Edge Collection

Affiliate Links

IBD Just Gel Polish Urban Edge Collection Swatches and Review

Hello Loves.  I finally have the IBD Just Gel Polish Urban Edge Collection to show you.  I was hoping to get these up earlier this week, but two of the colors were on back order.  They came in just as I was going to post without them, so I decided to wait a little longer.

The Urban Edge Collection consists of 6 creams and 2 glitters toppers.  I wasn't really expecting to like this collection based on the preview pictures, but as I was swatching them I found I actually do like a lot of the colors.  Ready to see them?

First up is Painted Pavement.  This color seems to be the hardest to find.  It is on back order through many channels, but it should be popping up soon.  Painted Pavement is a soft, pastel periwinkle that leans a little blue.  Application was smooth but I did find that I needed three coats for full coverage.
IBD Just Gel Painted Pavement Swatch

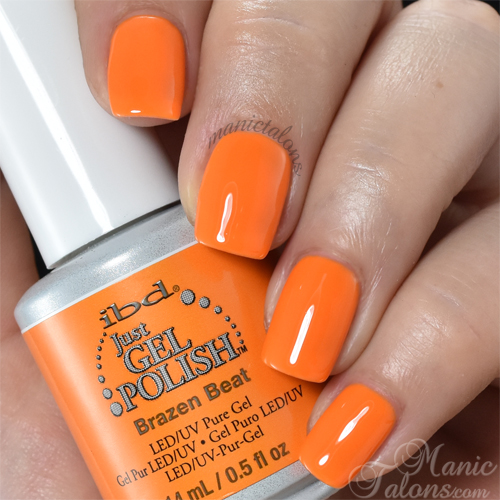
The next shade is one of my favorites of the collection.  Brazen Beat is a true orange that would have been perfect for Halloween.  It leans a little bright but I am thrilled that it doesn't lean pink or yellow like many orange polishes.  Sadly, this one was a little streaky for me even after three coats.  It may have needed a better shake.
IBD Just Gel Brazen Beat Swatch

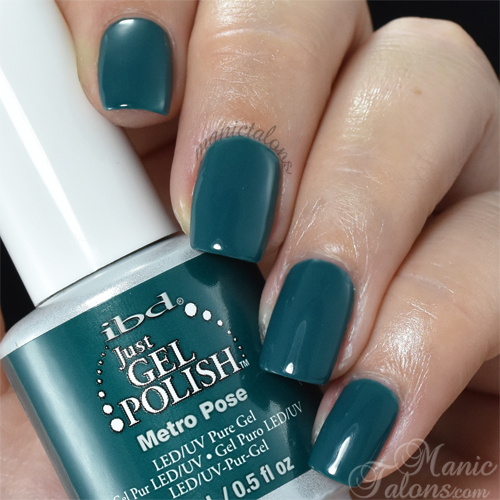
Ah yes...the color I hate to love.  Metro Pose is a gorgeous dark teal.  It leans very green in person.  I didn't have time to fight with it, so it appears blue in these photos.  The formula is fantastic and I found it offers perfect coverage in two coats.
IBD Just Gel Metro Pose Swatch

Since I didn't have time to fight with the color of Metro Pose, I am once again borrowing Angela's Pantone comparison for true color reference.  ;)
IBD Just Gel Metro Pose Pantone Comparison

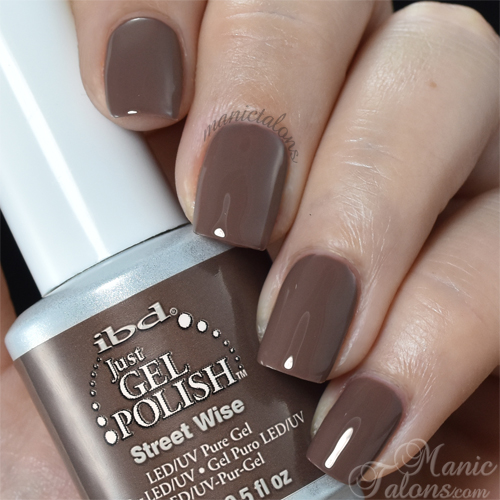
Street wise is a nice hazelnut brown cream.  It is a little warmer in person than it appears on my monitor.  Application was similar to Metro Pose - opaque in two and creamy as can be.
IBD Just Gel Street Wise Swatch

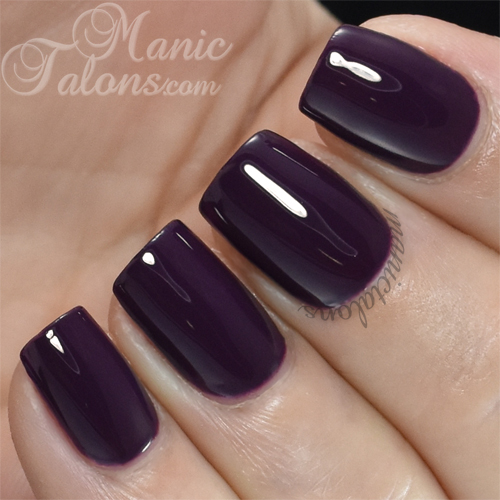
I'm sure it comes as no surprise that Luxe Street is another of my favorites from this collection.  This deep, vampy purple is yet another with a flawless formula.  Two coats for perfect coverage.
IBD Just Gel Luxe Street Swatch

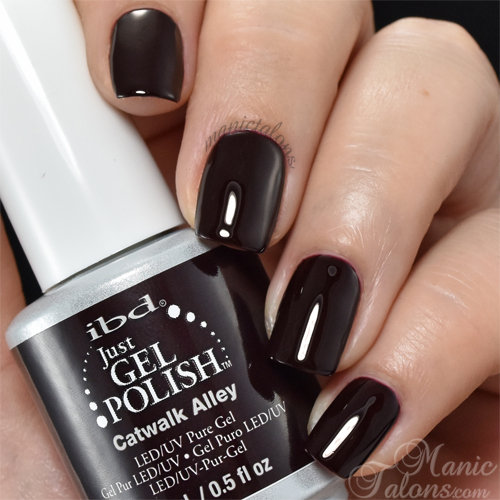
Catwalk Alley was a tricky little devil to photograph.  It wants to appear black in photos, but in person it is a deep, dark maroon.  In daylight, the maroon is much more obvious, but it is still a true vamp.
IBD Just Gel Catwalk Alley Swatch

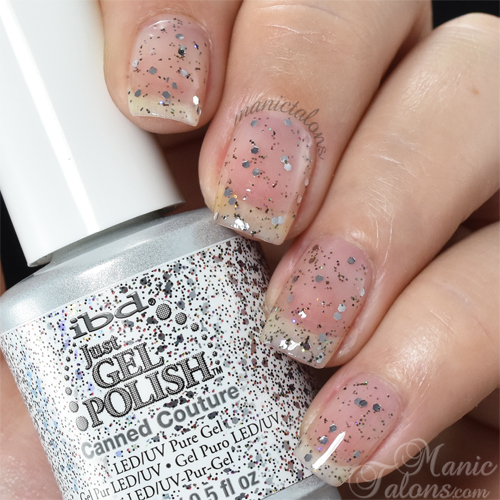
Ready to see the glitters?  Before we get to the descriptions, I have to say that I am increasingly frustrated by IBD glitter polishes.  The base is too thin to keep the glitter suspended, so they tend to be a pain to apply.  I had to do some major glitter placement with both of these.  The smaller dark glitter pieces wanted to cluster and clump together and the larger pieces wanted to stick to the brush.  It's just not worth fighting with them in my opinion.  Shame...they are pretty combinations and would be great if the formula wasn't such a pain.

Canned Couture consists of large silver hexes, dark silver micro glitters, and silver holographic shimmer.  I couldn't capture the shimmer to save my life, but I promise it is there.  This is two coats after a good shake.
IBD Just Gel Canned Couture Swatch

You can see the holographic shimmer a little in this photo of Canned Couture layered over Street Wise.  This is one coat after leaving the bottle upside down for a bit.
IBD Just Gel Canned Couture Swatch

Glam Ave is Canned Couture's golden sister.  This one consists of gold hex glitters, dark silver micro glitters, and golden red micro glitters.  This is two coats after a good shake.  As a side note, please excuse my stained middle nail.  I have no clue where that came from, but I suspect I touched some hair dye in the sink in the salon.  lol
IBD Just Gel Glam Ave Swatch

This is one coat of Glam Ave after letting the bottle sit upside down for a bit.  The gold doesn't really show in this photo, but I tried.  ;)
IBD Just Gel Glam Ave Swatch

The Urban Edge Collection can be found at your favorite distributor.  I also found 7 of the colors on Amazon here.

What do you think?  I wasn't very excited about this collection at first, but I was pleasantly surprised when I got them in my hands!

~Michelle

*This post uses Amazon Affiliate Links.  Purchases through those links generate commissions that help fund this site.
Read more ...

Friday, November 6, 2015

KBShimmer Winter 2015 Select Swatches

Press Sample Affiliate Links

KBShimmer Winter 2015 Collection Select Swatches

Hello Loves!  KBShimmer Bath and Body recently released their Winter 2015 Polish Collection.  This collection consists of 14 new shades, including the 2015 Toys for Tots Charity color.  This release also includes several winter themed water slide decals.  I have some of those to show you but I'm waiting until a little later in the season.  Be sure to check them out here.  For today, I have seven of the new polishes to show you.  Ready to see them?

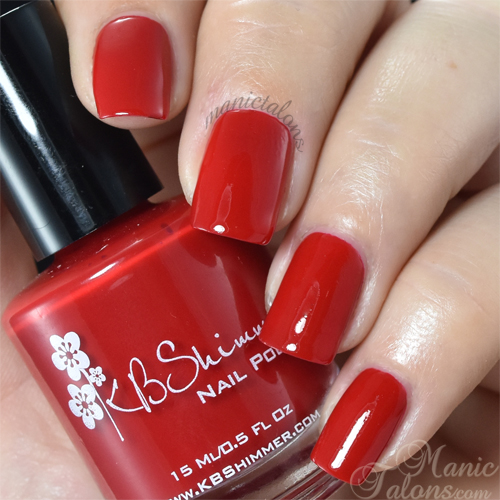
The first color I have to show you is one that excites me way too much.  I have been craving a true red cream from KBShimmer for so long!  Chilly Pepper is exactly that.  The formula is perfection and the color is exactly what I dreamed it would be.  Thanks, Christy!  All of today's swatches use KBShimmer Clearly On Top topcoat as well.  Excuse the bubbles in this one.  It was the first one I swatched and I forgot to let the bubbles settle from shipping.  I was a little excited.  lol  Clearly On Top is a quick dry top coat that does not disappoint!
KBShimmer Chilly Pepper Swatch

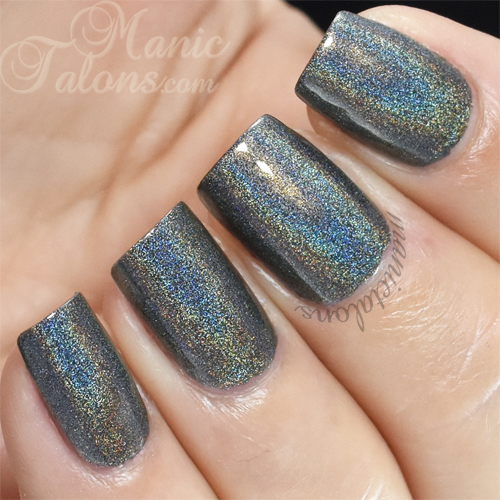
Next up is a strong, linear holographic polish with smokey, dark grey tones called Coal In One.  Application is nice and I found it to be opaque in two coats. 
KBShimmer Coal in One Swatch

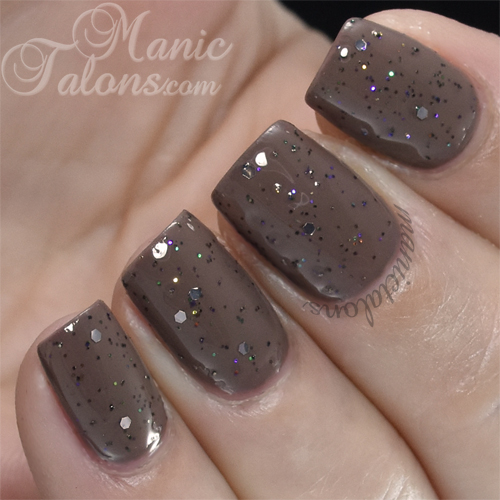
Brrr-tiful Dreamer is a grape leaning grey crelly with aqua, sliver, purple and fuchsia glitters.  I found that this one needed three coats for even glitter distribution, but it was opaque in two.  I should note that my camera didn't want to capture this one accurately.  It is more muted than it appears in my photos.
KBShimmer Brrr-tiful Dreamer Swatch

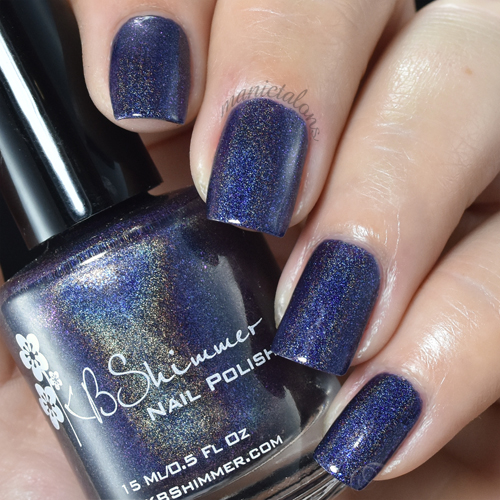
Claws and Effect is tied for my favorite polish in this release.  It is a dark purple leaning navy holo polish with blue/pink shifting glass flakes.  This polish has an incredible rainbow in direct lighting and the glass flecks really show off in indirect lighting.  It has so much dimension and is opaque in two coats for me!
KBShimmer Claws and Effect Swatch

Fleece Navidad is a soft grey/silver holographic polish with blue glass flakes.  The holo in this one is subtle but beautiful.  I swatched three coats here for full opacity.
KBShimmer Fleece Navidad Swatch

Kind of a Big Dill is a dark green jelly base with holographic glitters. I can't even begin to tell you how much I love this polish.  It reminds me of a dark evergreen tree with those sparkly silver icicles.  I swatched three coats for full coverage.
KBShimmer Kind of a Big Dill Swatch

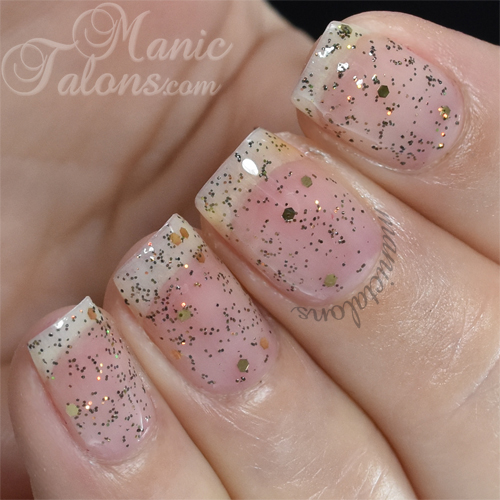
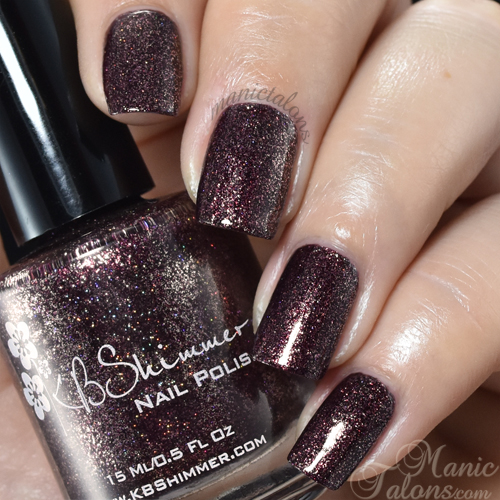
Finally, Yule Worthy is described as a holiday glitter topper or stand alone polish.  I don't like it as a topper, but I adore it in three coats as a stand alone!  This is the perfect color to transition from fall to winter.  It has a deep brown toned plum base and is loaded with holographic micro glitter.  My photos didn't capture the holographic glitter effect, but I promise it pops in person and is incredible!
KBShimmer Yule Worthy Swatch

Be sure to check out the other gorgeous colors in this release!  I had a very hard time choosing 7 to show you.  They are available for purchase now on KBShimmer's website here.  They are also on Amazon, and I have linked to each there in the descriptions above the swatches.  I'll show you those winter themed water slide decals over the next few weeks.  I'm hoarding them so I can wear them for longer than a day.  lol

~Michelle

*The polishes featured in this post were provided by KBShimmer for my honest review.  This post uses Amazon Affiliate links.  Purchases through these links generate commissions that help fund this site.  All other links are courtesy links and do not benefit ManicTalons.com. 

Read more ...

Monday, November 2, 2015

Two steps forward and one step back (a personal update)


Hello Loves.  Wow...I don't even know how to start this post.  I guess I'll get the update out of the way and then I'll show you some of my work from the past few weeks.

My stomach is in knots and my hands are shaking.  Which is seriously crazy because it won't be a very big deal to most of you, but it is huge to me.  I started Manic Talons just over two years ago as a hobby blog.  This is my sanctuary.  My home away from home.  This is the piece of me that I share with the world as my escape from the stresses and trials of everyday life.  You know, getting lost in the polish and the art.  Expressing my love and passion for miniature canvases and beautiful colors. Sharing that love with you - the people who understand that love and passion in a way that many of my local friends and family just don't.

Over the past two years, a lot has happened.  A lot.  I started down a new path - I went back to school, got my license, and have joined a fabulous salon with some of the most supportive people I have ever met.  I did a complete 180 in my professional life - I turned this passion into a career.  Not many people can wake up each morning and say that they are going to do what they love.  It doesn't feel like work.  Seriously.  It feels like Heaven, and I couldn't have done it without you.  But, there are some bumps in the road.  And those bumps are why I'm writing this post.

Ok, I'm rambling, so let me get to the point.  I keep posting that I'll be back on my normal schedule soon.  I fully intend to get back to it, but life keeps getting in the way.  I am very routine driven and the guilt that I feel for not keeping up with my posting schedule is intense.  I know, it's crazy.  This is my hobby and hobbies shouldn't cause stress and remorse.  But it does.  I have tried to stick to a posting schedule for so long that it has become a normal part of my routine.  Yet now I am finding that I have to choose between getting a blog post up or working on my career or spending time with my family.  The stress is taking the joy out of blogging for me, and I refuse to let that happen.  Not only is the stress killing the joy, but it is impacting my health as well.  I suffer from IBS (irritable bowel syndrome...yes, it is as lovely as it sounds) and I have recently started experiencing muscle spasms so strong that it feels like a baby kicking.  Funny how something so beautiful and welcome when you are pregnant can be so disturbing and unwelcome when you aren't.  But I digress...
I have come to the realization that I have to let something go in my schedule for life.  I can't give up on my career, and I certainly can't ignore my family.  So my blog here has to be the piece that is no longer scheduled.  Don't worry - Manic Talons is not going away.  It simply has to become my sanctuary again.  My hobby.  The thing I do in my spare time because I love doing it - not because it is on my calendar for the week.  So I'm dropping the idea of scheduled posts and will be posting as a hobby again.  I might go a week without posting or I might post 5 times in one week.  It will be a surprise for you and me!  lol

With that said, please be sure to follow me on Facebook, Bloglovin or by Email if you aren't already.  The links are in the sidebar to the right.  That way you won't miss posts since I won't be on a regular schedule.

Before I leave you to work on swatches for the KBShimmer Winter Collection, how about a few pictures from the past few weeks?  These are just a few of my favorites.

Let's start with Jennifer.  She is a life long nail biter and wanted pretty nails for a party she was attending.  I forgot to get a before picture and the cell phone shot that I grabbed of the after is a little blown out, but I had the picture she sent me from before so I'm including it.  lol  I used Cuccio T3 Controlled Leveling hard gel over tips to extend her nails.  The main color is Cuccio 2am in Hollywood with Pueen Stamping and Cuccio Vegas Vixen as an accent.  I love how these turned out!

Next is Jordan.  She is one of the stylists at the salon (and yes, her hands are stained from hair color).  This is not my design - she found a picture on pinterest.  I used Madam Glam Perfect Black and Electric Blue and Pink Gellac Luxury Gold for the base.  The accent nail is freehand with Wildflowers Nail Art Paints.

Speaking of Wildflower Nail Art Paints, I used them with my Wildflowers Art Brushes for this single nail between clients.  Stacked pumpkins!  I freaking LOVE these paints!  And the brushes.  :)

Sabrina came in for some Halloween nail art and saw the nail I was playing with above.  So I gave her a cute little pumpkin accent nail.  The base is Madam Glam Shimmer White.  I can't remember the purple, but it was also a Madam Glam.  Purple Sky maybe?  The shimmer didn't pick up well in the photo.  I'm still struggling with client pictures.  :(

Nicki also came back to see me.  This time, I she was missing a nail and needed a fill, so I rebuilt her pinkie with Cuccio T3 and a tip.  The fill was also with T3.  The colors are Madam Glam Electric Blue and Dream Diamond.  The color is off in this picture :(

Taking a break from the nails for a minute, Jordan and Jamie gave me some new color.  I freaking LOVE it!  A red base with caramel and red highlights and plum low lights.  It is a bit more natural than my previous vivids, but the variations of color are gorgeous.

Here's a sunlight shot.  :)

Since I'm posting my "ugly mug" in the hair shots, how about a Halloween pic?  My boys were super heroes (Batman and Iron Man), so I went as the comic book damsel in distress.  They rescued me from the evil villains.  lol  Ok, fine.  It was a last minute costume idea but I think it turned out kind of cute.  This was the second go at it.  McKenna did my makeup at the salon and I ruined it before time for trick or treat.  I was so mad!  I had to redo it myself and it didn't turn out near as fun as when she did it.  I also slapped on some pop art nails at the last minute.  Not my best work, but they turned out ok and the boys loved it.  That's all that matters, right?

Back to the nails for one more pic.  I also did some fun Nightmare Before Christmas nail art on Sabrina's daughter.  I can't remember the colors I used in this one.  I know...blogging fail.  But I'm pretty pleased with the final result and she loved it!

Ok, that's enough for today.  I have swatching to do.  :)  Oh, and I have the new IBD collection on the way.  I know I'm a little late with that one, but one of the colors was very hard to find when it first released so I decided to wait until I could get them all.  Those swatches will be coming soon.

Stay tuned for those KBShimmer and IBD swatches.  I don't know when, but soon.  lol  And thank you all for sticking with me while I'm trying to sort things out.  I will eventually go back to a regular schedule once I get settled at the salon and can put the majority of the startup marketing behind me.

~Michelle

Read more ...