Wednesday, November 26, 2014

Pink Gellac Ultra Shine Top Coats and Foil Effects Review

Press Sample Affiliate Links

Pink Gellac Ultra Shine Top Coats and Effect Foils Review

Hello Loves!  I have four fun products to show you today by Pink Gellac.  These are brought to you by Chickettes and I have had the opportunity to play with them for over a month now.  I have the Ultra Shine Top Coat, Ultra Shine Pearl Top Coat, Effect Gold Foil and Effect Silver Foil for review.  Wanna see them?

Let's start with the Pink Gellac Ultra Shine Top Coat.  I have used this one with almost every mani I have done since Andrea sent it to me to try.  That right there tells you how much I like it, but let's talk about the details for a minute.  The Ultra Shine Top Coat is a no-wipe top coat.  That means it doesn't have a tacky layer to cleanse at the end of the mani.  I absolutely LOVE no-wipe top coats.  Not having to cleanse at the end saves one more step that is drying to my skin.  The Ultra Shine Top Coat requires a 1 minute cure in LED, which is a little bit of a bummer, but it has amazing shine.  The shine, in my opinion, is stronger than my regular gel top coats by leaps and bounds.  What's more, it doesn't dull over time like some other no-wipe top coats will and it cures to a hard, protective finish.  Let's take a look over a black base.
Pink Gellac Ultra Shine Top Coat Review

The reflections are amazing.  You can see the shade around my lamp!  With that said, there is one thing I should mention.  The top coat is quite thick and tends to leave small gaps or pits when you first apply it.  The more you try to fix them, the worse it gets.  I quickly discovered that the trick is to apply it and leave it alone.  The gel will level and fill in the gaps beautifully.  Here's another shot.  You can see the spiral in the actual bulb on the index and middle fingers in this one.
Pink Gellac Ultra Shine Top Coat Review

Finally, here's a closeup.  Please disregard the noise in the photo and focus on the reflection.  Beside the glare reflection from the light, you can actually see the distorted reflection of my camera and tripod!  I have a lot of top coats in my arsenal, and none of them compare when it comes to shine - not even my beloved Couture top coat!
Pink Gellac Ultra Shine Top Coat Review

Moving on, the Ultra Shine Top Coat also comes in a shimmer version called Ultra Shine Pearl Top Coat.  I have shown it to you in a few nail art pieces previously, but let's take a look over black.  This one is also a no-wipe top coat and applies like the regular Ultra Shine Top Coat.  The difference is the Ultra Shine Pearl Top Coat has a silver and scattered holographic shimmer.  It performs beautifully over nail art to add that extra shimmer without obscuring even the most delicate designs.
Pink Gellac Ultra Shine Pearl Top Coat Review

The shine isn't quite as reflective as the regular Ultra Shine Top Coat since the shimmer breaks up the reflection, but the shine is still quite strong.  In the picture below, you can still see the shade around my lamps on the index and middle nails.
Pink Gellac Ultra Shine Pearl Top Coat Review

Here's a closeup of the pearl.  I soft focused this one just a tad to show the scattered holographic shimmer mixed in with the silver.
Pink Gellac Ultra Shine Pearl Top Coat Review

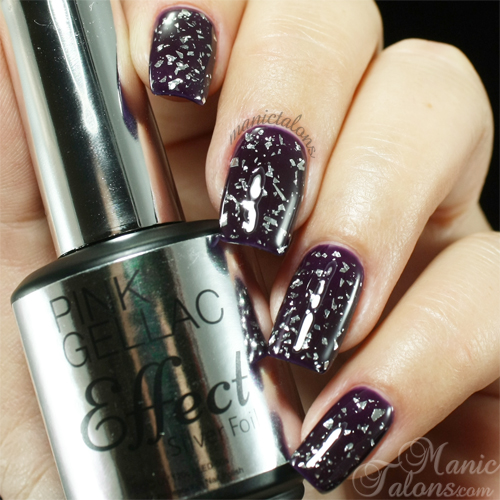
Next, I have the Effect Silver Foil topper.  The Effects are not stand alone top coats, but rather they are glitter style toppers that can be applied between the final color coat and top coat layers.  The Effect Silver Foil is, well, silver foil flakies in a clear base.  The base is average consistency but it is loaded with the flakes.  Application is nice for a flaky.  I applied one stroke down the center of the nail and then used the brush to move the pieces around until I was happy with the coverage.  Oh, and the flakes don't stick up like some of the flakies we have seen lately. *coughGelishcough* *coughFingerPaintsGelcough*  I have swatched it here over a dark purple.
Pink Gellac Effect Silver Foil Swatch

Here's a closeup that shows the flakes a bit better.  Or maybe not...but look at that shine from the Ultra Shine Top Coat.  lol  By the way, the Effect Silver Foil would look awesome over a black base for a quick and easy New Years mani.
Pink Gellac Effect Silver Foil Swatch

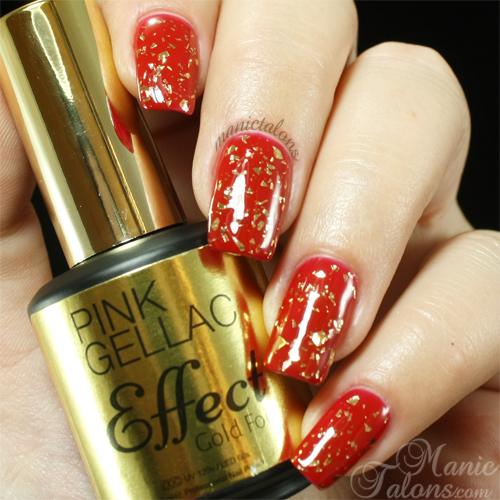
Finally, I have the Effect Gold Foil to show you too.  This one is exactly like the Effect Silver Foil, just gold.  So there isn't really much I can say that you haven't already heard.  I swatched it here over Pink Gellac Lipstick Red.  Lipstick Red is a classic red cream.
Pink Gellac Effect Gold Foil Swatch

As I mentioned previously, these are available for purchase via the Chickettes Boutique or on Amazon.  Chickettes is also having an awesome Black Friday sale with 20% off everything in the Boutique and free shipping on orders over $50.  :)

~Michelle

*The polishes featured in this post were provided by Chickettes for my honest review.  This post uses Amazon Affiliate Links.  Purchases through these links generate commissions that help fund this site.
Read more ...

Monday, November 24, 2014

The Nail School Chronicle: Week 1

Press Sample Affiliate Links

The Nail School Chronicle: Week 1

Hello Loves!  I officially survived my first week of nail school at Georgia Career Institute.  Whoa, what a week!  I also have my Thanksgiving mani to show you, so stick around to the end of the post to see it. :)

So, what was the first week like?  Fast paced and a little overwhelming, to be honest.  Since it's a revolving curriculum, all of the students are at different places in terms of hours.  Some have been learning for only a few weeks.  Others are nearing graduation.  All of my classmates are friendly and my instructor is as well, so that helps.  When I walked in, I was handed my books and told to read over the Chapter on Skin and Nail Physiology and Diseases.  Whoo Hoo.  lol

The next thing I was given was a fake hand that seriously brought back memories of watching the Adam's Family with my Grandma as a child.  Yes, I just dated myself, but these dummy hands remind me of "Thing".  Come to think of it, my dummy hand will be referred to as "Thing" going forward.  After all, every "client" has a name, right? ;)  I was also given monomer, polymers, tips, files, an acrylic brush, and quick instruction on overlays.  That rapidly moved into blended tips.  Yes, my first day jumped head first into working with acrylics.  Y'all, I'm no stranger to gel polish, but acrylic scares the crap out of me.  Ok, it doesn't really scare me, but it's a completely different animal than gel polish.  I feel like I've never picked up a nail brush in my life working with this stuff.  The nail program is very heavily weighted in acrylic work, so I need to master it even though gel is my passion.  Wanna see my first full attempt at blended tips with an acrylic overlay?  It's not very pretty, but I guess it's not horrible.  Excuse the poor lighting.  The classroom lighting isn't great for photos.
My First Full Attempt at Blended Tips with Acrylic Overlay

By the third day, I was working on completely sculpted pink and white acrylics.  Needless to say, tips are much easier for me.  Want to see my first full set of sculpted nails?  They're pretty funny.  ;)  That index nail looks a bit ducky.
My First Full Attempt at Sculpted Pink and White Acrylics

Sadly, I don't have my kit yet, so the first week I was working with a hodge podge of materials:  monomer from the school, polymers from my personal stash (Thank you to Brenda from Tuff Enough Nails aka T.E.N. for sending me those with the Poly Polish I reviewed last month), an acrylic brush that was included in a press sample as a gift from Thresa from Esther's Nail Center (Thanks Thresa!), and other odds and ends from the school.  I did pick up an acrylic starter kit the other day so I could practice at home.  Hopefully my kit will be in soon.  I should note that it is not the school's fault that I don't have my kit yet.  Apparently OPI is behind in supplying them to the schools. :/

So, what else did I learn this week?  Let's see...

  • Getting up at 5:30 in the morning really sucks.  I'm so not a morning person!  I much prefer to sleep in and stay up late at night.
  • Shaping acrylics by hand is challenging.  Apparently I'm not capable of filing someone else's nails without also filing my own.  My poor thumb nail on my left hand is missing the corners now.
  • I really hope my first real client is double jointed.  I find myself moving the dummy hand into positions that just aren't natural for a real client.  lol
  • Neither Couture Gel Polish or Luxio Gel Polish will continue looking great when constantly assaulted by a 180 grit file, but both stayed on without chipping!  (Check in Friday for my full review of Luxio)
  • Nail Glue is NOT my friend.  I can't even begin to tell you how many times I glued fake nails to my myself on accident.  And we're not talking about putting them on my nails.  No, we're talking about fake nails affixed to the pad of my finger, the side of my palm, and even on my elbow once.
  • Going back to school and reading text books for the first time in over 14 years is quite...um...different.  Don't get me wrong, I love to read.  But text books aren't exactly my first choice of literature.  I can honestly say that I have forgotten how to study.  :(
  • Nail Diseases and Disorders can be really disturbing.  Especially the text book photos.  Yet all of the names sound the same.  This test next Monday is going to be challenging.

That pretty much sums up my week.  Ready to see my Thanksgiving mani?  I decided to combine pigments and stamping for a quick and easy mani this week.

I started with a white base and then burnished (or scrubbed) in three different pigments into the tacky layer.  The pigments are from the T.E.N. Color Explosion Powders line and remind me of the colors of changing leaves.  The colors are Red Ruby, Fired Up Red, and Lil Shot O Orange.
Tuff Enough Nails Pigments

These pigments are awesome.  They are super fine and stick to the tacky layer of gel polish with ease.  Here are the open pots in the same order as the closed pots above.
Tuff Enough Nails Pigments

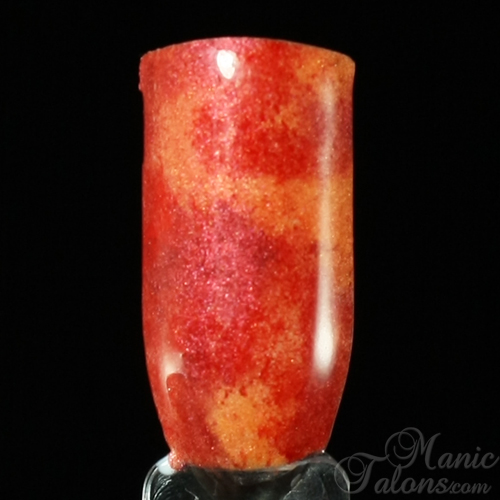
Of course, I forgot to take a picture of the base before stamping over it.  I keep doing that!  Sorry, I guess I get so into the art that my brain shuts off for a bit.  But I do want to show you the base, so I recreated it on a swatch stick.  I seriously considered not stamping over it.  It's so pretty all alone!  To create this look, I burnished the colors randomly over the nail.  I started with a swirl of Lil Shot O Orange in the center and then added the Fired Up Red and Red Ruby to create a marbled effect.
Pigment and Gel Polish Marbled Base

For my actual manicure, I used the Pink Gellac Ultra Shine Pearl top coat over the pigments to add a little extra sparkle (I used a regular gel top coat on the swatch above to show you the true colors of the pigments).  Then, because I can never leave well enough alone, I stamped over the base with Maybeline Bold Gold and two images from BM-H11 from the Bundle Monster holiday plate set.  The ring finger is the pumpkin image, though it's hard to see the photo.  The rest of the nails are stamped with the coordinating leaves image.  This set is a recent addition to my collection.  I don't know why I waited so long to get it.  It really is a must have for any holiday.  I finished with the regular Pink Gellac Ultra Shine top coat.  Both the regular and pearl ultra shines are no-wipe top coats, which I really like.  Check in Wednesday for my full Pink Gellac top coat review. 
Thanksgiving Manicure with Pigments and Stamping

I love the subtle stamping over the colorful fall base.  I'm kind of disappointed to know that I'm going to mess it up with that danged file tomorrow at school!  lol

I guess that concludes this week's edition of The Nail School Chronicle.  Check back next Monday, same time and place, for the next edition.  This upcoming week will be a short one thanks to Thanksgiving break, but I'm sure I'll have something fun to report.

~Michelle

*The pigments used in this post were provided by Tuff Enough Nails (T.E.N.) for my honest review.  This post also includes Amazon Affiliate Links.  Purchases through those links generate commissions that help fund this site.  All other links are courtesy links.

Read more ...

Friday, November 21, 2014

Blue Roses on Black

Press Sample Affiliate Links

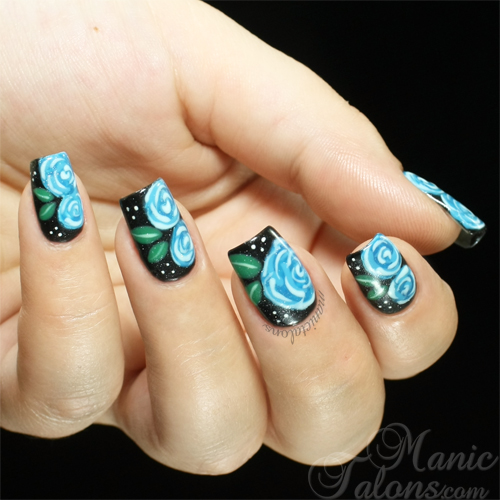
Hello Loves!  Last week I wrote a guest post on The Dalai Lama's Nails to celebrate Hannah's blogiversary.  I loved my recreation of her design so much that I pulled elements from it and did it again!  Except this time, I went with blue.  Imagine that.  lol
Blue Roses on Black with Revel Nail Gel Polish

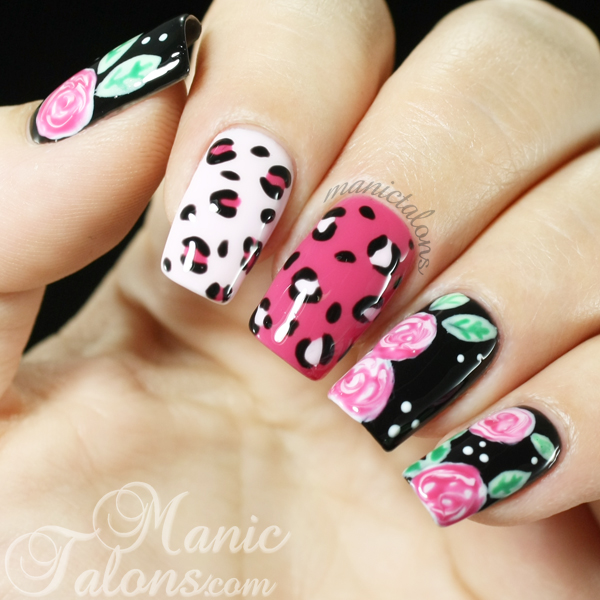
Since I didn't share my recreation of Hannah's mani the other day that inspired this one, I'll share it now.  Be sure to check out my guest post here to see the details.
Roses and leopard print manicure

Clearly, the roses were my inspiration for today's mani.  To create my blue roses, I started with a base of Revel Nail Rebel (black).  I then added blobs of Revel Nail Honor (white) where I wanted the roses so that the blues would pop more.  Once the white was cured, I covered them with a thin coat of Revel Nail Spree (dark blue).  I cured again, then added thin lines of Revel Nail Honeymoon (medium blue) to form the petals.  Finally, I added more lines in Revel Nail Blowout (light blue) and cured those.  Here's another look.
Blue Roses on Black with Revel Nail Gel Polish


I don't think I've shown you Revel Nail Blowout before, so here's a proper swatch photo of that one.  The other colors mentioned above are linked to the posts with the swatches.  :)  Blow out is a very light baby blue cream.  Application is standard for Revel - smooth and levels well.  I did need three coats for full coverage, but I find that is the case with almost all light colors for me.
Revel Nail Gel Polish Blowout Swatch

Back to the Blue on Black mani.  The leaves are Revel Nail Matrix (dark green) with details of Revel Nail Envy (light green).  The accents dots are Revel Nail Honor.  Finally, I topped everything off with Pink Gellac Ultra Shine Pearl top coat.  I adore this top coat for so many reasons.  First, it's a no wipe which means no tacky layer to remove.  Second, the shine is incredible.  I'll expand more on that Wednesday when I do my Pink Gellac Top Coat Review.  Finally, the shimmer is super fine and doesn't obscure the art.  The closeup of my ring finger below shows the shimmer from the top coat.  It does not show the shine since I shot this in a filtered light box to highlight the art without glare from the lights.  Again, I'll go into that more on Wed.  :)
Blue Roses on Black with Revel Nail Gel Polish

Here's one last shot of the final mani.  I'm not completely in love with the middle finger nail, but I adore the blue on black combination.  :)
Blue Roses on Black with Revel Nail Gel Polish

The Revel Nail colors featured in today's nail art can be purchased from www.RevelNail.com.  The Pink Gellac Ultra Shine Pearl Top Coat can be purchased through Amazon or directly through the Chickette's Boutique.

~Michelle

*This post uses Amazon Affiliate Links.  Purchases through these links generate commissions that help fund this site.  The products used in this post were provided by Revel Nail and Chickettes for my honest review.


Read more ...

Wednesday, November 19, 2014

Guest Post on The Dalai Lama's Nails


Revel Nail Swatches

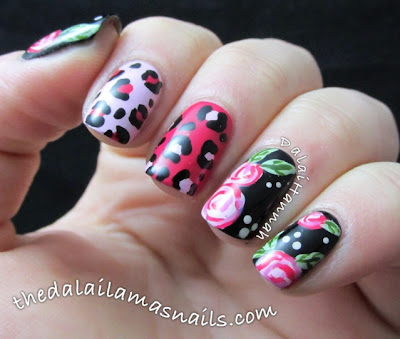
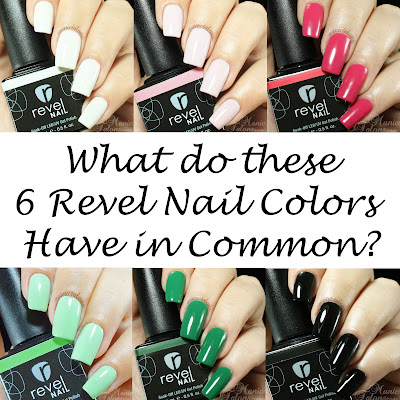
Hello loves!  What do these 6 Revel Nail colors have in common?  I used them all to recreate this adorable design by Hannah from The Dalai Lama's Nails for her Blogiversary celebration!  Hannah's design is pictured below.  Swing on over to her blog to check out my guest post to see my 100% gel version.  ;)

Rose and Leopard print nail art by The Dalai Lama's Nails

Also, since I used three colors I haven't swatched for you before, here are those swatches.  ;)

Revel Honor is a pure white cream.  Like most whites, I felt this one needed three coats for complete opacity. 
Revel Nail Honor Swatch

Hijinks is a very soft, light pink cream.  Hijinks also needed three coats to be fully opaque.
Revel Nail Hijinks Swatch

Finally, Envy is a soft mint green cream.  Another three coater for complete opacity.  I guess that's the trend with these lighter colors for me.  My stubborn VNL plays a large part.
Revel Nail Envy Swatch
Excuse the photo quality on this one.  I had to shoot dark and brighten the image in photoshop to keep it from blowing out the polish so that it looks white.

I hope you enjoy my recreation of Hannah's mani!  Would you believe this is the first time I've done an animal print design?  Crazy, right?

~Michelle

*The polishes featured in this post were provided by Revel Nail for my honest review.
Read more ...

Monday, November 17, 2014

The Nail School Chronicle: Introduction

Affiliate Links Press Sample


Hello Loves.  Today's post is a little different, but it is the start of something wonderful.  I generally don't post much about my personal life, but I feel like now is a great time to change that.  Why?  Well, because my personal life is about to do a complete 180!  After over 10 years in the field of database administration and marketing, I have decided to pursue my passion and am seeking my Nail Technology license.

I am now officially a full time Nail Technology Student at Georgia Career Institute.  Want to see some cheesy photos from Orientation on Friday?  lol  Our dress code is black on black with a blue apron that makes us easily recognizable as Nail Technology students.  I'm standing in front of the collage that all graduates sign on their way out of the school.  Seems like a great place to start my journey - in the same spot where I'll end it in 6 months.  :)
The Beginning of my Nail School Journey

That probably wasn't the best place to take a picture.  The overhead lighting shining on the board creates shadows.  I promise I don't have a mustache (even though it IS no shave November lol).  I guess I could have photoshopped it out, but "ain't nobody got time for that".  ;) 

Here's another shot that shows more of the board and my sexy apron.  I'm so awkward in photos.  I never know what to do with my hands.  I'll have to work on that so my graduation photo is fabulous. 
The Beginning of my Nail School Journey

The awkward pose kind of fits, I guess.  I look like I'm terrified.  In a way, I guess I am.  I'm both excited and terrified.  This will be a major career change for me.  After all, nails are a far cry from databases.  But that is only half of my nervousness.  GCI is 53 miles from home, meaning I'll be on the road for 2.5 hours a day.  That's not such a big deal, but it also means I'll be over an hour away from my children while I'm at school.  That freaks me out a little since my husband also commutes to work and is usually over an hour or more away too.  I keep telling myself it's only 6 months and my parents are local so they can step in and help if the kids need us, but its still very nerve racking.

So, why did I choose a school so far from home?  Two reasons.  First, there are no schools in my immediate area that offer Nail Technology.  There are two that do full cosmetology, but I just couldn't see going to school for a year when only 90 out of 1500 hours would focus on nails.  I want more training than that and I have no desire to do hair.  So I had to expand my search.  The closer you get to Atlanta, the more options you have.  There were a few schools that are a bit closer and certainly more that are cheaper, but GCI has a lot of qualities that drew my attention and enrollment.  Their reputation is outstanding and they cover the 600 hours required by the state of Georgia for licensing plus 20 additional hours on electric files.  Since so many techs destroy natural nails with electric files, I definitely want to get that training.  I was also completely blown away when I walked through the door.  I don't know what I was expecting, but I certainly didn't expect to walk into an upscale salon environment.  Check out the photos of the campus on GCI's Facebook page to see where I'll be studying four days a week for the next six months!  The photo below (borrowed from GCI's facebook page) shows the nail technology area where I'll be spending most of my time.
Nail Technology Area at GCI

So, what does this mean for my little slice of the internet here?  No worries.  I'll continue blogging just as I have for over a year now.  If I can blog while working full time, I can certainly blog while going to school for four days a week.  ;)  I am also starting a series - this series - The Nail School Chronicle.  I plan to post weekly updates on the topics we cover and my nail school experience.  I admit it, I have no clue what to expect.  So I figured I would share here so you might have a better idea if you're thinking of joining the nail technology field.  I hope you're as excited to read about it as I am to share it!

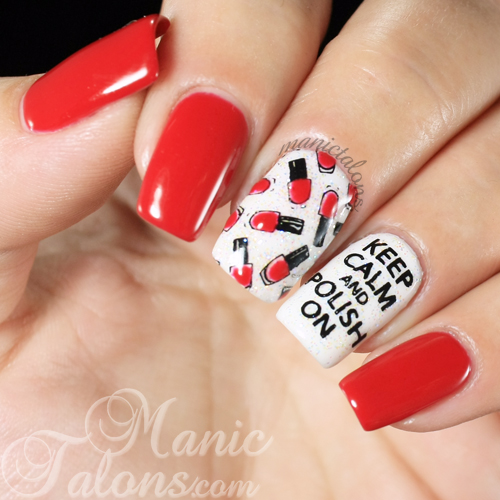
You may have noticed my nails in the head shot above.  Wanna see a closeup of what I wore to orientation?  I started with a base of Couture Gel Nail Polish in Runway and Ooh La La French.  I love this combination - both polishes apply beautifully.   I used three coats of each for this mani.  I topped the Ooh La La French nails with a thin layer of Couture Bubble Bath for the sparkle (the sparkle sadly got lost in the photo, but its very pretty in person).  I then stamped the middle and ring fingers with images from BM-619 from the new Bundle Monster CYO 2014 plate set.  I knew I had to have this set as soon as I saw these two images.  I mean, they're just perfect for the occasion!  The image for the "Keep Calm" nail has a nail polish bottle below the words, but it wouldn't fit since I recently filed my nails shorter.  I ended up with a crooked image that is slightly distorted, but I was able to cut the bottle off and just keep the words.  :)  I then used a thin detail brush to fill in the polish bottles with Runway.  What do you think?  Appropriate mani for the occasion?
Keep Calm and Polish on Manicure

~Michelle

*This post uses Amazon Affiliate Links.  Purchases through these links generate commissions that help fund this site.  The polishes used in the nail art were provided by Couture Gel Nail Polish for my honest review.


Read more ...
Friday, November 14, 2014

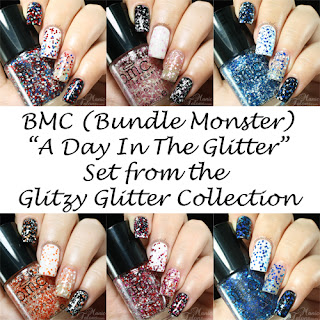
BMC Glitzy Glitter Collection Set 1: A Day In The Glitter

Press Sample Affiliate Links

BMC A Day In The Glitter Set

Hello Loves.  I have six glitter toppers from BMC (Bundle Monster) to show you today.  This is the "A Day In The Glitter" set from the Glitzy Glitter Collection.   These traditional nail polish glitter toppers layer beautifully over gel polish.  I even found that they can be removed without wrecking the gel beneath like a lot of glitter polishes will!
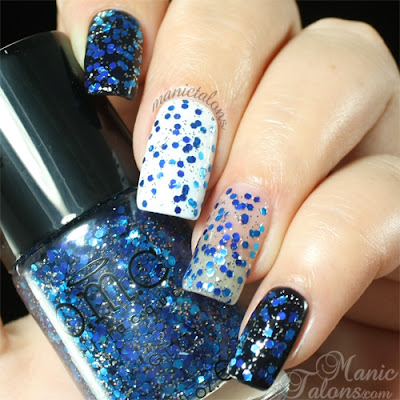
I swatched each of these little beauties over black, white, and nude nails.  As you'll see, most of them don't really play well with white but are great over other colors.  I also found that application is pretty much the same for all of them, so I'll talk about that now.  These glitters are quite thick.  When you pull the brush out of the bottle, you have more than enough glitter on it for each nail.  There's absolutely no glitter fishing needed.  With that said, I ended up doing one dabbed on coat for each swatch.  I say dabbed on because you can't brush them on like you would a solid polish.  The glitters will float down the nail.  Dabbing seems to be the easiest way to get a nice distribution.  I finished each swatch with one thin layer of top coat.

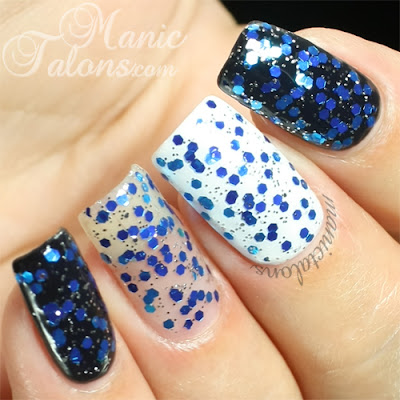
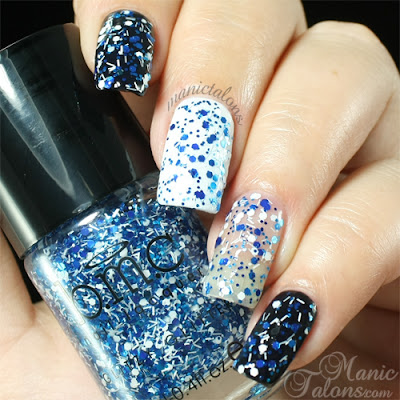
Boy Crazy is a mix of silver micro glitter and larger blue hex glitters.  This is the only polish in today's swatches that I feel wears well over white.
BMC Boy Crazy Swatch

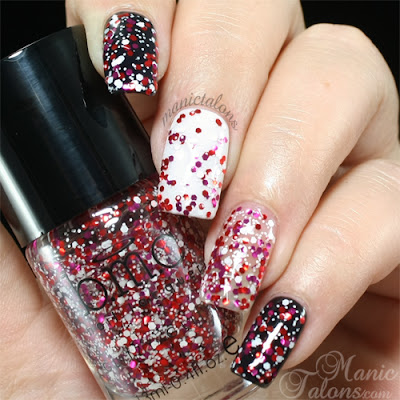
Cherries On Top is a beautiful mix of small white hex glitters, white strip glitters, and larger red, pink and white hex glitters.  As you can see, the white pieces disappear over the white nail. 
BMC Cherries on Top Swatch

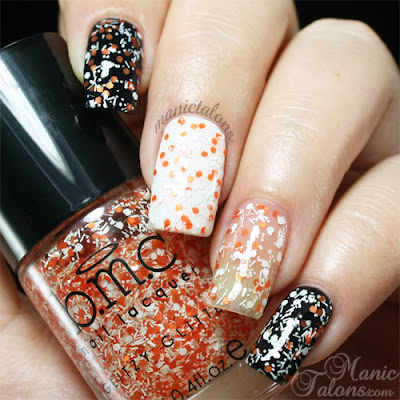
Mimosas For Breakfast is very similar to Cherries on Top with small white hex glitters, white strip glitters, and white and orange larger hex glitters.  This one isn't great over white either.
BMC Mimosas For Breakfast Swatch

Party Deck is a fun mix of small blue hex glitters, white strip glitters, and larger blue and white hex glitters.  Yet another that doesn't play well over white.
BMC Party Deck Swatch

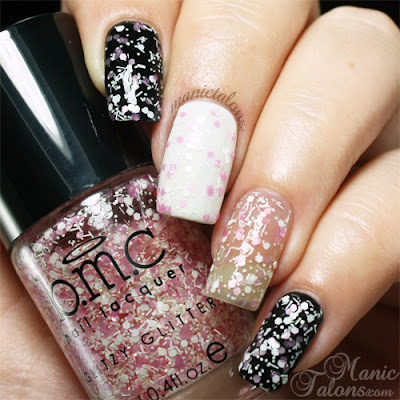
Teeny Bikini is my favorite of the six.  This one consists of small white hexes, white strips, and larger pink and white hexes.  I'm thinking it would be gorgeous over a muted or pastel purple.
BMC Teeny Bikini Swatch

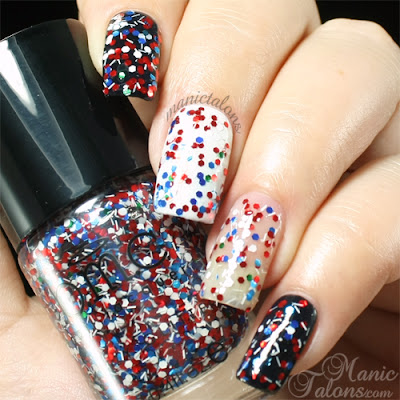
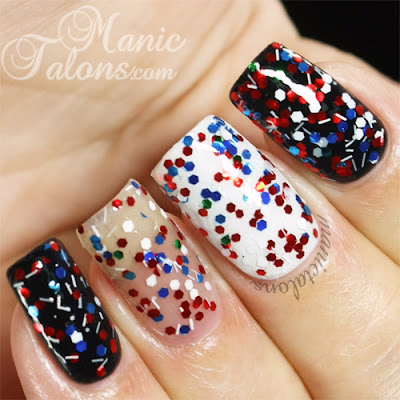
Finally, Under the Pier initially looks like a fun patriotic polish for those of us in the US, but if you look closer you'll see it's not all red white and blue.  This one consists of white strip glitters and red, white, blue and green hexes.  The green hexes are scattered throughout and definitely not as plentiful as the red, white and blue glitters, but they are definitely in there.
BMC Under the Pier Swatch

What do you think of these fun glitter toppers?  I love the color combinations and love even more that they're only $2.99 each on Bundle Monster's Website!  You can also grab the entire set on Amazon for $9.75 plus shipping.

~Michelle


*The polishes featured in this post were provided by Bundle Monster for my honest review.  This post also includes Amazon Affiliate links.  Purchases through these links generate commissions that help fund this site.  All other links are non-affiliate links.

Read more ...