Friday, October 31, 2014

Don't Let the Vampires Bite!

Press Sample Affiliate Links

Hello Loves!  I have my final Halloween mani to share today.  I'm really sad to see October go.  I had planned to do so many fun manicures this month but didn't have a chance to execute them.  Bummer.  But I have exciting news for November that I'll share at a later date.  Today, it's all about the spooky nails that are a must for Halloween. :)

Halloween manicure with vampire fangs and bite marks

This manicure popped in my head in the middle of the night.  Crazy, right?  I actually woke up, sat straight up in bed, and thought "Bite Marks!"  And I knew I had the perfect color base to go with it.  This beautiful black with red micro glitter is Garter Your Heart from the new IBD Neo Romantique collection.  We'll just call this a sneak peek.  I'll have swatches of the full collection for you next week.

I then paired Garter Your Heart with IBD Dockside Diva on my ring finger as the base for my bite marks.  The fangs, blood, lips and bite marks are Oumaxi acrylic paint from Bundle Monster (press sample).  I don't think I have mentioned the brushes I use for fine detail work, but they are part of this 20 piece pro brush set also from Bundle Monster (press sample).  I'm quite pleased with the quality of these brushes and find them very easy to work with.  I'll do a full review on them soon.

Want to see another shot of my Vampire mani?

  Here's one more at a slightly different angle.  This one shows the fangs a little better.  :)
Halloween manicure with vampire fangs and bite marks

I hope everyone has a fun and safe Halloween!  Don't let the vampires bite.  ;)

~Michelle

*This post uses Amazon Affiliate Links.  Purchases through these links generate commissions that help fund this site.  The acrylic paints and brushes used in this manicure were provided by Bundle Monster for my honest review.  The acrylic paints were reviewed previously here.  A full review has not yet been written on the brush set.
Read more ...

Thursday, October 30, 2014

Madam Glam UV Gel (Soak Off Gel Polish) Review

Press Sample

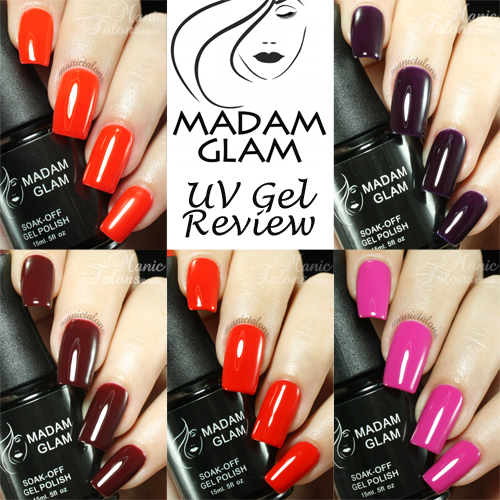
Madam Glam UV Gel Review

Hello Loves.  I have a new gel polish line to show you today.  Madam Glam is well known for their regular nail polish line, and they have now branched out into soak off gel!  You know me...I had to put them to the test.  :)

Let's start with a few basics and a few swatches and then follow up with my thoughts on application, wear, removal and price.

Introduction


The Madam Glam UV Gel line currently consists of 16 colors that are represented by numbers (they also have names but the names are not displayed on the bottles).  Don't let the name "UV Gel" mislead you.  These are soak off gels that are LED compatible (cure times are 30 seconds in LED or 2 minutes in UV).  They are salon quality and come in 15ml (0.5 fl oz) bottles.  The bottles are unique in that they have representations of the colors on the top of the cap.  I love this feature - it's like a little swatch right on top of the bottle.  Based on the five colors I am going to show you today, the caps are dead on accurate. 

Swatches


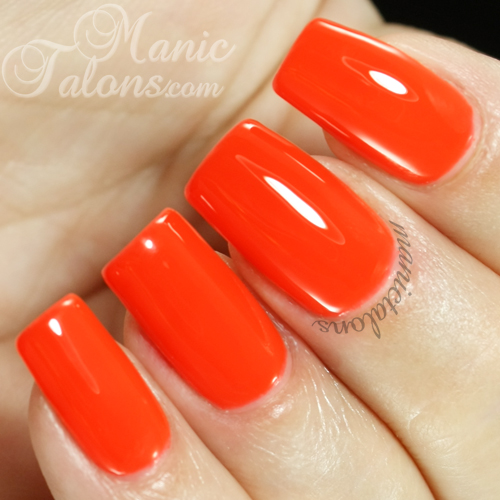
The first color I have to show you is Madam Glam 003 - Blood Orange.  This is a very bright, almost neon orange cream with a slightly jelly finish.  This one is a lot brighter than I was anticipating based on the color dots on Madam Glam's website.  I found that I needed 2 coats for this one to be opaque and could really have used three to completely hide my stubborn VNL.  However, since my layers are so much thinner than average, two coats will be plenty for the typical gel user.
Madam Glam UV Gel 003 - Blood Orange Swatch

(Helpful Tip:  When browsing through the colors on their website, be sure to hover over the color dot to see a photo of the bottles.  As far as I can tell, most of the bottle photos are close to accurate with the exception of True Fire Brick Red.)

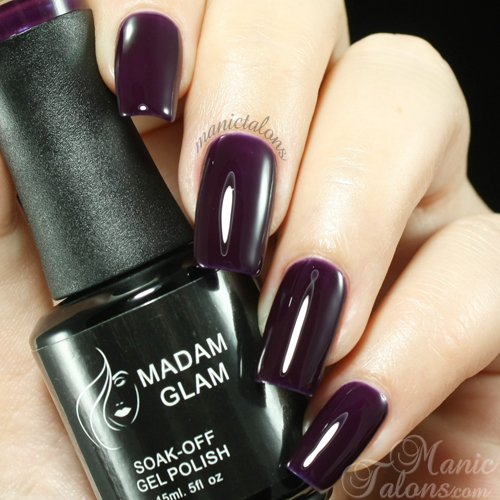
The second color I have to show you is Madam Glam 291 - Deep Dark Purple.  This is a deep purple cream that is visibly purple but gorgeously vampy.  Added bonus - she can easily be a one coater if your application is even.  I swatched two below.  I also had absolutely zero issues curing her even though the gel is thicker and a super dark color.
Madam Glam UV Gel 291 - Deep Dark Purple Swatch

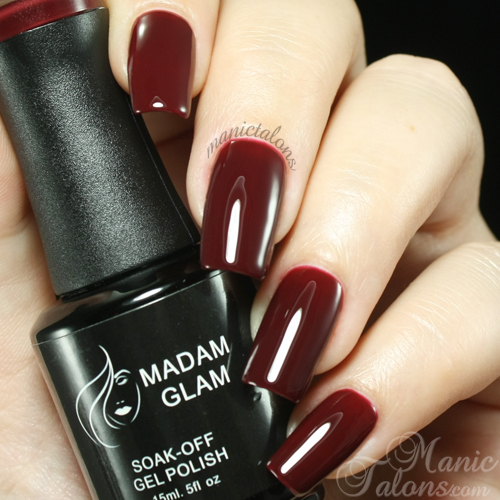
Madam Glam 412 - Deep Brown Red is a perfect maroon cream.  Like Deep Dark Purple, this one can easily be a one coater and cured beautifully.  I swatched two coats below.
Madam Glam UV Gel 412 - Deep Brown Red Swatch

Madam Glam 043 - True Fire Brick Red is a classic orange leaning red cream.  The color dot and bottle photo for this one on Madam Glam's website are more than a tad off.  Guess what?  This one is a definite one coater, even for me!  Below is one amazing coat True Fire Brick Red.
Madam Glam UV Gel 043 - True Fire Brick Red Swatch

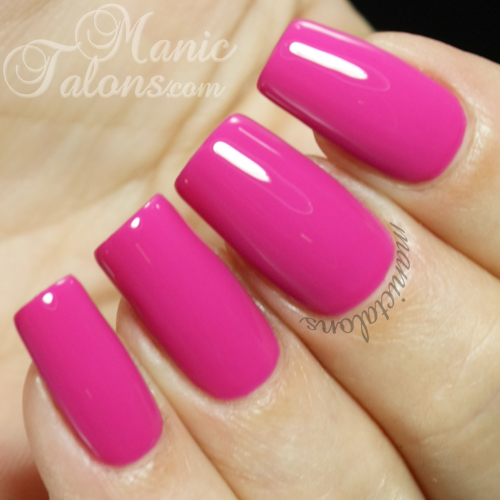
Finally, Madam Glam 075 - Magenta is a stunning magenta cream.  Magenta is one of those colors that is hard to define by the name alone, so I'll take it a bit farther.  This gel is the perfect mix of muted purple and pink.  Magenta is also a potential one coater.  I swatched two below.
Madam Glam UV Gel 075 - Magenta Swatch

I have no clue what blogger is doing to some of my photos.  Blood Orange and True Fire Brick Red appear degraded on my screen, yet they are perfect in Picasa.  I apologize if they look weird on your screen too!  Moving on...

Application


The Madam Glam gel polish brushes are the standard salon style brushes that are flat and wide.  I personally love this style brush as it makes a standard three stroke application incredibly easy.  All of the five that I swatched above applied nicely with no shrinking or pooling.  The gel itself is thicker so it stays where you put it but it also levels quite well for a smooth finish.

The Base Gel is average to thick consistency.  I found it easy to apply as well though it can get away from you if you aren't careful.  Remember, thin thin thin for base gels!

The Top Gel is also average to thick consistency and applies beautifully.  I had no issues with pitting or streaking from the top coat and it cures to a high gloss finish.  This is a traditional gel top coat that requires cleansing.

Let's take a look at the consistency of the gel and the brushes, shall we?  As you can see from the photo, the gel is thicker than your average soak off gel but not chalky at all.  It is smooth as silk.  (Note: these brush shots are a little over exposed, so they are NOT color accurate)

I wiped the brush a bit so you can get a better look at the width.

Wear


I completed my wear test using Madam Glam Base Gel, Madam Glam 003 - Blood Orange, and Madam Glam Top Gel.  On day 10, I noticed something a bit strange.  I had lifting along the side of my pinkie nail.  This is not a common area for lifting to occur, so I suspect my prep may be to blame.  I have deep sidewalls on a few of my nails that tend to hold alcohol from the dehydrating step of the manicure.  It is not uncommon for me to get into a manicure and realize I still have alcohol pooling in those areas.  The shape of my nails paired with the fact that the lifting did not occur on all of my nails supports my belief that I am to blame for this one.  But I'm going to show it to you anyway since I snagged the lifted portion on my pinkie while digging my lighter out of my pocket the next day and ended up with a bare pinkie nail.  ;)

Of course, the wear test must go on.  By day 14, the other nails were still intact.  Tip wear was minimal and all of my tips (minus the pinkie) were still nicely wrapped at the end of the test.  The shine from the top coat remained strong through the test as well.  If you are new to my little slice of the internet here, I complete my wear tests on my dominant hand.  Sadly, this is the hand with the crazy nails that go in different directions.  It is also the hand that I use to smoke and the hand that I neglect.  If a gel polish is going to chip, it will happen on my right hand. 

Removal


I am happy to report that Madam Glam UV Gel Polish soaks off beautifully.  In the collage below, the upper left photo shows the final wear.  The upper right photo shows the gel after buffing the top coat to break the seal.  The bottom left photo shows the gel immediately after removing my Nail Mates removal caps at the 10 minute mark.  The gel was falling off of my nails on the nail bed.  The tips were also loose enough to gently push the gel off with my thumb nail on my other hand.  I'm growing out a bit of damage from a bad removal from a few months ago and gel tends to bond to those damaged areas a little stronger than on the healthy portion of the nail.  Finally, the bottom right photo shows my nails after pushing off the gel and washing my hands.  Madam Glam UV Gel definitely passes my removal test.

Price


Madam Glam UV Gel is priced at $17.95 per bottle.  But wait...that's not the price you'll pay.  Madam Glam has provided a 30% discount just for you.  Use coupon code YGEL30OFF at checkout to claim the discount.  This brings the gels to a much more competitive price of $12.57 each.  Even better, Madam Glam offers free global shipping on orders of $25 or more even when you use the discount code. 

Final Thoughts


Overall, I am extremely pleased with the formula, quality, application, wear, and removal of Madam Glam UV Gel.  My only complaint is the limited color choices, but I'm sure more colors will be added in the future.  Furthermore, the customer service is excellent!  I had a lot of questions about these gels when I was researching them and every question was answered quickly and professionally.  This is, of course, before the customer service specialists at Madam Glam knew who I am.  Customer service is very important to me, and I am happy to recommend Madam Glam as a company.

So, what do you think?  Are the Madam Glam UV Gels calling your name?  If so, be sure to follow Madam Glam on Facebook, Twitter and Instagram to learn about new products!

~Michelle

*The products featured in this post were provided by Madam Glam for my honest review.
Read more ...

Wednesday, October 29, 2014

KBShimmer Winter Collection 2014 Swatches and Review

Press Sample

KBhimmer Winter Collection 2014 Swatches and Review

Hello Loves.  I have six of the KBShimmer Winter Collection 2014 new releases, 2 returning favorites, and one bonus polish to show you today.  Plus a review of two of the new KBShimmer Cuticle Oil fragrances.  All of these beauties will be available for purchase on KBShimmer Bath and Body's website on November 1, 2014.  KBShimmer is also getting into the holiday spirit with some free gifts and promotions to go along with this collection that I'll tell you about at the end of this post.

Ready to see some swatches?  I'm going to start with the most important polish in this release.  Why do I call it the most important?  Because Pining for Yule is the KBShimmer 2014 Toys for Tots® charity polish.  For every bottle sold between 11/1/2014 and 12/15/2014, $4 will be donated to Toys for Tots®.  Toys for Tots® is a great cause that is near and dear to my heart.  And it's definitely a great excuse to break a "no buy".  I mean, can you really argue against a beautiful polish that benefits children?  ;)

Pining for Yule is a glitter topper that is packed with holographic green "Christmas Trees", red star tree toppers, silver holo hex and micro glitters.  When I say packed, I'm not kidding.  I actually found myself wiping some of the glitter on the neck of the bottle to keep from overloading my nails with trees and stars.  I did do a little glitter placement for this one.  One coat swatched below over a white gel polish base.
KBShimmer Pining for Yule Swatch

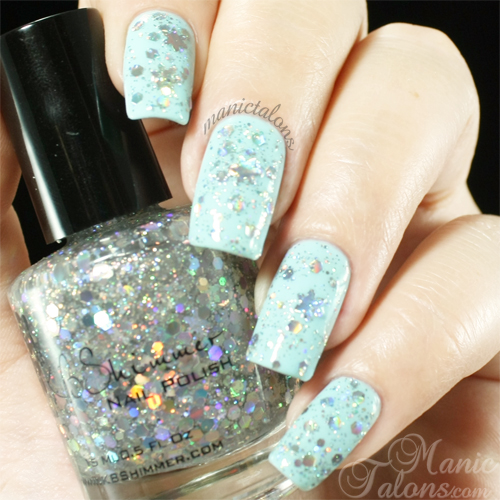
Flake Dance is another glitter topper that is new to the KBShimmer line for winter 2014.  This polish is a gorgeous mix of silver holographic snowflakes and a scattering of smaller silver holographic glitters.  Application requires a little bit of dabbing and some glitter placement.  I did have to fish a little for the snowflakes, but that's common with larger pieces like these.  Sadly, my photos do not do this topper justice.  Seriously, the bling from the glitters threw my camera for a loop.  The second, non-bottle shot is the better of the two.  It is shown below over a light blue base.
KBShimmer Flake Dance Swatch

Let's Sleigh Together is one of those crelly/glitter polishes that I just can't resist.  This finish doesn't exist in gel, and it's just too pretty!  Let's Sleigh Together is a pale grey crelly base with green, navy and pale mint hex glitters, blueberry circle glitters, and micro holographic glitters.  The result is a stunning polish that reminds me of the sky right before it snows.  Below is three coats with slight glitter placement.  No fishing required.
KBShimmer Let's Sleigh Together Swatch

Fallen Angle is probably my favorite from the new releases for winter 2014.  Fallen Angle is a vibrant, royal blue jelly base with holographic blue triangles, silver holo hexes, and blue hexes with micro sparkles.  While it doesn't quite show in my pictures, this polish has that ultraviolet purple sheen that really makes the blue base pop.  I'm not sure how to describe it, but you have to see her in person!  The depth is amazing and I love that it offers full coverage even though it is a jelly.  I swatched three coats below with slight glitter placement.  No fishing with this one either.
KBShimmer Fallen Angle Swatch

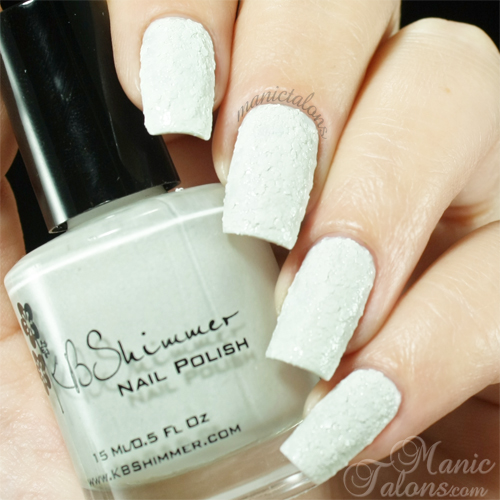
Once again, KBShimmer has added textured polishes to the mix.  I have two of the 4 new textures to show you.  The first is White Here, White Now.  This is a snowy white polish that is loaded with white glitters for that textured look.  I'm not going to lie...this one reminded me of cottage cheese as I was applying it.  While the second coat was still wet, it reminded me of stucco.  Once it fully dried, it took on the look of clusters of large snowflakes.  :)  I can easily see this one being used in holiday nail art this year.  I swatched two coats below.  I should also note that this is not a texture that works well with top coat.  I tried it...and it looked like sealed plaster.  So keep it textured!  I also had to shoot this one a little darker and then adjust in photoshop for the texture to show in the photo, so I apologize for the weird skin tone and greyish color.  The texture is much more obvious in person.
KBShimmer White Here White Now Swatch

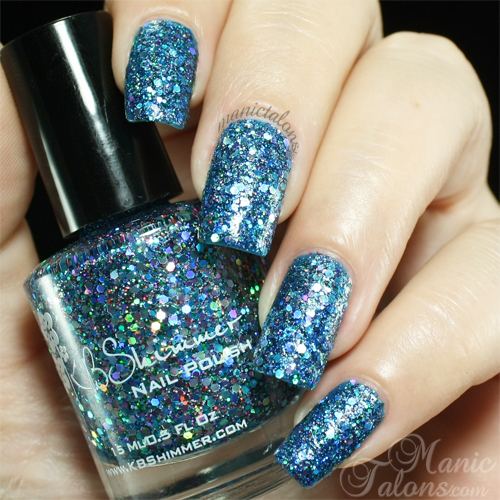
The second texture I have to show you is Too Cold To Hold.  This rich sapphire blue base is filled with holographic silver, blue and green holographic glitters for a bejeweled textured look.  Ok, so that's the KBShimmer description.  If you ask me, we're talking major textured bling that reminds me of the inside of a crystal geode.  I swatched an easy two coats below.
KBShimmer Too Cold To Hold Swatch

Too Cold To Hold does play well with two layers of top coat if you aren't into textured polish.  The top coat also brings out the sapphire blue base more than the textured version.  I love it both ways.
KBShimmer Too Cold To Hold Swatch with Top Coat

The next two polishes are returning holiday favorites.  All Decked Out is a Christmas Tree inspired polish with a deep forest green jelly base loaded with a rainbow of hex glitters and a scattering of gold stars.  I wasn't sure I was going to like this one when I saw it in the bottle, but it completely transforms on the nail.  I swatched three coats below with glitter placement for the stars.  I did have to fish a little for the stars, but not too much.  Leaving the bottle sitting upside down for a bit before polishing would probably eliminate the need for fishing.
KBShimmer All Decked Out Swatch

Sugar Plum Faerie is also a returning favorite.  This is a soft plum violet crelly base with berry, purple and lime colored metallic holographic glitters in varying sizes.  No doubt, it certainly brings the bells from the Dance of the Sugar Plum Fairy to mind.  I swatched three coats below.  No glitter placement or fishing needed for this one.
KBShimmer Sugar Plum Faerie Swatch

Finally, Holly Back Girl is not an official part of the Winter 2014 release, but she is new to the line and will be available with the others on November 1, 2014.  Holly Back Girl is a white crelly base with red and green metallic glitters that builds beautifully for a soft holiday look.  I swatched three coats below, but it is also beautiful as one coat over white if you want the glitters to pop a bit more.  Also, be sure to check out the info below to see how you can score a bottle of Holy Back Girl for free.  ;)
KBShimmer Holly Back Girl Swatch

In addition to the new polishes (there are 5 in addition to the ones I have shown you) and returning favorites (3 in addition to the ones I have shown you), this release also includes 4 new KBShimmer Cuticle Oil fragrances - Chai Tea, Peppermint, Raspberry Vanilla and Unscented.  KBShimmer Cuticle Oils are a blend of avocado oil, Shea butter, apricot kernel oil, wheat germ oil, evening primrose oil, Argan nut oil, jojoba seed oil, and olive seed oil.  These cuticle oils absorb quickly and leave your cuticles soft without an oily feel.  I know, I know...a non-oily oil seems impossible, but KBShimmer somehow did it.

I have experienced the Chai Tea and Peppermint fragrances, and they are seriously divine.  The Peppermint smells exactly like the sweet peppermint sticks or balls.  The fragrance is medium to light - strong enough to notice but not overpowering.  The Chai Tea is dead on for a chai tea latte - I detect the definite hints of cinnamon and clove that make chai tea one of my favorite drinks.  This one is also medium to light on fragrance.  Between the two, I find that I like the Chai Tea fragrance in the morning and the Peppermint late at night when I'm struggling to stay awake while writing blog posts and editing photos. ;)
KBShimmer Peppermint and Chai Tea Cuticle Oil Review

At the beginning of this post, I mentioned free gifts and promotions with the Winter 2014 release.  Well, now I'm going to tell you about them!
  • Free Shipping For All Orders over $40 on KBShimmer.com! No code needed.  Runs from November 1, 2014 until December 31, 2014.
  • Free bottle of Holly Back Girl and free shipping with a $70+ Purchase!  Use code HBGFREE.  Runs from November 1, 2014 until December 31, 2014.
  • Free samples!  While supplies last, a free sample will be sent with each order.  Samples may include scrubs, lotions, vinyl nail decals, soaps, etc.  Orders will also include a branded emery board.
  • Free Snowman Glitter!  The first 400 orders will receive a bag of 1000 snowmen glitters perfect for winter nail art.
What do you think of these gorgeous new offerings from KBShimmer?  Are there any that will make their way into your stash?

~Michelle

*The products featured in this post were provided by KBShimmer Bath and Body for my honest review.


Read more ...

Monday, October 27, 2014

Poly Polish by Tuff Enuff Nails Review

Press Sample

Poly Polish from TEN review

Hello Loves.  I have a fun product to show you today from a company called Tuff Enuff Nails (T.E.N.).  The product is Poly Polish and it is a gel that you can mix with regular polish, pigments, glitters, and even acrylic paints.  That last part that grabbed my interest when a reader brought this product to my attention.  Naturally, I reached out to Brenda and she sent me a few samples to try out.

Note:  Poly Polish is not a soak off product and is not LED compatible.

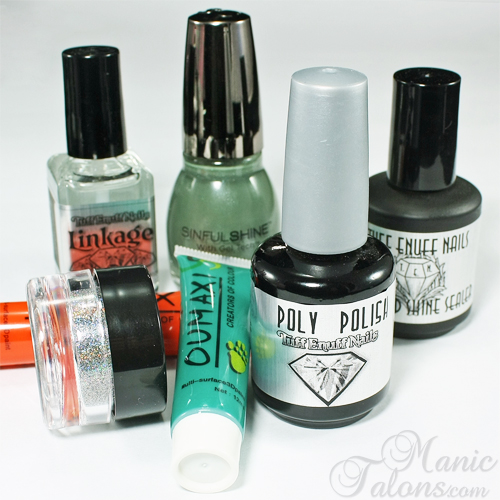
For my review, I decided to combine Poly Polish with regular polish for my base, glitter for accents, and finally acrylic paints for a little art.  These are the products that went into my manicure in this post.
Products used in my Poly Polish Manicure

After prepping my nails, I started with a thin layer of T.E.N. Linkage.  Linkage is an organic bonding agent that helps the gel adhere to the nail.  It is not a primer and is not acid based.  I then moved on to my Poly Polish and Lacquer base.

When mixing Poly Polish with regular lacquer, the mix should be 50/50.  When mixed correctly (note that a drop of polish does not equal a drop of poly polish), I found that the mix is very similar to the lacquer on it's own in terms of opacity.  Another interesting fact - the polish and Poly Polish mix did not dry on my pallet as I worked with it.  It kept the same consistency, which really surprised me.  I expected it to get thicker as the lacquer started to dry, but nope.  The polish I used for my mix is Sinful Shine Man Hunt.

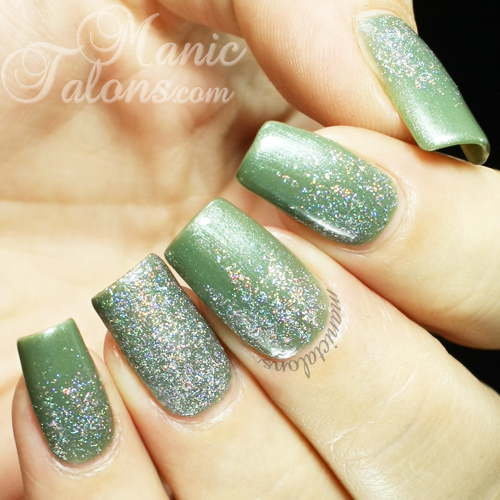
I didn't think to snap a picture before I added the glitter layer, so I'll move right on along into that.  The glitter was also provided by T.E.N. and is quite impressive.  This is the Holographic Glitter and I can't say for sure but it is either 0.004 or 0.002 in size.  Either way it is very fine and can be mixed into top coats or gel polish.  Glitters and Pigments can be mixed into Poly Polish at whatever ratio you need to get the desired look.  I mixed it 50/50.  Let's take a look.  I created a fade with the mixture on 4 of my nails and added a full coverage accent nail on my ring finger.  Finally, I applied a thin layer of T.E.N. Diamond Shine Sealer
Poly Polish and T.E.N. Holographic Glitter Manicure

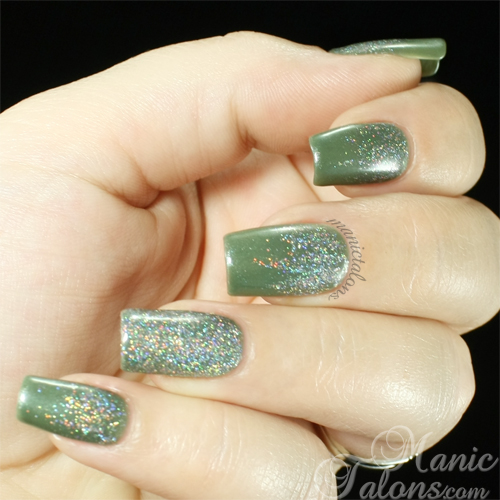
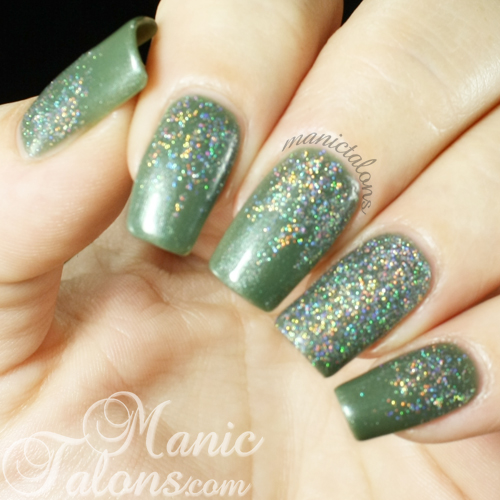
The photo above does NOT do this glitter justice, so how about a few more?
Poly Polish and T.E.N. Holographic Glitter Manicure

Here's a blurred shot to really show the holographic effect, but even this doesn't really do it.  This glitter is GORGEOUS in person.  Even if you're not a fan of hard gels, you need this glitter in your life.
Poly Polish and T.E.N. Holographic Glitter Manicure

To prove it, I prepared a swatch with black soak off gel polish and scrubbed a layer of TEN Holographic Glitter into the tacky layer.  I topped it with a thick top coat.  Of course, my camera wanted to go macro on me instead of capturing the colors, so I blurred the shots.  Left is slightly blurred.  Right is a stronger blur.
T.E.N. Tuff Enuff Nails Holographic Glitter

Let me back up for a second.  I forgot to tell you how I applied the Poly Polish and Sinful Shine mix as well as the Poly Polish and Glitter mix.  I applied the Sinful Shine mix with a #4 gel brush from T.E.N.  This brush is my new best friend!  Seriously, it is so easy to work with and the bristles are quite soft but not mop-like.  I applied the glitter with a #2 T.E.N. brush that is just as fabulous as the #4 but gave me greater control for more precise placement.
T.E.N. Tuff Enuff Nails Gel Brushes

Ok, moving on.  You know I had to test out the acrylic paint and Poly Polish mix.  This mix needs to be no more than 50% acrylic paint to avoid curing issues.  I mixed it just shy of 50/50 and the result is a nice and opaque gel paint.  I had planned to do two color roses and two color leaves, but when I started adding the roses to the nail I realized the paint mixture allowed me to create depth with just one color.  Oh yes, this just changed my nail art life.  Seriously, instant gel paints in any color you can mix?  Yes please!  I don't even care that it is a hard gel while I usually prefer soak off.  For art, I suspect it can be layered over a soak off gel base since I file the top coat off my soak off gels anyway.  I haven't tested it yet to see how such a combo will wear, but you can bet that I will!
Accent nail with Poly Polish mixed with Acrylic Paint

Speaking of wear, let's talk a little about that.  I didn't do a full wear test on my T.E.N. mani.  Why?  Because I forgot to do the art for my collaboration post from last week before applying this mani on my left hand.  So I had to cut the test a little short.  I wore the base and glitter for 4 days before adding the roses, which I wore for another 4 days.  My nails felt quite strong - way stronger than with soak off gel - and it wore perfectly.  No tip wear as is common with soak off gels. 

I have to be honest - the removal scared me a little.  I don't work with hard gel very often, so filing it off made me nervous.  I just knew I was going to over-file and hit my natural nail.  Turns out I was worried about nothing.  Brenda told me her gels are easy to remove, and she was right.  I was able to file it down to a very thin layer and then use a buffer to remove the rest without damaging my nails.  They are just as long and strong as they were before removing my Poly Polish mani.  :)

So there you have it - Poly Polish is a very versatile product that can be used to expand your nail art arsenal by combining it with other products you already have on hand.  I have a few more T.E.N. products to show you in the near future, so keep an eye out for those!

~Michelle

*The products featured in this post were supplied by T.E.N. Tuff Enuff Nails for my honest review.

Read more ...

Friday, October 24, 2014

New Purjoi Swatches and Purjoi Giveaway!

Press Sample

Purjoi One Step Swatches and Giveaway

Hello Loves.  A few weeks ago, I reviewed a new One Step Gel Polish from Purjoi Nail Studio.  Today I have a few more swatches to show you, plus the entire line on swatch sticks, and a chance for you to win three colors of your choice!  I'll start with the swatches, but make sure you scroll all the way to the bottom to enter the giveaway.  ;)  If you missed my Purjoi review, you can read it here.

When Joi sent me new colors to show you, I had to laugh like a maniac when I opened the package.  She sent not one, but two teal green shades.  You know how much I love my teal greens...and how much my camera hates them.  Thanks Joi!  lol

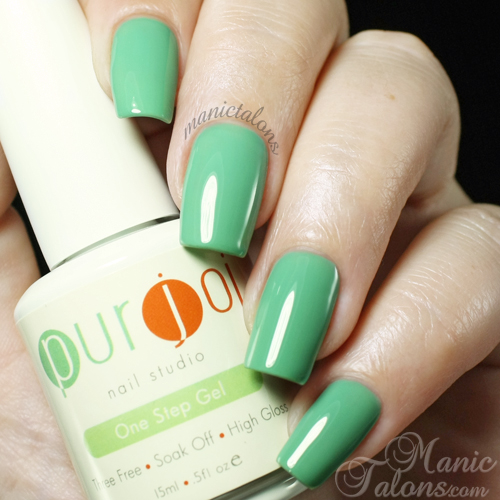
So we'll start with the teal greens.  The first color is called Simple Times.  This is a light to medium bluish green cream.  I got as close as I could with this one and the color is right on my monitor but it is more vibrant in person.  Two coats swatched below.
Purjoi One Step Simple Times Swatch

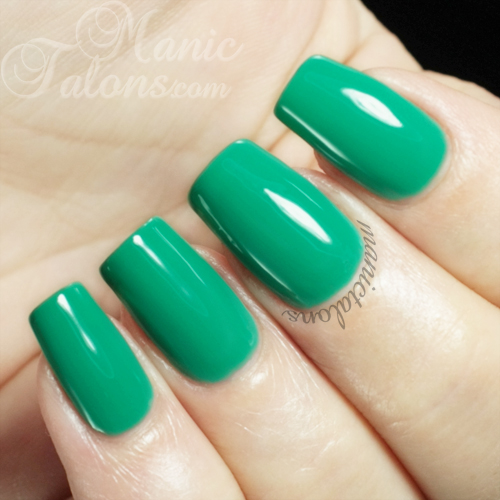
The second teal green is a darker shade called Spring Break.  I love this color just as much as my camera hates it.  Spring Break is a darker, mostly green teal cream.  Again, the color is accurate on my monitor but in person it is more vibrant.  This one is also two coats.
Purjoi One Step Spring Break Swatch

The third color Joi sent is THE perfect Halloween orange.  I can't think of a single better way to describe it.  Orange You Fine is a ever so slightly red leaning orange cream.  Again, two perfect coats.
Purjoi One Step Orange You Fine Swatch

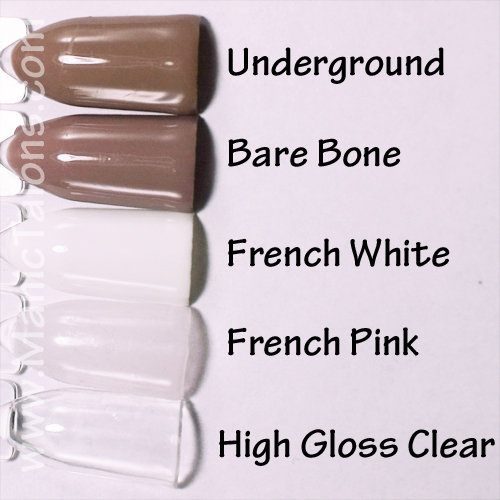
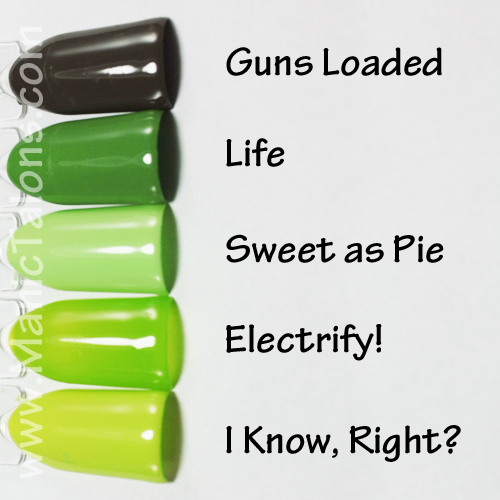
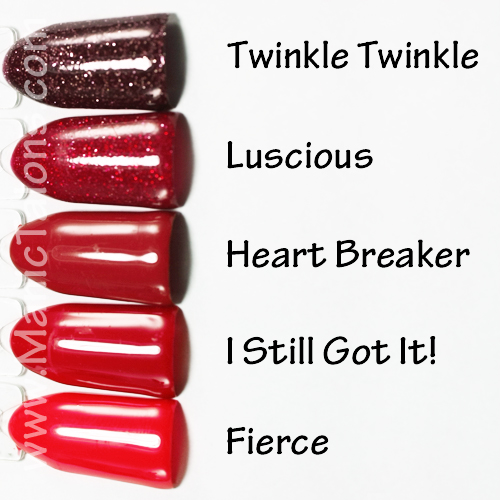
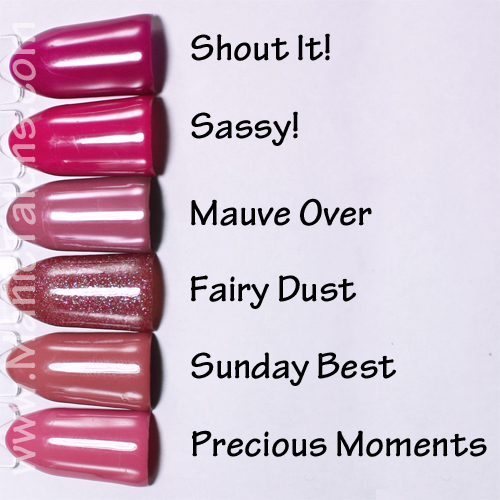
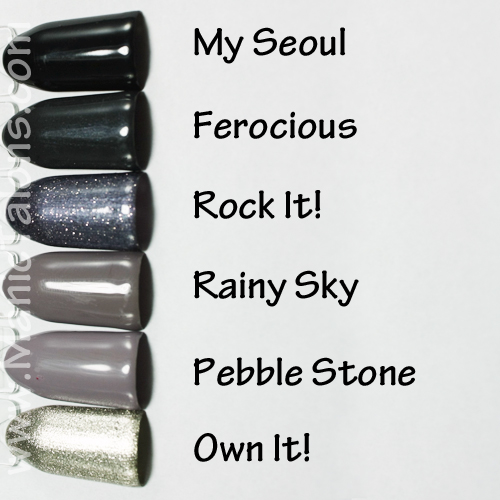
In addition to these three lovely shades, Joi was also kind enough to send me swatches of the entire Purjoi Nail Studio One Step line to date.  Wanna see them?  I thought you might. ;)  I'm not going to try to describe each photo/color group.  I think the pictures speak for themselves.
Purjoi One Step Nude Swatches
Purjoi One Step Gold Swatches
Purjoi One Step Green Swatches
Purjoi One Step Blue and Teal Swatches
Purjoi One Step Red Swatches
Purjoi One Step Coral and Pink Swatches
Purjoi One Step Mauve and Wine Swatches
Purjoi One Step Purple Swatches
Purjoi One Step Grey Swatches

Now that you've seen all of the colors, how about a chance to win some of your very own?  First, the contest rules/details:

The Prize:

The Rules:
  • Contest begins September October 24, 2014 at 12:00 am EDT and will end on November 7, 2014 at 12:00 am EDT.  
  • Contest is open to US mailing addresses only 
  • Winners will be contacted via email within 48 hours of the end of the giveaway.  The winners will then have 48 hours to respond and accept the prize.  If the winner does not respond to claim the prize by 48 hours after notification, a new winner will be selected for that prize.
  • The prize will be fulfilled by Purjoi Nail Studio.
  • Only entries through the Rafflecopter widget below will be counted.
  • All entries will be verified.  Invalid entries will be thrown out.
  • Additional contest rules and legal stuff may be read via the Rafflecopter widget below. 

Good Luck!

a Rafflecopter giveaway


If you don't see the Rafflecopter Widget above, click here to access the entry page directly.

~Michelle

*The gel polishes featured in this post were provided by Purjoi Nail Studio for my honest review.  The prizes for the giveaway are also to be provided by Purjoi Nail Studio.

Read more ...