Friday, January 30, 2015

IBD Just Gel Polish Gel Art Kit Review

Affiliate Links

IBD Just Gel Polish Gel Art Kit Review

Hello Loves.  I have a full review of the IBD Just Gel Polish Gel Art Kit for you today.  This one has been out for a while, but I found a great deal on Amazon and couldn't pass it up.  The Gel Art Kit consists of 6 bottles of polish and a dotting tool.  The polishes have really difficult to remember names.  Ready to hear them?  They are:  Just Black, Just White, Just Yellow, Just Green, Just Red and Just Blue. ;)

So how are these Gel Art Polishes different from the regular Just Gel Polishes?  Several ways!

The Bottles:  The bottles are half the size of a regular Just Gel Polish bottle at 0.25 fl oz.  Here's a comparison shot that shows the difference.  The smaller bottle makes sense considering these are thicker polishes that require less coats and are intended for nail art.
Ibd Just Gel Art Polish Bottle Size Comparison

The Brushes:  They come with a built in striping brush as opposed to the larger polishing brushes.  I found the striping brushes to be a great length and very easy to work with, though I did have to trim a few of them as they had uneven tips.
Ibd Just Gel Art Polish Brush

The Formula:  Each of these Art Gel Polishes are a thicker, one coat formula.  They are UV/LED compatible (of course, that part isn't different - the Just Gel Polishes are also UV/LED).  You know I had to put them to the test.  For the most part, they didn't disappoint.  I started with a few swirls.  Needless to say, I didn't keep this one for long.  The red nail looks like my cuticles are bleeding.  lol
IBD Just Gel Art Polishes over White

Here's a closeup of each of the colors on my nails.  The black is a little weak in spots, but I could have easily fixed those lines before I cured.
IBD Just Gel Art Polishes over White

And since I only have 5 fingers, I did a quick swatch with a black base so you can see the white too.
IBD Just Gel Art Polishes over Black

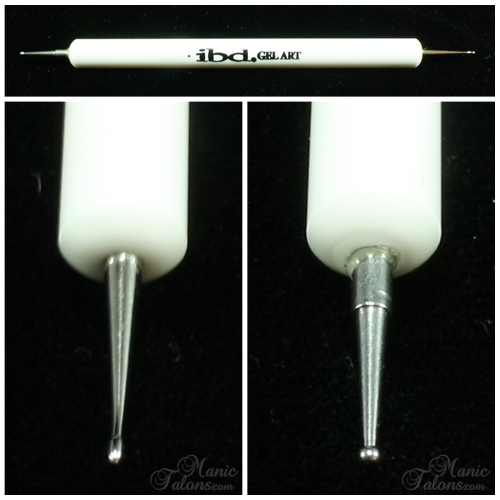
The Dotting Tool:  The dotting tool that comes with the kit is pretty basic.  The handle is acetone resistant plastic and it has two ends with different sized tips.  One is a super fine tip for creating the tiniest dots imaginable.  The other is a slightly larger bulb tip that is used for small dots and accents.  This one is also great for fine lines.
IBD Just Gel Polish Gel Art Kit Dotting Tool

Playing is playing, but let's see how they do in an actually mani with thick and thin lines over various colors.  You know, something with a bit more detail and less bleeding cuticle effect.  How about Argyle and Roses?  Yeah, I know...strange combination, but I love how it turned out.  lol
Argyle and Roses Manicure with the IBD Just Gel Polish Gel Art Kit

As you can see, the white is a little weak but the other colors perform quite nicely with just one layer.  Let's take a closer look.  I wish I had been able to work more yellow into the design, but I just couldn't find a way other than accent dots.
Argyle and Roses Manicure with the IBD Just Gel Polish Gel Art Kit

Overall, I'm impressed with the IBD Just Gel Polish Gel Art Kit and can definitely see myself using them regularly.  It is also a really great kit for anyone who is just starting out with gel polish nail art.  I hope IBD comes out with a greater range of colors soon.  I would love to see some secondary and tertiary colors.  Sure, I could mix them myself, but that defeats the purpose of the built in striping brushes, which is a feature I really like.  It not only saves time, but it also saves product since I don't have to decant a bit on a pallet and use a separate brush.

If you're wondering about that awesome holographic glitter base, let me tell you what happened there.  You see, I started out with a base of IBD Just Gel Patchwork.  I was looking for a glitter for an accent nail and realized I had this jar of microfine Supernail Glitter in Silver Rush that I picked up months ago but never opened.  I popped it open and dusted it onto a nail.  You know how much I love my glitter and my holos, right?  I had no clue this little jar held this much bang.  The pictures don't really do it justice.  Its mesmerizing.  Yeah, so I got a little light headed, my eyes crossed, and before I knew it I had glitter dusted every nail.  Funny how that happens to me sometimes.  Anyway, that's my story and I'm sticking to it.

As I mentioned in the beginning of this post, I found a great deal on this IBD Just Gel Polish Nail Art Kit on Amazon.  The last I checked, they had a limited number remaining, so if you want one, grab it while you still can here!

~Michelle

*This post uses Amazon Affiliate Links.  Purchases through these links generate commissions that help fund this site.  All products featured in this post were purchased by me.

Read more ...

Wednesday, January 28, 2015

LeChat Perfect Match Rosemantic Review

Affiliate Links Gift

LeChat Perfect Match Rosemantic Review

Hello Loves!  I don't think I've mentioned it here, but I recently joined the admin team in a facebook group dedicated to LeChat Perfect Match called LeChat Perfect Match Swatches.  One of my fellow admins was given a gift of the new Limited Edition LeChat Perfect Match Rosemantic from LeChat and passed it along to me to review.  Rosemantic is the first LeChat Perfect Match of it's kind.  Not only is it a thermal polish, but it is also scented.  But that's not all!  This is the first LeChat Perfect Match Mood to come with a matching Dare to Wear Lacquer that is also a mood polish!

Let's start with the Gel Polish and then touch on the Dare to Wear lacquer.  Rosemantic is a pink to red thermal cream.  It offers full coverage in the cold phase in two coats but needed three to be completely opaque in the warm phase.  With that said, my coats are super thin so you might be able to get away with two.
LeChat Perfect Match Rosemantic

As I mentioned previously, it is scented!  Rosemantic smells like, you guessed it, roses.  The fragrance is quite strong and lasted for the duration of my manicure.  I'll touch more on that in a minute.  I completely forgot to get a shot of the warm phase on it's own so I don't have a collage of the phases for this one, but here are the cold and transition shots.
LeChat Perfect Match Gel Polish Rosemantic Cold
LeChat Perfect Match Gel Polish Rosemantic Transition

There's an interesting thing about the Rosemantic Gel Polish.  It is a different color in the warm phase depending upon how you cure it.  When cured in an LED lamp, it is the pink featured on the bottle and in my swatch above.  As a user in the LeChat Perfect Match group discovered, it is a completely different color when cured with a CFL UV lamp.  When cured in the CFL UV lamp, the warm phase takes on a very peachy tone.  In the photo below, I cured the first (left) swatch in my Thermal Spa CFL UV lamp and the second (right) swatch in my Harmony 18G LED lamp.  Note that the left swatch is not pink toward the edge.  It is picking up the reflection from the pink swatch beside it.
LeChat Rosemantic cured in CFL UV vs LED

At first, I expected this to be the result of the longer cure times and predicted that Rosemantic would fade to the peachy color with wear.  I was wrong (proof I'm not perfect lol).  When cured in LED, it stays true to the pink color you see here.  The change also only seems to impact the warm phase as the cold (red) is a match regardless of how you cure it.  The red might be a tad peachier when cured in the CFL UV lamp, but I can't really tell a difference with my eyes.
LeChat Rosemantic cured in CFL UV vs LED

Let's talk about the Dare to Wear lacquer version really quick.  I wore it on my toes for a while and found the color to be true.  Application was smooth and coverage was nice with two coats.  I have no clue if the fragrance stuck around since I'm not exactly flexible enough to sniff my toe nail polish, but I do know that it stayed around on a swatch stick for quite a while.  I'm also not going to show you a picture of my toes, so how about a swatch stick picture?
LeChat Perfect Match Dare to Wear Lacquer Rosemantic

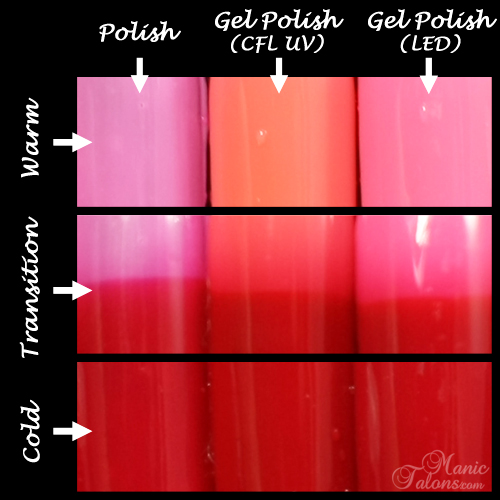
You might notice that the color of the warm phase on the lacquer looks different than the color of the warm phase for the gel polish (both CFL UV and LED versions).  You're right.  It is different.  I put together this cute little grid that shows the Lacquer, CFL UV cured gel and LED cured gel side by side.  As you can see, the cold phase is pretty much a dead on match, but there are definite variations in the warm phase.  The polish seems a bit more purple, the CFL UV is peachy and the LED is pink.
The Many Faces of LeChat Rosemantic

Ok, now that you've seen the variations, are you ready for my thoughts?
  • The lacquer doesn't match perfectly, but I'm totally ok with that since I rarely match my toes to my hands anyway.  Plus, unless you touch your toes a lot, I don't think they are different enough that anyone would notice.  I found it to be very shifty and definitely lives up to the thermal shifts we expect from the LeChat Mood gels.
  • The scent is a bit strong for me.  Or maybe it's that I'm not a huge fan of rose fragrances.  Either way, my hands are near my nose a lot as a smoker and I found it to be stronger than I prefer.  This is after just one layer of top coat.  I did end up stamping over it and adding two more layers of top coat over the stamping (pics in a moment).  After the third layer of top coat, the scent was barely noticeable.  So if you aren't a fan of rose fragrances, don't let that deter you on this one.  A couple of layers of top coat will mute it enough that you won't notice unless you pick your nose.  ;)
  • As long as you cure the gel polish in an LED lamp, the color stays true as a pink to red thermal.  If you cure in a CFL UV lamp, the color stays true as a peach to red thermal.  It doesn't change during wear that I could tell.  While some people might consider this a flaw in the color, I kind of like it.  Its like having two different gel polishes in the same bottle.
  • If you wear enhancements, I should warn you that the enhancement (acrylic or gel) will absorb the fragrance.  I noticed it was super strong while I was filing off the color and could still smell roses after I applied a different gel polish.
  • Finally, I only got 8 days of wear on my natural nails (right hand).  I don't know if the gel polish itself failed or if I was extra hard on my nails during school that week, but on the 8th day it peeled off of two nails in sheets.  I could speculate as to the cause, but I won't since I don't really know for sure.  ;)  I do know that my left hand was flawless at 12 days when I decided to change it, but my left hand is the one with gel extensions on two nails and gel overlays on the other three.

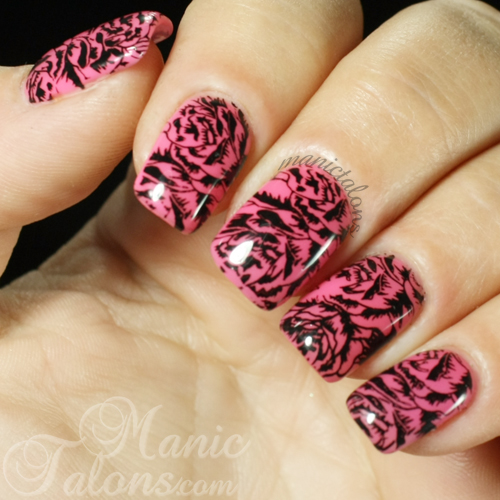
Ready to see Rosemantic with stamping?  I admit, I wasn't very creative with this one.  It is the color of roses.  It smells like roses.  You know I had to stamp it with roses.  lol  The stamping polish is Mundo de Unas black and the stamp is SE02B from the Pueen Encore Collection.  I adore the Encore collection for the endless possibilities!  Since I forgot to photograph all of the phases without the stamping, I have all three stamped phases to show you.  We'll start with warm and end with cold. 
LeChat Rosemantic Stamped - Warm
LeChat Rosemantic Stamped - Transition
LeChat Rosemantic Stamped - Cold

What do you think?  Is LeChat Rosemantic scented mood polish a must have for your collection?  I definitely see it as being a popular color for Valentine's Day.  :)

Also, if you love LeChat, I invite you to join the LeChat Perfect Match Swatches facebook group!  It is a closed group for members only, but we welcome DIYers and Pros alike.  It's all about swatches of LeChat gel polish (Perfect Match and Nobility) and sharing the "LeLove".  :)

~Michelle

*This post use Amazon Affiliate Links.  Purchases through these links generate commissions that help fund this site.  The LeChat Rosemantic that is featured in this post was provided to a friend as a press sample from LeChat.  It was passed along to me as a gift.  Thanks Angela!

Read more ...

Monday, January 26, 2015

The Nail School Chronicle: Week 8

The Nail School Chronicle

Hello Loves!  Ready for another Nail School Chronicle update?  This past week was a short one thanks to MLK Day, but I have so much to share!  It turned out to be a very exciting week.  :)

Where do I even start?  Goodness.  Ok, so I had another test last week.  Aced it.  Perfect score.  It was the second hardest chapter in freshman theory.  Yeah, I know I should just let it go, but this makes me even more annoyed by the 95 on the easy chapter.  Grrr.

Oh yeah, and I'm officially a Senior now.  What does that mean?  I'm being booted out of the classroom and onto the floor where I'll work on clients.  I'm not going to lie, I'm both excited and scared to death.  I don't feel ready.  Don't get me wrong, I know the basic material backward and forward and I have no doubts about my abilities on mani/pedi or gel polish.  I'm even ok with acrylic at this point.  So why does it scare me?  Because I know I can handle my own nails but I'm not confident I can do as well on someone else's.  Oh well.  I guess we'll see how it goes.  I still have a lot more training to go and will have hands on training with my instructor as I tackle (lol) real clients.  :)

Speaking of acrylic, I have another update to show you.  Remember the post from Week 1 where I showed you my first blended tip with acrylic overlay?  This picture?

Well, here we are 8 weeks later and I have a comparison picture to show you.  I'd say I've improved.  Its hard to tell in this picture, but the tips are light blue acrylic.  I lost a little of the definition on the 3d flower when I top coated, so that needs a little work.  But what do you think?
Blended Tip with Acrylic Overlay - Week 8 in Nail School

Here they are side by side.  I would actually wear the newest set!  lol
Acrylic Overlay Progression - Week 1 and Week 8

Ok, so becoming a senior was only the beginning of my excitement for the week.  If you follow me on Facebook or Instagram, you might know what's coming next.  See, what happened was...

I was sitting there in class minding my own business when Mr. Wayne came around with a new student.  Usually he walks in and introduces the new student to the instructor.  This time, he walked in the door and said "And this is Michelle."  I looked up to find myself face to face with Nicole from Nail Polish Wars.  I instantly knew her.  Unlike me, Nicole isn't afraid to share a selfie now and then.  My jaw hit the table and I kind of sat there speechless.  I think she said something like "Manic Talons!  Nail Polish Wars!"  Of course I knew who she was and I certainly knew her blog, but my mouth wouldn't move.  I mean, total fan girl moment.  I'm not usually one to be star struck, but I was caught off guard.  Nail Polish Wars is one of the first nail blogs I started reading long before I started Manic Talons.  If you're not familiar with her blog, click that link above and check it out.  Her work is fantastic.  I knew she was local, but I never expected to run into her at Georgia Career Institute of all places!  What happened next was a mix of squeals, hugs and selfies.  lol  I'm super psyched that she's joining us.  I mean, I love my fellow classmates, but having someone in class who "gets" me as a blogger is going to be awesome.  Plus, she's super funny.  Oh, and this is why I don't do selfies.  I always end up looking a hot mess.  Would you believe I actually ran my hands through my hair before the picture?  I promise I didn't just climb out of bed and go straight to class.  lol
Michelle from Manic Talons and Nicole from Nail Polish Wars

After she left, I marched over to Mr. Wayne's office and told him he is not allowed to do that to me.  He can't just walk in with a well known blogger like that with no warning!  He laughed and said "I didn't know!" so I had to school him.  Don't get me wrong, my little blog here has been successful but I'm always surprised to meet people who "know" me.  Still, I'm a small fish compared to Nicole.  Girl has mad skills and more than double the number of readers I have here.  I told Wayne I'll never win another mock nail art competition now that she's here.  lol  I know my art isn't too shabby, but she does all of her art with nail polish.  Nail polish!  I use gel polish and acrylic paints.  Those are soooo much easier to work with.  I'm always amazed by artists who use polish.

Moving on, I did something this week that I haven't done in over a year.  I sat down and did a mani on myself from start to finish without stopping to take photos of each step.  Crazy, right?  I actually wasn't planning to blog about this one at all, but I love how it turned out so much that I'm throwing it in here today.
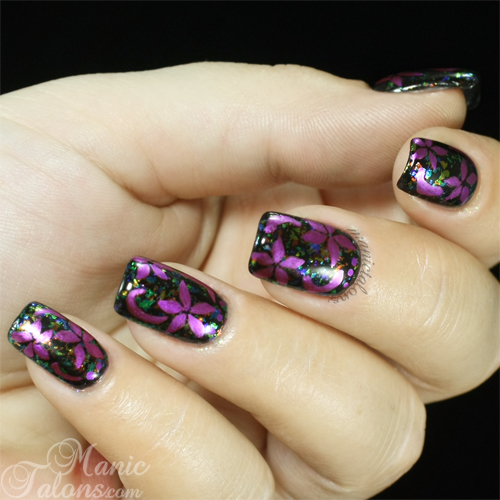
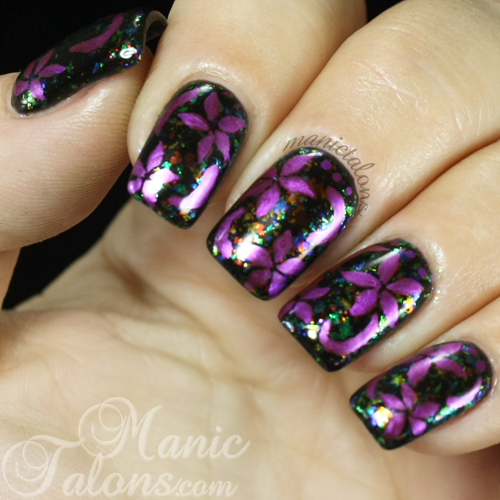
Metallic Flowers over Flakies Nail Art

So, what's going on in this one?  The base is Couture Little Black Dress.  I know I haven't blogged about Couture in a while.  Rest assured, I still love my Coutures.  I just have so much other stuff going on and Couture hasn't released new colors in a while.  Plus you can see my swatches of their entire line in the colors section of their website.  How much do I love my Coutures?  Well, this mani killed my second bottle of Little Black Dress.  I have a ton of other blacks to choose from, but LBD is still my favorite.  :)

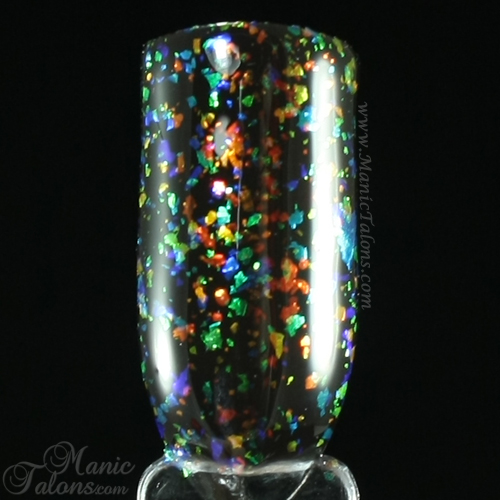
The next layer is KBShimmer Rainbow Shield.  Rainbow Shield is on the of the LE Flakies that KBShimmer released on Etsy a few months back.  As soon as I saw them, I knew I had to have them and ordered them immediately.  The collection consists of 6 flakies and it looks like they are still available.  They never made it to the KBShimmer website due to limited quantities, but you can buy them here while they last.  Trust me, they are all amazing.  I'll do swatches as soon as I make it through all the other stuff on my calendar.

Here's a swatch of Rainbow Shield over Couture Little Black Dress.  I can't help but love it!
KBShimmer Rainbow Shield over Black

Funny thing about this mani.  I decided to sponge on the flakies for better coverage without the added bulk.  It was genius and I love the result.  Except for one little thing...I wasn't smart enough to put down a layer of glue around my nails before I started sponging.  Whoops.  Turns out flakies stick like super glue and will not come off of your skin.  I waited 24 hours and scrubbed with polish remover, a nail brush, sugar scrub, and washed my hair before taking these photos.  I still have flakies stuck to my cuticles.  I've decided to just give up on removing them.  Anyway, for a final touch, I added some freehand flowers and swooshes with Bundle Monster Photo Op from the Metallic Red Carpet Collection.  Here's a better shot of the final mani.  See all the light reflections around my nails?  Those are the flakies that wouldn't let go. lol
Metallic Flowers over Flakies Nail Art

That wraps up this week's edition of The Nail School Chronicle.  Be sure to check back later in the week for more swatches and reviews.  I'm not sure what I'm going to show you yet, but I'm certain it will be fun.  :)

Oh yeah, I still haven't had a chance to update my Swatch Galleries.  I did update the Nail Art Gallery though.  Check it out to see all of my nail art creations in one place.  :)  I'll try my best to get to the Swatch Galleries this week!

~Michelle
Read more ...

Friday, January 23, 2015

Swirly Sweethearts with Bundle Monster Berry Fizz

Press Sample Affiliate Links

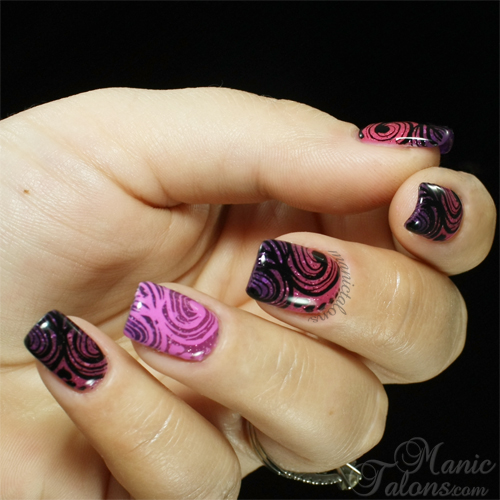
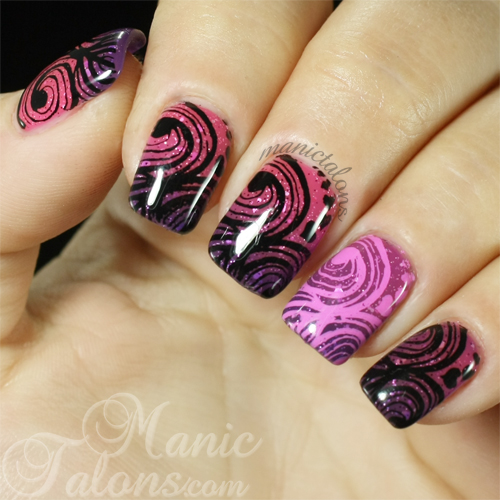
Hello Loves!  It's been a crazy week!  I'll go into the details in the next Nail School Chronicle entry on Monday, but I have a quick little stamping mani for you today compliments of Bundle Monster.  I'm still struggling to break out of my usual nail art style, so I'll call this a gateway mani.  It's not floral (whoo hoo!), but it is swirly which is typical for me. Want to see it?  Of course you do.
Swirly Sweethearts stamped over Bundle Monster Berry Fizz

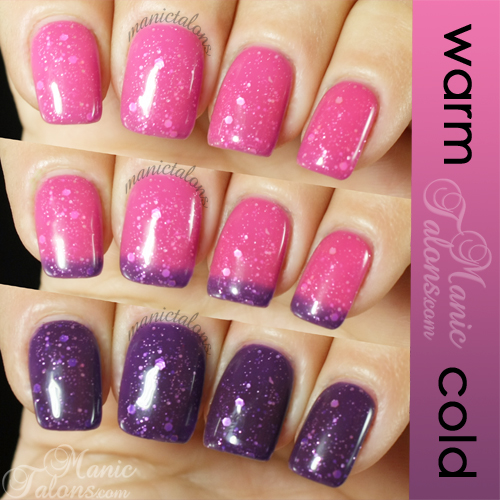
You want details, right?  The base is the last thermal from the Bundle Monster Fruit Cocktails Collection.  Yep, I finally made it through them.  Considering how it long it has taken me, one might think it is a huge collection.  Nope, just three thermal gel polishes.  lol  This one is called Berry Fizz.  Berry Fizz is a pink to purple thermal base with a scattering of multi-sized silver glitter.  I remembered to take a swatch photo of the base this time.  Go me!
Bundle Monster Berry Fizz Swatch

Not only did I remember the swatch photo, but I also remembered the photos of the phases.  I'm on a roll!  
Bundle Monster Berry Fizz Swatch

Berry Fizz is slightly thick due to the glitter, but it applies nicely and I didn't have any trouble getting even glitter distribution and full coverage in just two coats.  What do you think of this one?  Are you a fan of pink and purple?  To be completely honest, it is a little too girly for me on its own, but a little stamping fixed it right up!  For this mani, I used image BM-612 from the Bundle Monster Create Your Own 2014 Collection.  I don't know about y'all, but I can't resist the Bundle Monster plate collections.  I have purchased them all so far!  The main nails are stamped with Mundo de Unas Black and the ring finger is Mundo de Unas Mexican Pink.  I adore the nails that are stamped in Black.  The pink one, meh.  I should have stuck with black.  lol

Here's another shot of the final mani.  What do you think?  Love it?  Hate it?
Swirly Sweethearts stamped over Bundle Monster Berry Fizz

By the way, I'm sure most of you know this trick, but you can use school glue to help make stamping cleanup easier.  Brush the glue over the skin around your nails, let it dry, stamp, then peel off the glue.  It's fabulous and minimizes cleanup...if you do it right.  I did NOT do it right this time.  I completely forgot to moisturize before putting the glue around my nails and it wouldn't come off.  Oops.  It took me a good 10 minutes with a scrub brush to get the glue off of my skin.  Only I can mess up something as simple as peeling off glue.  Talent, I tell you.  Talent.  lol

If you would like to pick up a bottle of Berry Fizz of your very own, you can find it on Bundle Monster's Website here or on Amazon Here.  Oh, and in case you missed the other two gel polishes in the Fruit Cocktail collection, I swatched Raspberry Rush here and Mulberry Surprise here.  :)

~Michelle


*Berry Fizz was provided by Bundle Monster for my honest review.  All other products featured in this post were purchased by me.  This post uses Amazon Affiliate links.  Purchases through these links generate commissions that help fund this site.  All other links are courtesy links and do not benefit ManicTalons.com.

Read more ...

Thursday, January 22, 2015

Press Release: Le Mini Macaron Kickstarter

Press Release

Le Mini Macaron to Launch on Kickstarter January 9
Birmingham, AL and Shanghai, China


Beauty start-up Camelia Beauty announces the launch of a brand new nail product to debut this Friday, January 9 on Kickstarter.

Le Mini Macaron is an all-in-one gel manicure kit, inspired by the colorful French macaron. This adorable, affordable kit gives girls all the tools needed to create beautiful and shiny gel manicures by themselves at home.

Background
Gel manicures started to become popular 4-5 years ago as an alternative to regular nail polish manicures. Gel is famous for its brilliant shine and long-lasting, chip-free results. However, gel manicures are usually done at a salon by a professional nail technician, requiring an LED lamp to cure the gel dry. In addition, application tends to be time-consuming, with many steps and products involved, and costing on average of $30-50 each time.

“The invention of gel polish was a huge advancement in the nail industry. Girls could now have manicures that last 2-3 weeks without any chipping, and with an incredible shine that regular nail polish just couldn’t achieve,” says Christina Kao, Managing Partner at Camelia Beauty and one of the creators of Le Mini Macaron. “But while gel offers amazing benefits, it is also considered expensive. With the launch of Le Mini Macaron, we wanted to make gel available to all girls, so everyone could experience the fantastic results…without the heavy price tag.”

Le Mini Macaron was created for girls who like doing their own nails, and who appreciate an application process that is fast, easy and fuss-free! “I personally love beauty products that not only give great results, but also come in cute, colorful packaging! That’s what we have tried to do with Le Mini Macaron,” says Christina.

The Macaron Concept
Everyone loves macarons! From high-end French pâtisseries to retail fashion, beauty, and gift products, these colorful French pastries are a great inspiration. “We designed our product around the macaron because it’s such a simple concept, yet so fun, pretty, flirty and easily identifiable. With the colors and flavors, we have endless room to play and create new gel polish colors. The reaction we have gotten so far from consumers has been so exciting, and we really believe in the potential of this concept,” says Christina.

Inside Every Kit
The cute and compact kits come in different macaron-inspired colors (like Strawberry Pink and Lavender Purple) and include everything needed to DIY gel manicures at home:
* A one-finger LED lamp, designed like a French macaron
* A bottle of shiny gel polish, applies in only one step
* Power charger with a USB adapter
* Cuticle stick and nail file to aid in application
* 10 soak-off remover pads
* Detailed instructions for application and removal


Product Highlights: LED Lamp
* LED lamp cures in only 30 seconds. Small but powerful. (Compare to 60, 90, and 120 second lamps.)
* Sleek design with matte, soft touch surface.
* Small and portable – convenient to bring to school, office or home.
* LED lamp cures toenails too – just flip the magnetic top around!
* USB charger plugs straight into the laptop for added convenience.

Product Highlights: Gel Polish
* One-step gel. The 3-in-1 formula contains base coat, color, and top coat in one bottle for simplicity and convenience.
* The brilliant shine and lasting of gel polish without the hassle.
* Easy on, easy off. One-step gel is easier to remove than 3-step gel. Soaking with the remover pads for 10 minutes will allow the gel to lift off easily.
* Chip-free formula lasts for 7-10 days.

Why Kickstarter?
“We started our company Camelia Beauty two years ago, but both François and I had been in the business in other capacities prior to this,” says Christina. “We have all the creativity and resources for design and large-scale production, and we are passionate to get our product to market as fast as possible. But with large retailers and actually getting products onto store shelves, this takes months of planning and time. So we decided to put Le Mini Macaron onto Kickstarter so that we could launch now and put our products into the hands of our customers as fast as possible.”

The Kickstarter campaign will launch on January 9 and run for 30 days. “Our hope is to generate interest and contributions for Le Mini Macaron from our target customers…enough so we can do an initial production run to start. And in return we are offering different rewards, from single products to limited edition sets,” says Christina. “Kickstarter and crowd funding is a great way to test your product in front of the end consumer and either validate that your product has legs out in the real world…or gather targeted consumer feedback so as to revise and refine your product further.”

“We have a lot of belief in the potential of Le Mini Macaron and also the future of one-step gel in general,” says François, founder and GM of Camelia Beauty and one of the creators of Le Mini Macaron. “When we see how fast and easy it is to apply, along with the excellent results, we understand that one-step gel is going to revolutionize the way girls do their manicures. And we want to be at the forefront of this change.”

In future, Le Mini Macaron will be available online at a retail price of $30 via http://www.leminimacaron.com

Visit our Kickstarter Campaign Here.
~~~

Le Mini Macaron is a new beauty brand focused on nails and gel polish. It was founded by Christina Kao and Francois-Xavier Humbert and is one of the brands under Camelia Beauty, LLC. We have offices in Shanghai, China, Birmingham, AL in the U.S. and Lyon, France. Other brands under Camelia Beauty are Shine & Sheen (http://www.shineandsheen.com) and MyTrendyKit (http://www.mytrendykit.com).

For press inquiries or opportunities regarding retailer/distributor partnerships, please contact Christina Kao at christina.kao@cameliabeauty.com.


*This post is a Press Release from Le Mini Macaron.  All content within was provided by Le Mini Macaron.
Read more ...
Wednesday, January 21, 2015

Fun with NFC Nail Light Stickers

Affiliate Links

Funky French manicure with NFC Nail Lights

Hello Loves!  I recently joined an awesome professionals only nail tech group on facebook called Nail Tips for Nail Techs, and they were talking about these NFC Nail Lights.  Wait...what?  Lights for nails?  Yes please!  You know I had to order some.  After about 3 weeks of waiting, they arrived this past Friday.  Needless to say, I didn't waste any time ripping open that little envelope and putting them into and onto my nails.  I also quickly learned that it is insanely difficult to capture blinking lights with a camera.  I did manage to snag a few pictures, but a video shows them so much better.  So let's take a look at a quick video before I go into the details.


Ok, so what exactly are NFC Nail Lights?  They're these little (sorta) stickers that include a copper conductive coil that is attached to a tiny LED light.  They were originally developed in Japan and were seen first in Japanese nail art as many awesome nail techniques are.  They pick up Near Field Communication (NFC) signals from electronic devices that are equipped with NFC functions and use those signals to power the LED light (to put it simply).  For example, those quick pass scanners where you simply wave a card in front of them or some android phones have NFC capabilities.  My phone is a Galaxy S5, so I'm set.  :)  Depending on the NFC source, the lights might blink like they do with my phone or turn on and stay on as long as the NFC source is close.  Key card readers make the lights stay on.  And believe me, I wish I had one for taking photos, but the guy at the gas station was giving me funny looks when I kept putting my hand up to the reader, so I don't think he would have understood if I broke out my camera for a photo session.  lol

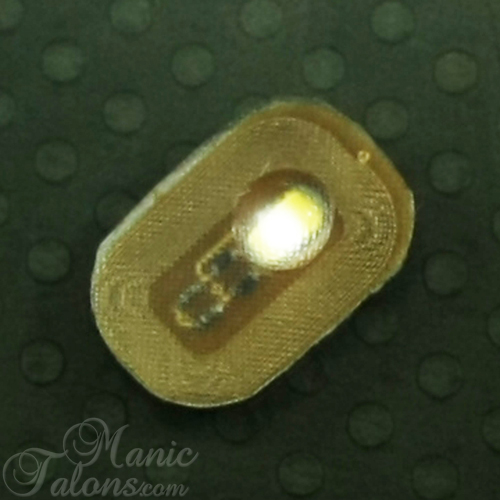
The little stickers/chips are on a larger piece of sticky backing and look like this when they arrive.
NFC Nail Light Sticker

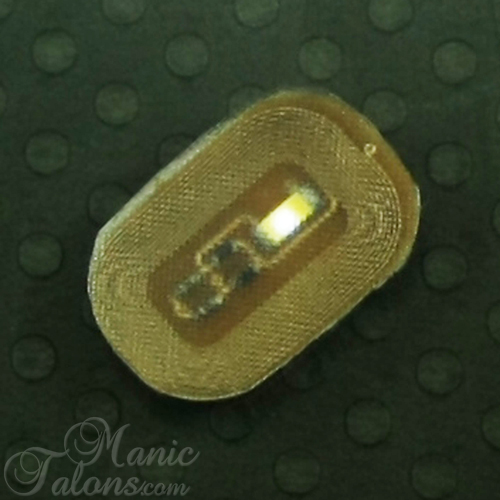
Once you trim away the excess sticky backing, you end up with a smaller but still kinda large, intelligent sticker.  This is the trimmed sticker compared to my index nail.  I wanted to give you the actual dimensions, but my kids ran off with my measuring tape and it is no where to be found.  lol  I ordered mine from Ebay and the listing doesn't give the size either.  (I should note that the listing I just linked is the exact listing I used to purchase my lights.  The lights I received don't look exactly like the ones in the listing, but they work and I'm very happy with the purchase.  Shipping was fast considering it came from overseas too.)  So here's that photo.  The small yellow rectangle is the actual light.  The rest makes it work.  They are approximately 0.5mm thick.  Oh, and the film on the top is removed before encasing the light.  I didn't remove this one yet since I'm not ready to use it.
NFC Nail Light Sticker Size

I ordered 10 of the lights to start with and wish I had ordered more.  I destroyed three of them trying to find the best way to apply them.  lol  But after a few tries, I learned a few tricks.  First, they can be embedded under clear acrylic or hard gel.  Since I'm still wearing enhancements on my left hand, I decided to embed them under my hard gel.  In this case, I used two stickers on one nail and overlapped them slightly.  However, I don't recommend this.  The resulting nail is a bit too thick for my liking in order to conceal the overlap of the stickers.  Let's take a look at the mani, shall we?
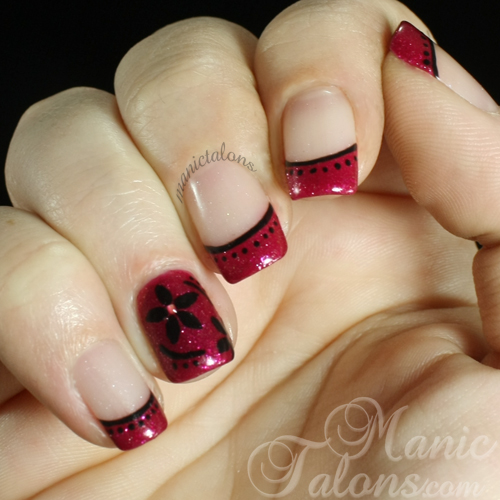
Funky French Manicure with NFC Nail Lights

Ok, so here's what I have going on in this one.  I started with sculpted nails using Akzentz UV/LED Proformance hard gel.  Love this stuff!  On the accent nail with the lights, I started with a thin sculpt, added the stickers, then built the apex and bulk of the nail over them.  The stickers are staggered and overlapping.  I wish I had thought to get a picture before I added the color.  The base for the french is Pink Gellac Pearl No Wipe Top coat.  The french and base color for the accent nail is Madam Glam Glittery Berry.  The black details are Akzentz Gel Play in black.  I adore this funky french design.  Can you believe this is my first ever true funky french?  Insane!  As you can see in the photo above, the accent nail is pretty thick.  You might also notice the domes over the lights.  I'll explain that in a moment.  First, let's take a look at a tip view of that accent nail to show you exactly how thick it is.
2 NFC Nail Lights on one nail

Pretty thick, right.  There's no way I could pick up a quarter from a flat surface with that nail!  If I had only used one light, I could have achieved a much more natural thickness, I think.  The good news is that these lights also work well with SOG.  My Cinderella hand (right hand) is 100% soak off gel with one light embedded in the gel on my ring finger.  Wanna see it?  It looks sooo much more natural.  And look, proof that I actually do wear matching manicures on both hands from time to time.  ;)
Funky French with Gel Polish and NFC Nail Light

Here's a side view of Cinderella.  One light and SOG is definitely the way to go if you're not wearing enhancements or can't stand the bulk.  The nail is still a little thicker than your average SOG, but tolerable, I think.
Funky French with Gel Polish and NFC Nail Light

So how do you apply them with SOG?  It's pretty easy.  Trim the sticker down, but make sure you don't cut into the copper coil.  Apply your base gel and remove the tacky layer.  Stick the sticker on the nail and press firmly to be sure it adheres without gaps or bubbles.  At this point, I applied a small bit of Gelish Structure Gel around the sticker to hide the edges.  If you don't have Structure, you can use a thicker top coat or even your color gel polish and get the same result, though it might take a few layers.  Once the gel is built up around the sticker and appears smooth, apply your color over the nail including the sticker but not over the light portion.  I actually applied the color over the whole nail and then carved out the area over the light.  Cure the first layer, then repeat with a second layer.  At this point, you can add your art and finish with top coat over the entire nail.  Or...

About those domes I mentioned earlier...It occurred to me when I was playing with my stickers that the lights don't seem as bright as they do in photos and videos I saw online.  Then I realized the photos and videos all showed the lights under cabochons.  It was a duh moment.  Putting them under a dome will magnify the light!  So I added a few self-made cabochons over the lights.  It made a huge difference.  Of course, I didn't think to snap before and after photos, so let me show you on a separate sticker.  Check out Kim's tutorial on Ten Little Canvases to learn how to make the cabochon.  Remember to skip the first part of the tutorial since you want it to be completely clear over the light.  ;)

I made a quick cabochon with Akzentz hard gel for this, but Gelish Structure definitely works.  If you're quick enough, you can also make them with SOG top coat and a dotting tool but it takes a few  layers to build them up.  Here's the cabochon I'm using in the next photos.
Clear cabochon made with Akzentz Proformance Hard Gel

This is a picture of the light without the cabochon.  Remember, this still has the protective film over the light, so it is actually a little brighter when the film is removed.
NFC Nail Light with cover

And here's the same light with the cabochon over it.  Huge difference, right?
NFC Nail Light with cover magnified with cabochon

I added small, 1.5 mm cabochons over the lights in my mani.  Next time I'll plan for much larger ones, but this was the best I could do as an afterthought without messing up the design.  The result is a much rounder and brighter light.  :)  Here's another shot of my nail with the light activated.  I had to take it dark and brighten it up in photoshop a bit, which is why it is a bit noisy.  Oh, and I removed the cover from my phone to see if it made a difference.  It doesn't.
NFC Nail Lights in Akzentz Hard Gel Sculpted Nail

What do you think?  These little NFC lights are pretty awesome, right?  They are, but there are some negatives too.  First, they only work when I'm touching the NFC area on my phone, which is about the size of a US half dollar on the back side of my phone.  Since I'm constantly texting or checking facebook, that section of my phone sees a lot of action.  Which means my lights also see a lot of action.  But I don't see the lights.  They're on the wrong side of the screen.  lol  The other down side is that the NFC function on my phone drains my battery really fast.  Another downer is that they are single use only.  Finally, they are NOT compatible with Iphone.  Iphone 6 has NFC capabilities built in, but Apple has it locked for the time being.

The NFC lights are still fun as a novelty thing, though.  You'll see them on this blog again for sure.  Actually, I ordered another 40 from Aliexpress this past weekend.  This time, I ordered different colors.  They're also coming from China, so it will be a while before I get them.  I'm hoping to have them before Valentine's Day, but I'm not going to hold my breath.  lol

~Michelle

*Note:  This posts uses Ebay and Amazon affiliate links.  Purchases through these links generate commissions that help fund this site.  Several of the products used in this post were press samples that have been reviewed previously.  Those items link to the previous review posts.  All other items were purchased by me.
Read more ...