Saturday, August 30, 2014

One Year Blogiversary and Boston Terrier Nail Art

Affiliate Links


Hello Loves.  Today is a very special day!  Manic Talons is officially 1 year old!  When I first started this little blog, I only half expected to keep it up.  And I certainly didn't expect to have so many readers.  I am truly honored.  I admit, I'm a stats junkie.  I watch to see how many of you read my posts, and watching that number climb over the past year has really inspired me to keep pushing myself to improve my art.  Thank You!  Thank You!  Thank You!  Sometimes I need a gentle kick in the tail, and you have been here to give me one (and yes, this might be the only time anyone ever thanks you for kicking her).

Before I show you what YOU have inspired, I should probably point out that I am celebrating by giving back.  Yes, you read that right.  I have a number of giveaways planned for September, including a full Couture Gel Polish Kit, a gift certificate to Girly Bits Cosmetics, ArstyFartsy Crafts Glitter, DIY Hard Nails, and more!  Trust me, you don't want to miss them.  The giveaways will be posted off schedule (not my my regular posting days), so be sure you're following through one of my many social media channels so you don't miss them.  :)  Hint:  The first will start next week.  

Ok, so enough about what's coming up.  Here's what I have to show you today.  As I've mentioned a few times in the past, I have a love for Boston Terriers.  Before starting our family, my husband and I volunteered with the Boston Terrier Rescue of East TN as fosters.  We have had many of these bouncing balls of energy in our home over the years and continue to be ruled by three Bostons and a Chow mix.

I know it's horrible to pick favorites, but everyone has that one dog who touches your heart.  Annie Belle is my heart dog.  She has been there for me through thick and thin, joy and sorrow, the births of my sons, the loss of loved ones...for 8 years she has been my rock.  She is my little clown, my confidant, my snorting little angel.  She also puts up with my special kind of crazy.  This is an old photo, but she has painted piggies so I can't resist sharing it!
Annie Belle the Boston Terrier

When I first decided to attempt nail art other than basic glitter and dots in 2012, I naturally decided to do an "Annie Mani".  Want to see it? 
Simple Boston Terrier Nail Art Design

I was so proud of this bug-eyed version of a Boston Terrier, I forced it on anyone and everyone I could get to look.  lol  I'm pretty sure a few of my facebook friends thought I had lost my mind.  I probably lost a few that day too.  I don't even remember which gels I used for the Boston, but I do remember that the base was IBD Just Gel Indian Sari (it's a horribly inaccurate photo though).  When I started thinking about what to do for my first blogiversary, it just seemed natural that I would recreate the "Annie Mani."

I started with a base of IBD Just Gel Indian Sari.  Then I broke out my acrylic paints and got to work.  I'm tickled pink with how it turned out.  See, thanks to your encouragement, my nail art skills have come a LONG way! 
Boston Terrier Nail Art

Here's a shot with my inspiration picture.  Bless her heart, Annie is such a gentle soul.  She has been putting up with my shenanigans for years.  lol  She walked around with those stickers on her face for hours that night.
Boston Terrier Nail Art

I think I captured her soulful eyes quite well.  What do you think? 
Boston Terrier Nail Art

Of course, it looks much better from a distance than it does up close.  Here's the proof.  I'm still super pleased with it, though.  My only regret is not using a peel off base coat so I could save it forever.  (Yes, I know I'm a freak.  lol)
Boston Terrier Nail Art

Again, Thank You to each and every one of you who read my blog and give me that kick in the tail I need to keep improving my art.  Stay tuned for the giveaways!  I promise, they're coming and they will be awesome.  A few will be US only due to sponsor restrictions, but others will be open internationally.  :)

~Michelle

*This post uses Amazon Affiliate Links.  Purchases through these links generate commissions that help fund this site.
Read more ...

Friday, August 29, 2014

Holographic Studded Nails (A BPS Review)

Press Sample Affiliate Links

Hello Loves.  Today's mani isn't exactly what I had in mind, but when I started adding these awesome holographic studs from Born Pretty Store to my nails, I just couldn't stop.  This is so outside of my comfort zone, but I love it!  lol
Holographic Studs from Born Pretty Store

I started with a base of, you guessed it, Couture Little Black Dress.  I then planned to add a stud to each nail and then maybe pair it with some stamping, but the studs kind of took over.  I love the punk, yet girly feel of the final mani!
Holographic Studs from Born Pretty Store

My photos didn't capture these studs in all of their glory.  They have a holographic finish, so they really light up.  This is just the non-work-appropriate mani I needed to lift my spirits.  ;)

If these studs aren't your style, Born Pretty has several others to choose from. Click here to check them out. Be sure to check out some of Born Pretty Store's other nail art items too!  Use code MANYX31 for 10% off and free shipping. 

~Michelle

*The studs featured in this post were provided by Born Pretty Store for my honest review.  This post uses Born Pretty Store Affiliate links.  Purchases through these links generate commissions that help fund this site.
 
Read more ...

Wednesday, August 27, 2014

Bundle Monster Gel Polish Oasis Collection Swatches and Review

Press Sample Affiliate Links

Bundle Monster Gel Polish Oasis Collection Swatches and Review

Hello Loves!  I have another Bundle Monster Gel Polish Collection to show you today.  The Oasis Collection!  The Oasis collection is made up of 6 "nude" or neutral shades, 5 creams and 1 shimmer.  This is the perfect "office appropriate" collection.  They are available for purchase on Bundle Monster's website individually or as a set as well as on Amazon.  Like most of the Bundle Monster gels I have tried so far, these are a little on the thicker side in terms of consistency but offer great coverage.

Ready for some swatches?  The first color in the collection is Peaceful Harmony.  Peaceful Harmony is a peach nude shade with a subtle shimmer.  This soft peach applies well but is a little sheer compared to the other colors in the collection.  This one required three coats for full opacity.
Bundle Monster Gel Polish Peaceful Harmony Swatch

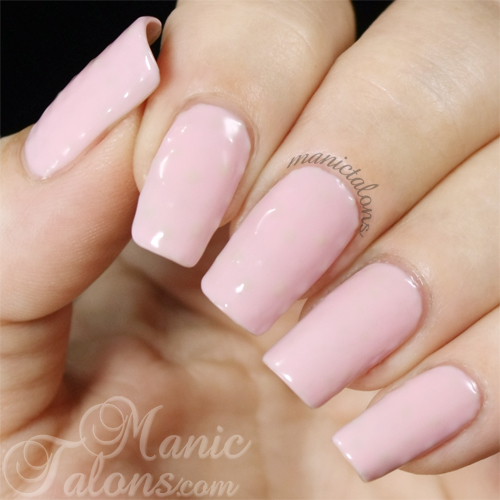
Poised Serenity is a beautiful pink nude cream.  This one applies nicely and is opaque in 2 coats.  Contrary to my usual 3-coat standard, I decided to show this one in two coats.
Bundle Monster Gel Polish Poised Serenity Swatch

Darling Delight is a soft, lavender grey cream.  Like Poised Serenity, it offers perfect coverage in two coats.
Bundle Monster Gel Polish Darling Delight Swatch
 Bundle Monster Gel Polish Darling Delight Swatch


The next three shades are decidedly grey with different undertones.  The first of the greys is Gentle Tranquility. Gentle Tranquility is a soft grey with blue-green undertones.
Bundle Monster Gel Polish Gentle Tranquility Swatch
 Bundle Monster Gel Polish Gentle Tranquility Swatch

Cafe Au Lait is a medium grey cream with olive undertones.  It applies flawlessly and is opaque in two coats.
Bundle Monster Gel Polish Cafe Au Lait Swatch
 Bundle Monster Gel Polish Cafe Au Lait Swatch

Finally, Intoxication is a dark grey cream.  I consider this one to be a true grey.  As with the others, it applies perfectly and is opaque in two coats.
Bundle Monster Gel Polish Intoxication Swatch
 Bundle Monster Gel Polish Intoxication Swatch

I'm quite pleased with the Oasis collection.  I'm not usually a fan of nudes, but I tend to think of nude as beige and tan.  These shades are certainly neutral while still having a slight pop of color that makes them anything but boring.  What do you think?  Which colors in this collection are calling your name?

I would also like to note that Bundle Monster does list the ingredients on their Amazon listings as well as on their website.  I'm not sure if this is a new addition or something I simply missed when I looked for them before, but if you have allergies or sensitivities to gels, you might want to check those out.  :)

I'm working my way through swatching the Woodland Fantasy Collection now, so be on the lookout for a post with those in the near future.  If you're a fan of glitter, you're going to love them!

~Michelle


*The polishes featured in this post were provided by Bundle Monster for my honest review.  This post uses Amazon Affiliate Links.  Purchases through those links generate commissions that help fund this site.

Read more ...

Monday, August 25, 2014

Renaissance Custom Lacquers - Select Swatches and Review

Press Sample

Renaissance Custom Lacquers Swatches

Hello loves!  I have a few fun lacquers from Renaissance Cosmetics to show you today.  Renaissance Cosmetics is an Indie polish company that offers a large range of lacquers with unique finishes that simply aren't available in gel polish.  You know I'm a sucker for unique finishes, and these certainly do not disappoint.

I'm super excited to have the opportunity to show you these today.  I have only recently started branching out into indie polishes over the past year, and I have to admit that the companies I have worked with so far really set the bar high in terms of quality, uniqueness, and customer service.  I'm happy to say that Renaissance Cosmetics falls right in line with the others.  The polishes are very high quality and apply nicely.  I'll go into application more with the swatches, but overall I'm impressed.  Add in the worldwide shipping, and I'm sold!

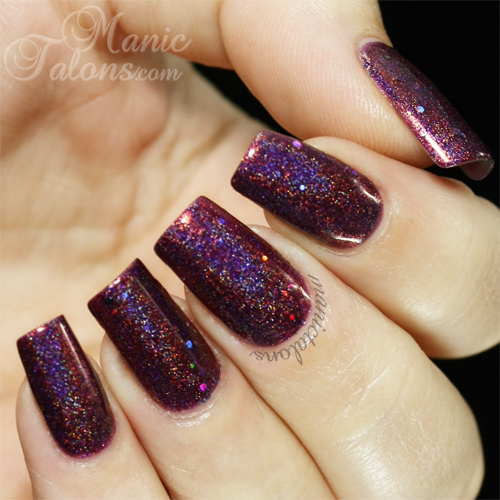
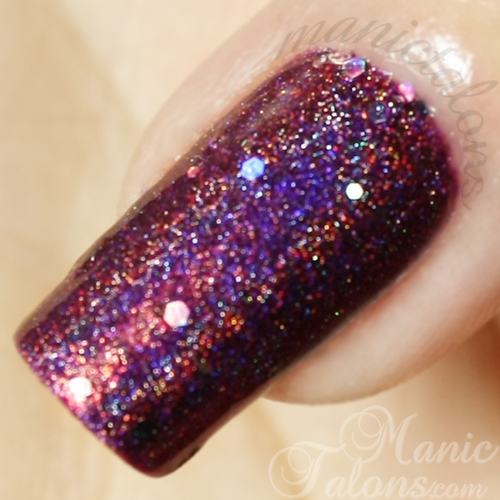
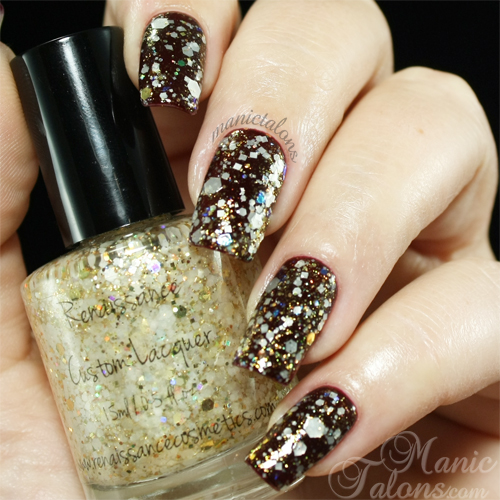
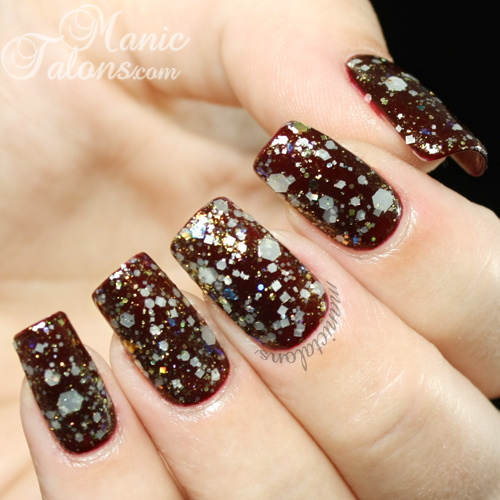
Enough talk.  Ready for some photos?  The first polish I have to show you is Flirt.  Flirt is a wine colored linear holographic polish with larger holographic glitter pieces scattered throughout.  The result is a polish with dimension and brilliance.  This is two easy coats.  I found that the larger glitter pieces did want to migrate down the nail a little, but I had plenty of time to put them where I wanted them before the polish started to set.  Major bonus for a gel user like me who isn't used to polish that actually dries.  ;)
Renaissance Custom Lacquers Flirt Swatch

Renaissance Custom Lacquers Flirt Swatch

Renaissance Custom Lacquer Flirt Closeup

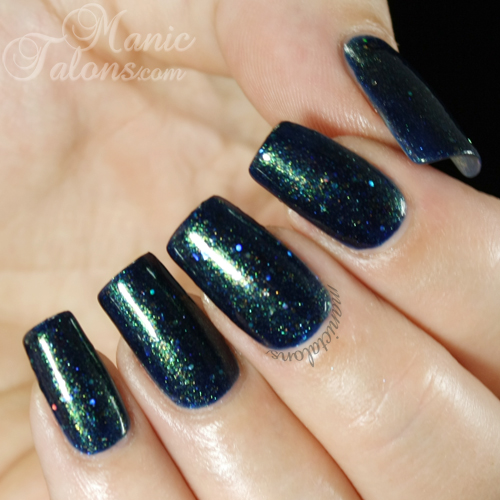
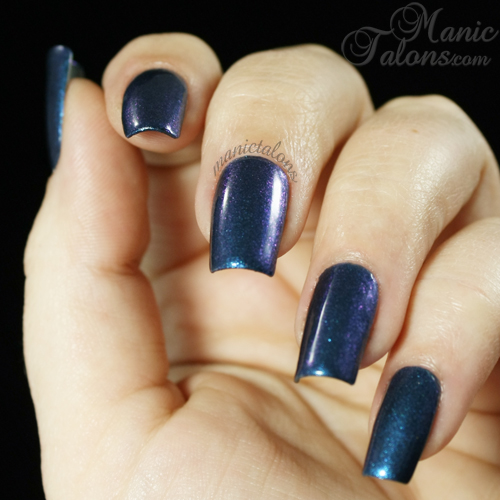
Nightshade is an amazing blue base with a shifty golden/teal shimmer and holographic glitters.  There is no doubt in my mind that Meghan created this polish specifically for me without even knowing it.  This is the kind of shade and finish combo that makes my heart sing!  Like Flirt, this is two easy coats.  I tried to capture it with the light bouncing off the nails from several angles to show the color and the flash.
Renaissance Custom Lacquer Nightshade Swatch

Renaissance Custom Lacquer Nightshade Swatch

Renaissance Custom Lacquer Nightshade Closeup

St. Clair is another polish that makes my heart happy.  You know I love my blues!  This lovely bottle contains an almost metallic blue polish with a subtle purple shift.  This one is also perfect in two coats and applied like a dream.  The shift is quite obvious to the naked eye, but tried to escape my camera.  I think I managed to capture it a little in the final shot.
Renaissance Custom Lacquer St. Clair swatch

Renaissance Custom Lacquer St. Clair swatch

Renaissance Custom Lacquer St. Clair swatch

The last polish I have to show you is one that really surprised me.  It is beautiful in the bottle, but I'm not usually a fan of gold.  In the bottle Porcelain Dream appears to be a glitter topper with mix of white and gold glitter with gold holographic pieces thrown in.  But on the nail...oh my word!  This polish has a little bit of everything!  Golden shimmer, white and gold glitters, holographic glitters, and be still my heart - blue glass flecks!  What's even more amazing is that this is ONE coat over a base of IBD Just Gel Dare To Be Decadent.  One Coat!  This makes it perfect for gel sandwiches.  :)  I did have to place the glitters a little to keep the larger pieces where I wanted them, but like Flirt and Nightshade, I found I had plenty of time before the polish started to set. 
Renaissance Custom Lacquer Porcelain Dream Swatch

Renaissance Custom Lacquer Porcelain Dream Swatch

Renaissance Custom Lacquer Porcelain Dream Closeup

If you're like me and love refreshing your mani mid-week, you seriously need to check out Renaissance Cosmetics.  These polishes are fabulous!  To see more swatches, be sure to follow Renaissance on Facebook and Instagram.

~Michelle

*The polishes featured in this post were provided by Renaissance Cosmetics for my honest review.

Read more ...

Friday, August 22, 2014

IBD Just Gel Sole Review: Solar Color Effects Gel Polish

Affiliate Links

IBD Just Gel Sole Solar Changing Gel Polish Review

Hello Loves!  I finally got my hands on the IBD Just Gel Polish Solé Solar Changing Gel Polishes.  I've been looking for them for a while now.  Naturally, I couldn't resist playing with them as soon as they came in.  ;)

There are two Solé Gels - Blue and Purple.  Both start out as sheer, milky white gels that take on color when exposed to UV light.  Once back in the shade, they return to their original milky white colors.

Want to see them?  I thought you might.  The first is Solé Blue.  Indoors, this one is a sheer, milky white with a slightly blue tinge. Please ignore my stained nails.
IBD Just Gel Polish Sole Blue Swatch Indoors

Outdoors, it quickly changes to a darker blue.  I found that when exposed to UV via my LED lamp, the  color was much darker and completely opaque.  The full afternoon sun, however, didn't cause as much of a shift so the resulting color is a bit sheer.
IBD Just Gel Polish Sole Blue Swatch in Sunlight

Solé Purple is very similar in the indoor phase.  It has a slightly pink tinge.
IBD Just Gel Polish Sole Purple Swatch Indoors

In full sunlight, it takes on a purple tone.  I'm not sure why there are gaps in the color outdoors in this swatch.  It was streak free in my LED lamp.  I suspect the top coat may be thicker in those spots?  The purple does seem to shift a little quicker than the blue and also takes longer to shift back to white after returning indoors.
IBD Just Gel Polish Sole Purple Swatch in Sunlight

Ok, so application is a little tricky with these.  Since they are sheer indoors, it is difficult to tell if you have streak free coverage.  I also was a bit disappointed that they are not opaque in the sun like they were straight out of my lamp.  But...

While they aren't great as wear-alone colors, they are fabulous for fun, solar changing nail art!  They may also make really fun toppers, but I haven't tested that yet.  The shift from milky sheer to color is almost instant and the shift back is very quick too.  They would be perfect for office appropriate nail art that only appears when you leave the office.  ;)

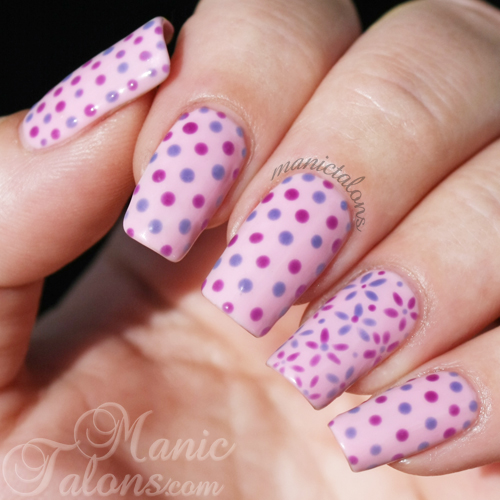
I tried them out with a few dots and flowers over a base of IBD Just Gel Juliet (swatched here). You may notice that my mani appears a little lumpy.  That's because it is.  I kept confusing myself when I was adding the dots (was that dot supposed to this milky white that turns purple or milky white that turns blue?) so I removed them a few times during the process.  I finally realized that a second flash cure would change the color enough to tell what goes next.  lol  Anyway, they're lumpy because I removed the tacky layer from the final coat of Juliet before adding the dots, so they didn't level.  But enough of that.  Here's the indoor mani.  Aside from the lumps, the dots are 99% invisible.
IBD Just Gel Sole Solar Changing Gel Polish Nail Art Indoors

And here's the mani in full sun.  So freaking fun!
IBD Just Gel Sole Solar Changing Gel Polish Nail Art in Sunlight

Sadly, right after I took this picture, a storm blew up and turned the skies dark.  So I couldn't get a good video of them shifting in natural light.  I did get a low quality video yesterday that I shared on my Instagram page, so feel free to check it out there.  I also got the video below with my LED lamp that shows the instant change under the lamp and how quickly the dots and flowers disappear. 


What do you think?  Do you need these IBD Just Gel Solé solar changing gels in your collection?  I'm definitely going to have fun with these!

~Michelle

*This post uses Amazon and Ebay Affiliate Links.  Purchases through these links generate commissions that help fund this site.
Read more ...

Wednesday, August 20, 2014

Glitter Placement with ArtsyFartsy Crafts Diamonds

Hello Loves.  I've wanted to do a glitter placement manicure for a while now and finally found the time to give it a try.  Whew!  I think I'll leave these to the pros like Laura at Polish All The Nails.  (Seriously, Laura has amazing glitter placement skills.  If you aren't familiar with her nail art, go check it out!)  This type of manicure takes some serious patience!  Here's mine.
Glitter Placement Manicure with ArtsyFartsy Crafts Diamond Glitter and Couture Gel Polish

For this mani, I started with a base of Couture Little Black Dress.  You know, my go-to black.  I then added a thin layer of top coat but did not cure it.  This layer of top coat is used to lock the glitter in place later.  The glitters I used are ArtsyFartsy Crafts 2x4mm Blue Holographic Diamonds and ArtsyFartsy Craffts 2x4mm Fuchsia Holographic Diamonds.  After placing the glitters in the uncured layer of top coat, I cured to lock them in place.  I then added a few more layers of top coat to seal the glitter to the nail.

I adore these holographic diamond glitters.  They really shift as the light catches them and create a very fun effect.  Excuse the bubbles in the top coat.  I didn't notice them until it was too late to fix it.
Glitter Placement Manicure with ArtsyFartsy Crafts Diamond Glitter and Couture Gel Polish

I absolutely adore the final result, but this is not exactly what I had planned.  I set out to do a full manicure with full coverage glitter like the pinkie nail.  However, when I added the gel top coat, I found that it really didn't want to stick to the slick surface of the glitter.  I ended up with pits in the top coat from where it pulled away in some areas.  After two more layers of top coat, I finally got good enough coverage, but there were still a few gaps around the cuticle line.  At this point, I decided to switch up the design and skip the full coverage glitter on the other nails.  These worked much better and I achieved full coverage of the glitter with two layers of top coat.
Glitter Placement Manicure with ArtsyFartsy Crafts Diamond Glitter and Couture Gel Polish

What do you think?  Would you rock this mani?  It was super fun in full sunlight.  I tried to take a short video, but every time I stepped outside with my camera, the sun ducked behind a cloud.  Isn't that how it usually goes?  ;)

If these diamond glitters interest you, check out the selection on ArtsyFartsy Crafts.  Sandy has a wide variety of glitter shapes and her prices are great!  I especially love that she offers small quantities that are more than I'll ever need for nail art.  Oh, and her ultrafine holo glitters, glitter mixes and glow glitters are fabulous too.  I swatched and reviewed a few of those in this post.

~Michelle

Read more ...

Monday, August 18, 2014

Mani Swap with Jessica from Be Happy and Buy Polish

Affiliate Links

Hello Loves!  Once again, I have teamed up with the lovely Jessica from Be Happy and Buy Polish for a mani challenge.  Last time we did Quilted Twin Nails and she stomped my creative tail.  This time, it's a mani swap!  I selected one of Jessica's manicures to recreate and she selected one of mine.  Want to see them?  Originals are on the left, recreations on the right.  :)
Manic Talons and Be Happy and Buy Polish Mani Swap

Let's start with Jessica's recreation of my Basket of Roses mani.  In case you missed it, the full details can be seen here.  The basics are pretty simple.  The background in my version was stamped using the Messy Mansion Easter Plate (MM36).  I then freehanded the swirled roses on the tips.  They didn't turn out quite how I wanted them - the top coat smushed the colors together a bit.  Here's my original.
Manic Talons Basket of Roses Manicure

And here's Jessica's version.  She absolutely NAILED it.  Her roses are exactly what I was going for but missed in the original design.  Oh, and that lattice work?  She used striping tape and then freehanded the dividing lines.  Girl has skills!  Be sure to check out her post here to learn which polishes she used in her recreation.
Basket of Roses Manicure Recreation

Ready for my recreation of her mani?  Choosing one of her designs to recreate was a challenge in itself.  She has so many adorable manicures!  I finally settled on this sweet sailboat/nautical design.  Isn't it precious?
Be Happy and Buy Polish Nautical Manicure

Here's my recreation.  I'm pretty pleased with how it turned out.  I think Jessica used striping tape for her version, but you know I hate striping tape and I didn't have vinyls thin enough so my stripes are freehand.  They have a little bit of wonk to them, but they're close enough for me.  ;)
Manic Talons Nautical Manicure

For my version, I used Gelish Deep Sea as the navy, IBD Cosmic Red as the red, and IBD Carte Blanche for the white (swatched here).

While I was preparing this post, I realized I haven't swatched IBD Cosmic Red for you.  This is super surprising as it was one of the first IBD Just Gel Polishes I added to my collection, and it has seen a lot of love over the years.  So, here you go.  IBD Cosmic Red is a red jelly base that is packed with red micro glitter.
IBD Just Gel Polish Cosmic Red Swatch

I also took the time to swatch Gelish Deep Sea.  I have a lot of older Gelish colors in my collection, but I don't wear them very often.  Deep Sea is the one color that I have probably worn most of all of my Gelish.  It is, in my opinion, the perfect navy blue with a subtle red and blue shimmer.  It's just beautiful.
Gelish Deep Sea Swatch

It's the shimmer in Deep Sea that really gets me, and it didn't show up as much as I would like in the swatch photo above.  So you know I had to take a closeup.
Gelish Deep Sea Swatch Closeup

Finally, here's one more shot of my recreation of Jessica's mani.  I do adore this design.  Would you believe this is my first nautical manicure?  Nautical has been on my list of designs to try for a while, and that cute little sailboat made it the perfect choice for this mani swap.  :)
Manic Talons Nautical Manicure Recreation

What do you think?  Did I recreate Jessica's mani as well as she recreated mine?  I told her when she showed me her recreation that I'm going to stop playing with her if she keeps showing me up!  lol

~Michelle

*This post uses Amazon Affiliate Links.  Purchases through these links generate commissions that help fund this site. 
Read more ...