Monday, September 28, 2015

The Future of Manic Talons

I know this is just North America...I didn't have a full world image ;)

Hello Loves.  I have something weighing heavy on my mind right now.  As you know, I recently made the change from a DIY Nail Hobbyist to a Professional Nail Technician.  I'm now embarking on a journey that is a complete 180 for me in terms of my career.  You were right here with me throughout my nail school journey.  You helped me through some low times.  You picked me up when I was down.  You supported me both emotionally and financially to help me reach this goal.  Now that I am here, there is something else for me to consider.  So I have been doing a lot of thinking...a ton of thinking...about the direction of this blog going forward.

I started ManicTalons.com with the goal of providing honest reviews and color accurate gel polish swatches.  Over the past two years, this blog has changed a little as I incorporated different product types, but one thing has remained the same:  Manic Talons has always been primarily DIY themed.  Sure, I have both Pro and DIY readers.  I review a few Pro products that are nearly impossible for DIYers to find, but most of the products I show are easily obtainable.

One thing I have learned as I have joined forums for professional nail techs is this:  a vast majority of professionals are not supporters of DIY.  They believe that pro products should not be available to non-professional users.  They see DIYers as clients that got away.  These are the tools of our trade.  They are the products that set us part and make us money.  In a perfect world, these products would only be available to licensed professionals.  But this is not a perfect world.  As you know, the internet is the DIYer's best friend.  As a DIYer, you have access to products that you couldn't get at the store down the street.


The industry is changing and that is a fact.  Change is Inevitable!  Services that once were available only in the salon can be done at home for those who choose to pursue that route.  I also understand that DIYers are not lost clients.  The vast majority of DIYers do their own nails for artistic reasons, for the control, for the ability to change colors more frequently, for...heck, a million reasons.  There is a split in the industry:  those who frequent salons and those who don't.  I also accept that those who do not frequent salons are not likely to start.  You have taught me that. ;)


So, let's cut through the bull and get real for a second.  Thing is, I completely disagree that the products are what set Professionals apart from DIYers.  A Professional Nail Tech has specialized training.  We have spent countless hours perfecting our craft.  We learn about sanitation, proper procedures, nail anatomy and health.  The products we use are not what set us apart!  We set ourselves apart!  Our knowledge sets us apart.  We are the doctors of the industry (a comparison I use loosely, by the way).  We shouldn't expect our clients to come to us every time they need a coat of lacquer just as a doctor doesn't expect to see a patient every time she has the common cold.  We are here for more advanced services.  A basic manicure isn't about a coat of polish.  It is about cuticle work, nail shaping, overall nail health and that luxurious massage.  It's about pampering and relaxation.  The tools of our trade help us, but they are NOT the key to our success. 

So, now I'm a pro.  What does this mean for Manic Talons?  Should I become a pro only blog?  That would be the most rational answer based on the popular opinion of my new peers.  Or should I continue blogging as I have for the past few years?  Not so popular with my new peers, but this would stay true to those of you who supported me throughout my journey so far.  What of my new clients?  Will it hurt my business to have my tips and secrets out here on the web for them to read?  So many things to consider.  After months of consideration, I have decided how I will proceed with ManicTalons.com.

As I'm preparing to start my new job at Artistic Expressions Hair Salon, we have decided that my business cards will include my blog URL.  I want my clients to be able to learn more about who I am and where I came from.  It is my firm belief that the best service I can provide to my clients is education.  I accept that they will do some things on their own.  Home care is a HUGE part of any salon service.  If my clients want to embark on a DIY journey, I will be here to guide them.  This is not a popular choice, I know.  But I have to stay true to who I am.


So what DOES this mean for ManicTalons.com?  Not much.  I will continue to review both DIY and Professional products.  I will continue to share my thoughts and share my art.  There will be a few minor changes, though.  First, I am going to replace my Monday Nail School Update with a Client Nails series.  Yea for hands that are not my own!  With each photo I share, I'll include the polishes and products used.  There will also be a client nail gallery added to the top menu.  The other change has more of an impact on you, my readers.  In the past, I have linked to products on Amazon when I can.  I will continue to do this for products geared toward DIYers (Bundle Monster, for example).  For pro products, I will link to the official company pages.  Y'all are internet savvy.  You can find them on your own if you want to purchase.  Of course, some of them will be difficult to find (Akzentz, for example) and I apologize for that.  But being pro opens new doors for product reviews and I do have a number of professional nail techs that follow this blog and appreciate those reviews.

So, there you have it.  There will be some minor changes going forward, but Manic Talons will continue serving both DIYers and Professionals as I have for several years now.  After all, it is important to remember where you came from!

I'll be back on schedule with posting soon and I have some fun things to show you.  I hope to "see you around" for many more years to come.  As always, I am happy to answer any questions you might have about products or nail care.  You can reach me easily via my facebook page or by email at manictalons@yahoo.com.

Oh, and because I'm sure you're curious...I am responsible for choosing and supplying my products at Artistic Expressions Hair Salon.  As you can imagine, deciding which lines to carry was extremely difficult!  I have sampled and reviewed so many of them!  So...here's what I will be carrying for now.  I may add others in the future, but these are my startup lines and some of my personal favorites:

Polish:  Cuccio Colour and KBShimmer
Gel Polish:  Cuccio Colour Veneer, Pink Gellac and Madam Glam
Art Paints:  Wildflowers Nail Art Paints and Akzentz Gel Play 
Hard Gel:  Cuccio T3
Skin and Nail Care:  Cuccio Naturale (Milk and Honey line)
(plus a variety of nail art supplies...stamping, crystals, etc...from various sources)

~Michelle

*All links within this post are courtesy links and do not benefit ManicTalons.com
 
Read more ...

Thursday, September 24, 2015

Bundle Monster BMC Stardust Pigment Review

Press Sample Affiliate Links

Bundle Monster BMC Stardust Pigment Collection Review

Hello Loves!  Just popping in with a quick review.  I know I mentioned I would be a little sporadic with my posting, but now I can tell you why!  In a few weeks, I'll be joining the team at Artistic Expressions Hair Salon in Braselton, GA as their new in-house nail tech!  I'm super excited and can't wait to start, but there is so much to do between now and then!  You know, purchasing supplies, collecting MSDS sheets, planning services and prices, starting a business...whew. 

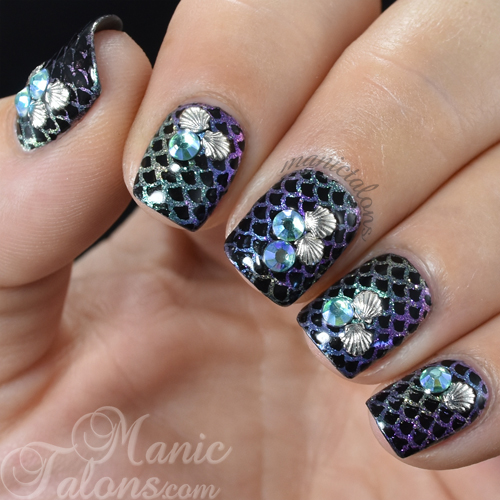
So I decided to take a quick break from all the planning to show you the BMC Stardust Pigment Collection.   This collection consists of four pigments that are shifty and beautiful.  I originally planned to swatch them all for you on my nails, but time became a factor and to be completely honest, I started playing around and ended up with these gorgeous mermaid nails and I can't bring myself to take them off! 

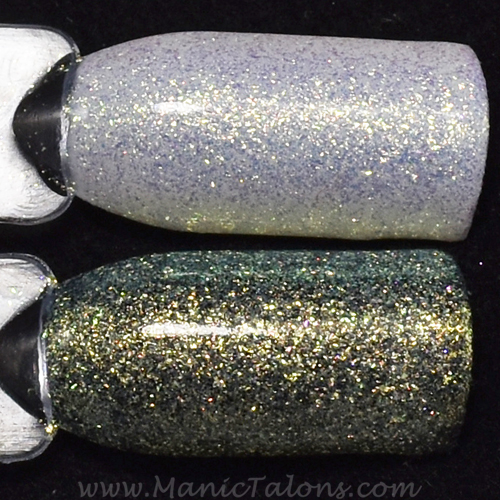
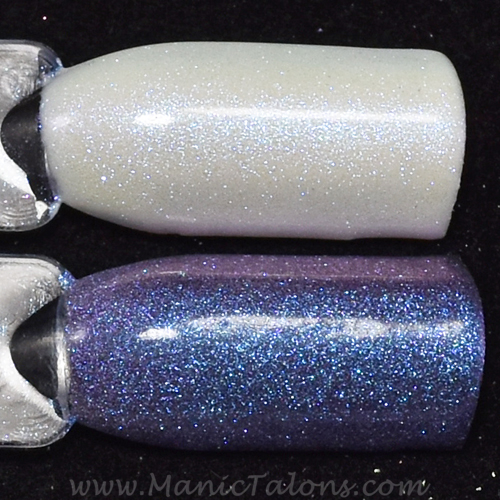
Let's start with some swatch stick swatches and end with my mermaid nail design.  All of these pigments are iridescent shimmers that will look different over various base colors.  I swatched them over black and white to give you an idea of the range they can create.  They are very shifty and have duo-chrome qualities.  For these swatches (and the nail art), I scrubbed the pigments into the tacky layer of the base color. 

Let's start with Andromeda.  I took the photos a little on the dark side to try and capture the shimmer over the white base.  Andromeda has a pink to purple flash.  Over black, she is bold and beautiful.  Over white, she offers a soft shimmer that is only visible when the light hits it just right.  As you can see based on the comparison between the pot and the swatch sticks, the pots are small.  However, the pigments go a really long way!
Bundle Monster BMC Stardust Pigment Andromeda Swatch

Bundle Monster BMC Stardust Pigment Andromeda Swatch

Milky Way is similar to Andromeda in that it provides a shift over black but more of a shimmer over white.  It is different in that the shimmer and shift are golden and chunkier.  
Bundle Monster BMC Stardust Pigment Milky Way Swatch

Bundle Monster BMC Stardust Pigment Milky Way Swatch

Nebula has a green shift and is finer like Andromeda.  It shifts through various shades of green and teal.
Bundle Monster BMC Stardust Pigment Nebula Swatch

Bundle Monster BMC Stardust Pigment Nebula Swatch

Finally, Supernova is the blue shimmer shifter of the collection.  It is fine like Andromeda and shifts from blue to purple.
Bundle Monster BMC Stardust Pigment Supernova Swatch

Bundle Monster BMC Stardust Pigment Supernova Swatch

Now for the nail art.  To create this look, I started with two coats of black gel polish.  I then used a small brush to place each of the pigments into the tacky layer randomly over the nail.  I sealed them with a layer of top coat and then stamped in black with this reverse scale pattern from Lily Anna 09.  Finally, I added a few small silver seashells and shifty blue crystals that I picked up during my New Year's nail art binge order.  I don't remember where I got them - some ebay store I think.  Anyway, I am head over heels in LOVE with the way this one turned out.  The Stardust Pigments gave the base a metallic look while the color shifting crystals and shells give it a touch of whimsy.  :)
Mermaid Nails with BMC Stardust Pigments and Lily Anna Stamping

Mermaid Nails with BMC Stardust Pigments and Lily Anna Stamping

Mermaid Nails with BMC Stardust Pigments and Lily Anna Stamping

I am completely in love with the BMC Stardust Collection Pigments.  In LOVE!  There are endless possibilities here.  I can see myself layering them over various colors, mixing them with jellies and top coats, and creating all kinds of shimmery messes! 

If you would like to add these gorgeous pigments to your collection, you can pick them up on Bundle Monster's Website here or on Amazon here.

~Michelle

*The Stardust Pigments featured in this post were provided by Bundle Monster for my honest review.  This post includes Amazon Affiliate links.  Purchases through these links generate commissions that help fund this site.  All other links are courtesy links and do not benefit ManicTalons.com

Read more ...

Thursday, September 17, 2015

Say Yes to the BCM I Do Collection

Press Sample Affiliate Links

BMC I Do Gel Polish Collection Review

Hello Loves!  I have the Bundle Monster "I Do" Gel Polish Collection to show you today.  This collection consists of 6 soft or sheer polishes.  On their own, they are perfect for natural looks.  Together, they are great for french manicures.  Ready to see them?

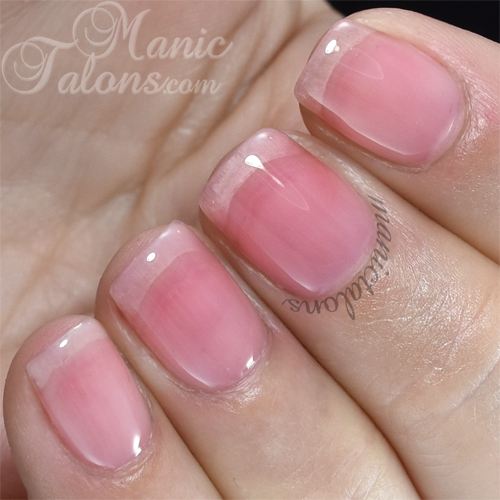
First up is Blushing Bride.  This is your perfect sheer pink base for a french manicure.  In one coat, it gives a very natural pink base.  In two coats, it gives a stronger pink that is commonly seen in an American Manicure.  I swatched two coats below.
BMC Gel Polish Blushing Bride Swatch

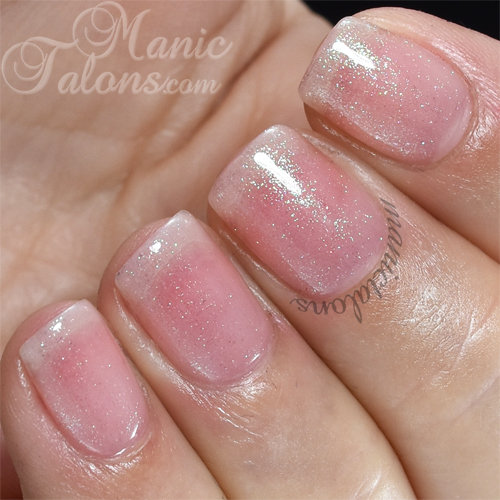
The next polish in the collection is Happily Ever After.  This is Blushing Bride with a soft shimmer.  I swatched two coats here.
BMC Gel Polish Happily Ever After Swatch

Love at First Sight is a soft, pastel pink nude cream.  This one is fully opaque in two-three coats.  Very nice for the natural nude look that is so popular right now.
BMC Gel Polish Love at First Sight Swatch

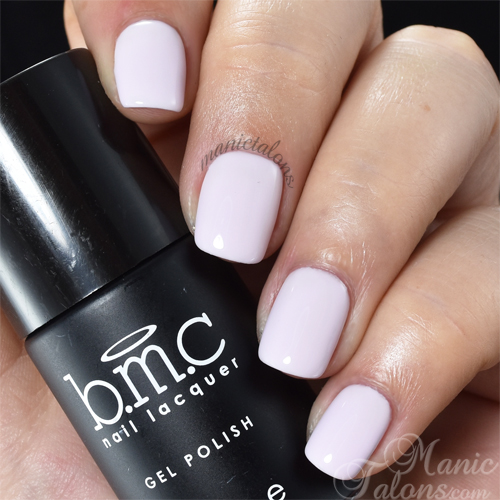
Something New is a super soft, lavender toned white.  In the bottle, it looks much more lavender.  On the nail, it is a soft white with just a hint of purple.  Application was nice and it is opaque in two coats.
BMC Gel Polish Something New Swatch

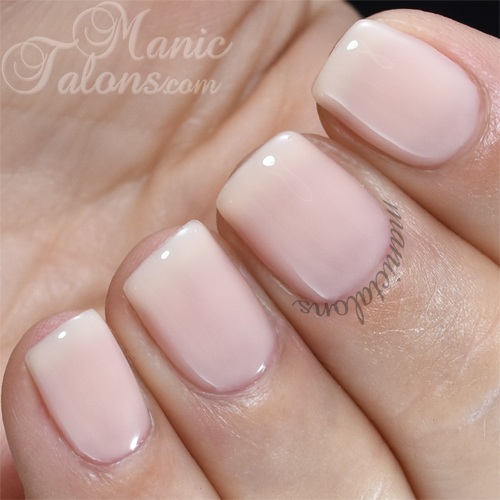
Behind the Veil is my perfect french base.  This is a sheer, milky white that offers a little bit of coverage to conceal imperfections but still allows the natural nail to show through.  I used this one in the french manicure that I'll show you below.
BMC Gel Polish Behind the Veil Swatch

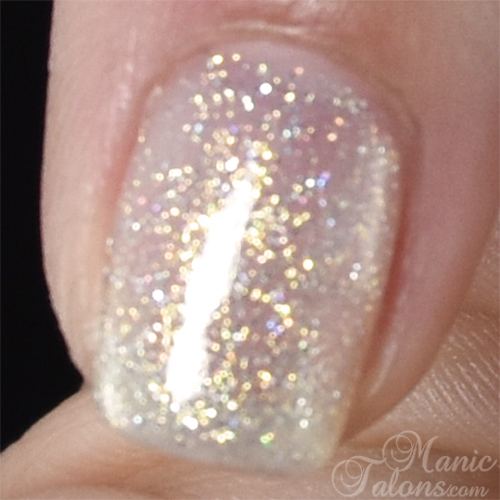
Finally, Glass Slipper is my absolute favorite of the collection.  This is a gorgeous shimmer polish with gold and iridescent shimmer.  I can't tell if the base is clear or a milky white, but the effect is gorgeous.  I swatched two coats below.  Of course, my camera doesn't like to capture the gold shimmer.
BMC Gel Polish Glass Slipper Swatch

Here's a blurred shot that shows the gorgeous bling and gold shimmer!
BMC Gel Polish Glass Slipper Swatch

Bundle Monster also sent me a set of gold and silver mixed studs and clear glass crystals to play with.  The crystals really had me scratching my head for a minute since they have gold backing and don't sit flat on the nail.  Then the perfect design popped into my head!  Ready to see it?

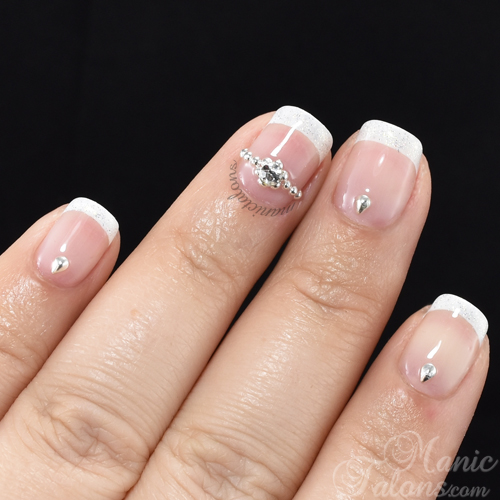
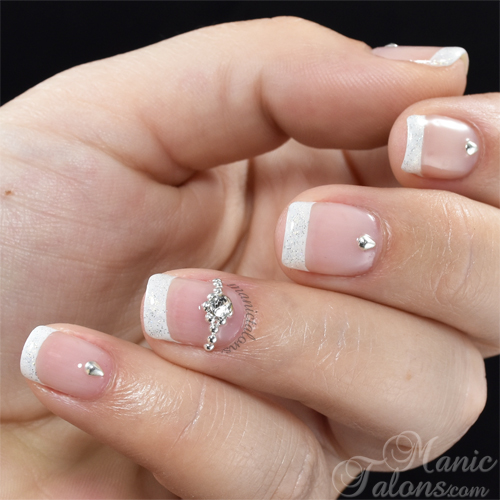
For this mani, I started with my base gel.  I then painted on the french tips with my favorite white gel polish.  I applied two coats of Behind the Veil over the entire nail (including the tip) and finally ended with Glass Slipper over the french tip.  Then it was time to start playing!  I decided the silver studs worked better with this manicure, so I grabbed a few different sizes of round studs and built the base for my ring.  Then I placed the largest crystal on the base, and the end result is this adorable engagement ring!  The tear shaped studs on the other nails are also from the silver wheel.
Bridal Nails with Bundle Monster

I am completely in love with this look!  It is so simple and elegant at the same time.  So I took a ton of pictures.  lol
Bridal Nails with Bundle Monster

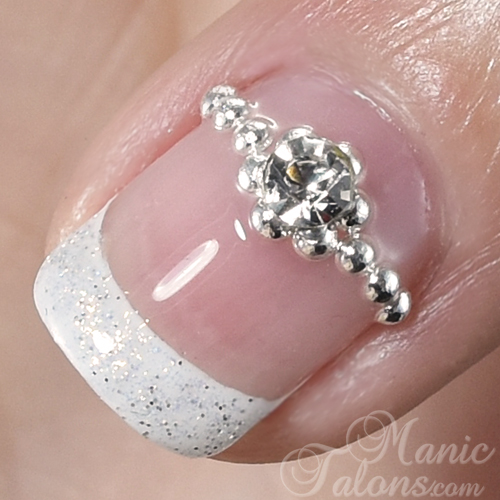
I'm really pleased with how the ring turned out, so I took some close ups too.
Bridal Nails with Bundle Monster

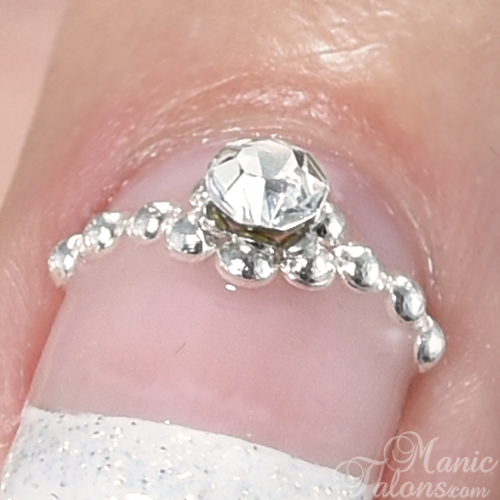
This one shows how the glass crystal sits higher on the nail just like an engagement ring setting.  You can also see the smaller studs that I layered on top of the larger ones for my setting in this shot.
Bridal Nails with Bundle Monster

Ok, one more shot and I'll move on.  ;)
Bridal Nails with Bundle Monster

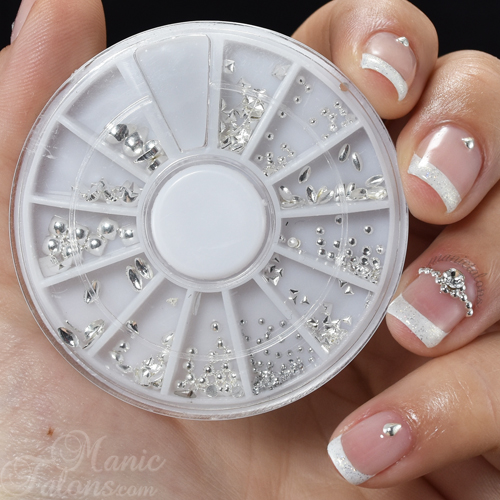
Let me talk about the studs and crystals set for a second.  I was super thrilled to see the teeny tiny studs in this set.  They remind me of the higher priced Japanese studs I have in my collection, but they are much more affordable!  Look at the teeny tiny little dots in the lower right of the wheel.  :)
Mixed Silver Studs from Bundle Monster

I didn't take shot of the gold wheel since I didn't use the studs in this mani, but the pieces are very similar and it also includes some teeny tiny pieces!

Let's take a look at the crystals.  They come in 6 sizes with the one I used being the largest.  The smallest are tiny!
Mixed Clear Crystals from Bundle Monster

What do you think of the I Do Collection?  I personally think it is a nice addition to the Bundle Monster line - especially for french and natural looks.  I'm also in love with this set of studs and crystals!

If any of the colors in the I Do Collection (or the whole collection) needs to join your personal gel polish stash, you can pick them up on Bundle Monster's Website here or on Amazon here.  You can find the studs and crystals set on Bundle Monster's Website here.

~Michelle

*The polishes and nail art pieces featured in this post were provided by Bundle Monster for my honest review.  This post uses Amazon Affiliate links.  Purchases through these links generate commissions that help fund this site.  All other links are courtesy links and do not benefit ManicTalons.com. 


Read more ...

Monday, September 14, 2015

KBShimmer Fall Collection 2015

Press Sample

KBShimmer Fall Collection 2015

Hello Loves!  It's time for KBShimmer's Fall Collection for 2015!  This collection consists of 12 gorgeous new shades.  I have 6 of them to show you today.  I usually have a hard time picking polishes from the new KBShimmer collections, but this time it was excruciatingly painful to choose!  I want them all and will be purchasing the other six as soon as I have a little wiggle room in my budget.  :)  I also have another set of KBShimmer Water Slide Decals to show you.  Ready to see them?
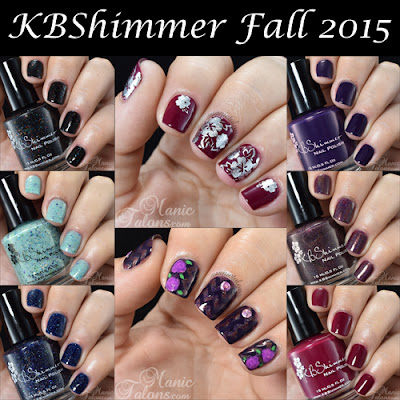
Lets start with the holographic polish in the group, shall we?  Fig-Get About It is a two coat fig toned burgundy.  I have worn this one several times since receiving it for review, and it is fabulous!  Dark and sophisticated with a very strong holographic rainbow.
KBShimmer Fig-Get About It Swatch

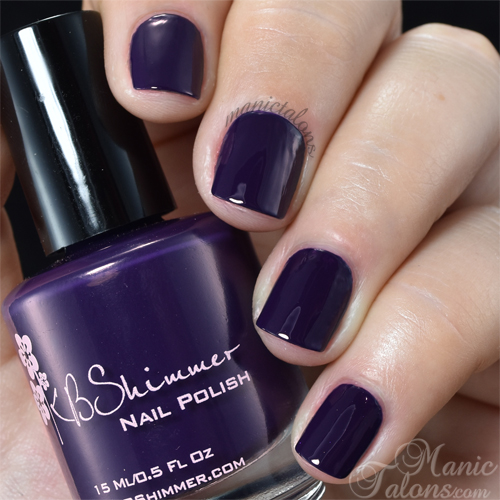
The next polish I want to show you is called Soul Deep.  Soul Deep is the perfect example of a KBShimmer cream polish.  This dark blurple shade (midnight blue with purple tones) is an absolutely flawless one coat polish.  Trust me, when I can get one coat coverage out of a polish, that's saying something!  Polish still defeats me since I'm so used to gel, but I'm getting better at it and a perfect formula definitely helps. :)
KBShimmer Soul Deep Swatch

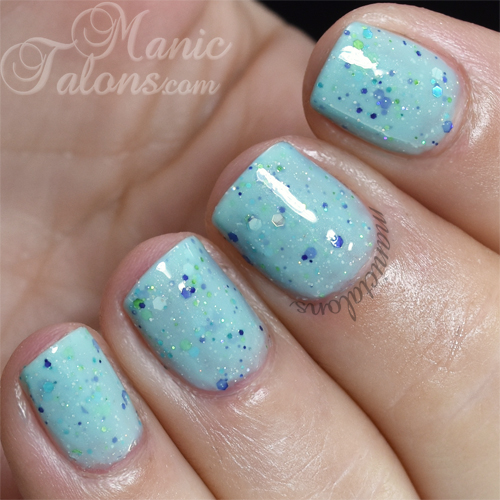
Moving on, I've Seen Sweater Days is a muted teal creally with cobalt blue glitter, lime green holographic glitter, and silver glitter.  This one does require three coats for opacity, but I found it easy to apply with very little glitter placement needed.
KBShimmer I've Seen Sweater Days Swatch

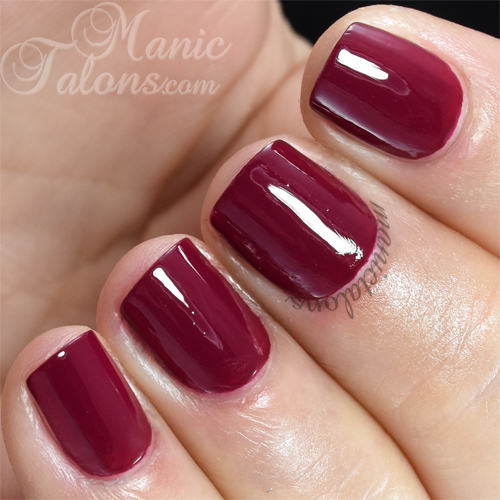
Such a Vlad-Ass is a darkened blood red cream.  The formula is great on this one too and it offers full coverage in two coats.  With that said, I completely flubbed my swatch on this one.  I admit, I was rushing a bit too much and let my top coat brush drag.  Of course, I didn't notice it until I was editing the photos and I was already well into a wear test so I couldn't go back and reswatch it.  I did double check it on my toes (no pictures for proof - you can thank me for that later) and it was definitely my error.  Anyway, here she is!
KBShimmer Such a Vlad-Ass Swatch

The next two polishes I have to show you are something I rarely encounter - they are so perfect that I can't bring myself to put art on top of them!  I'm not even kidding.  Art would take away from these beauties.

Carpe Denim is a dark navy jelly base that is loaded with silver glitters.  I swatched three coats but I could have gotten away with two.  The third just added more depth and bling.  I seriously don't have the words to describe this polish.  It reminds me of a midnight sky, but prettier.  My pictures do not do her justice.
KBShimmer Carpe Denim Swatch

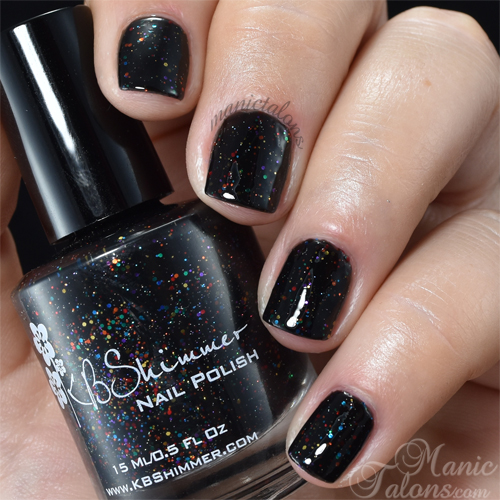
Finally, Dark and Twisty is the other that I can't bring myself to put art over.  This black jelly base is loaded with multiple colors of fine metallic glitters.  It can be layered over black or worn alone in three coats for opaque coverage.  I swatched three coats here and it builds beautifully.  I am head over heels in love with the dark but colorful effect.  When the light hits it just right, the glitters really pop.
KBShimmer Dark and Twisty Swatch

Here's a closeup.  I have a feeling I'm going to wear this one a ton this fall and winter!  Heck, I might even wear it year round.  It's like gems in a murky pool.
KBShimmer Dark and Twisty Closeup

So there you have them - six of the new KBShimmer shades for fall.  But wait!  I'm not done yet!  I also have a few nail art looks to show you.  :)

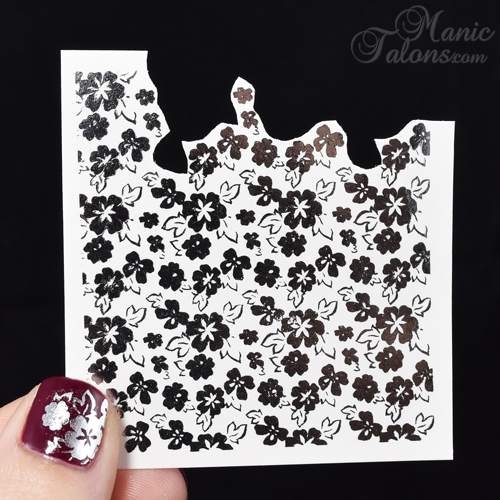
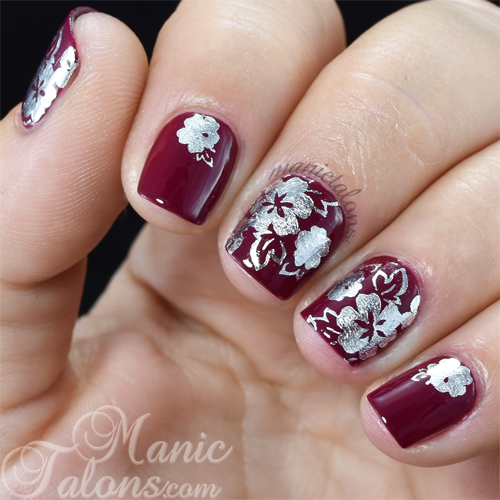
First up is a simple water slide decal mani.  These Silver Floral Water Slide Decals are avaliable from KBShimmer as well.  I love that the decals are a full sheet so I could pick and choose the floral arrangement.  I didn't think to take a picture of the sheet before I started cutting out my pieces, but this shot shows you how much is left after I finished one hand.  You can get a lot of manicures from this sheet!  The flowers look black in the photo, but you can see on my thumb that they are a silver foil effect.
KBShimmer Silver Floral Water Slide Decal

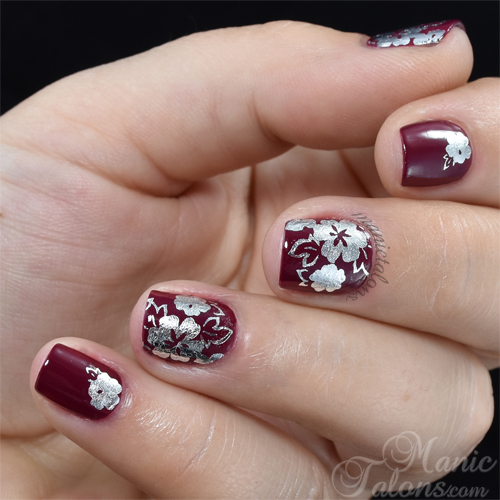
I applied these over a base of Such a Vlad-Ass.  Application was easy as could be.  I simply cut out the floral designs for each nail, popped them into a cup of water for a few seconds, slid the design off of the backing and placed it on my nail.  Then I used a trick that Christy shared on her Periscope a few weeks ago.  This is news to me, so I thought I would share it - you don't have to trim water decals to an exact fit!  Just add your top coat and it will melt the decal into the polish so you can peel the excess away.  Whoa...mind blown!  (Yes, I know.  I'm easily amused.  By the way, this only works with lacquer top coat.  Gel top coat doesn't melt the decal).  These silver foil flowers did lose a little of the foil effect when I added the top coat, though.  As they melted into the polish, they picked up a little texture.  I'll try them with gel polish next time and see if they stay super shiny.  Either way, they're gorgeous!  You can't ask for a quicker or easier nail art option.
KBShimmer Silver Floral Water Slide Decal

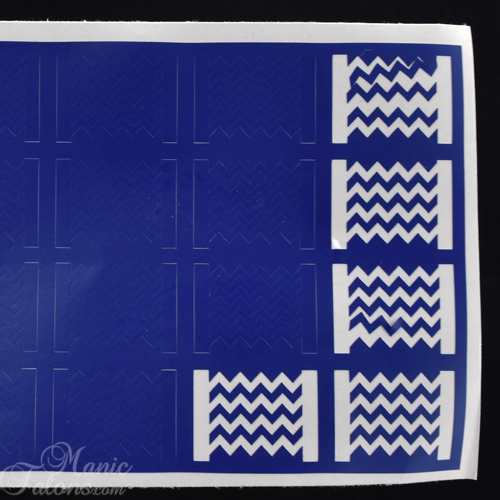
Ok, one more nail art design and I'm done.  I took the opportunity to cash in on free shipping and added some of the KBShimmer Chevron Vinyls with Guides to my order.  I love the looks you can get with chevron vinyls, but I absolutely HATE trying to place the individual strips.  So these connected chevrons are perfect for me.  I tried to get a photo of the sheet before I used them, but it didn't really show the designs very well.  So here's a shot that shows where I removed several of the guides from the sheet.  The full sheet includes 32 Chevrons with Guides.  (Note, there are three individual chevrons left after you peel off the guided piece that can be placed one by one, so it's like a double sheet.) 
KBShimmer Chevrons with Guides Nail Vinyls

I admit, this mani almost killed me.  I wore it for a week and wanted to share it sooooo bad but couldn't because the polishes hadn't been released yet.  I started with a base of Fig-Get About It.  Then I used the Guided Chevron vinyls, alternating the direction of the chevrons on each nail.  I added one coat of Soul Deep over each vinyl and peeled them off for perfectly spaced chevrons.  Whoo Hoo!
KBShimmer Chevrons with Guides Nail Vinyls

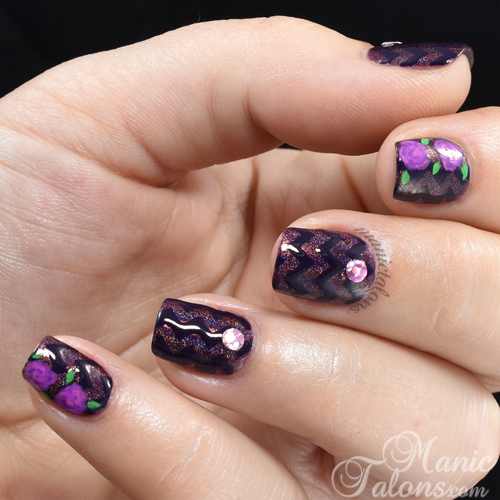
I am a firm believer that there is no such thing as too much purple, so I kept going.  I added a few freehand roses with my Wildflowers Nail Art Paints and tied it all together with some holographic purple studs.  It's a purple overload, but I adore the final result!
Purple on Purple with KBShimmer Fall 2015 Polishes

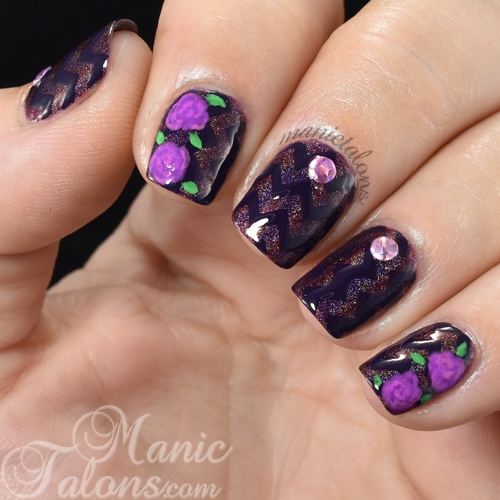
I adore it so much that I couldn't stop taking pictures.  Here's a closeup.  The peek-a-boo holographic effect makes my heart smile.  And y'all know how much I love floral nail art.  So yeah...this one made me very happy.
Purple on Purple with KBShimmer Fall 2015 Polishes

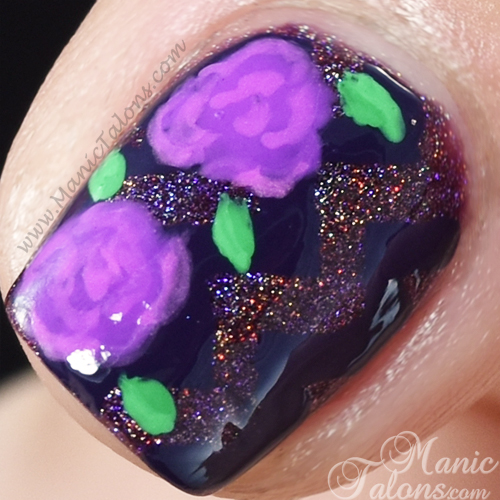
One more shot and I'll wrap this up.  ;)
Purple on Purple with KBShimmer Fall 2015 Polishes

Be sure to check out the other 6 polishes in the Fall 2015 Collection.  One of them glows in the dark!  And while you're at it, take a peek at the other Water Slide Decal offerings and Nail Vinyl offerings.  KBShimmer has some gorgeous designs to choose from, including this blue floral water slide decal I reviewed previously.

The KBShimmer Fall 2015 Collection is available now as a full set with a free Clearly On Top topcoat.  The individual polishes will be available for purchase tomorrow (September 15, 2015).  If you look today, you'll notice the individual colors say "Sold Out."  No worries - they have plenty of stock and those "Sold Out" labels will disappear when the individual polishes are open for sale.  :)  Be sure to look, though!  Christy has loaded blogger swatches so you can window shop the other colors now too if you don't want the full set. For my international readers, the KBShimmer Fall Collection will be available via Harlow & Co.

~Michelle

*The KBShimmer Nail Polishes and Water Slide Decals featured in this post were provided by KBShimmer Bath and Body for my honest review.  The Chevron with Guides Nail Vinyls were purchased by me.  All links within this post are courtesy links and do not benefit ManicTalons.com. 

Read more ...