Monday, March 30, 2015

The Nail School Chronicle: Week 17 (Bonus Purjoi Announcement)

Press Sample Affiliate Links

The Nail School Chronicle Week 17

Hello Loves!  Week 17 of nail school is now behind me.  Whew...I'm on the downhill slide now.  I'm still behind in hours, but I'm staying late every Monday to make them up and hopefully I can still make my May 15 graduation date.  I can't believe how close it is getting!

So, what happened in school this week?  I've got nothing.  Ok, that's not true.  It was a fun and busy week, but I didn't get any photos to share.  We did start the chapter on artificial enhancements this week.  Crazy right?  I've been working with acrylic since the first week of class, so the chapter seems a little late to me.  It's all part of GCI's rolling curriculum.  Since you can technically enter the program any Monday, the chapters might not always occur in the most logical order.  Either way, it's a fun chapter and we're starting the gel portion next week.  Needless to say, I'm looking forward to that one.

Ok, since I don't really have anything groundbreaking for the school update, how about we make this post a little fun?  I've been itching to sit down and do a mani on myself without having to stop and take a million pictures along the way, so I did just that this past weekend.  No swatches to go with it, but I promise I'll get to those soon.  I originally planned to do an Easter mani, but it just didn't end up that way.  lol  Want to see it?

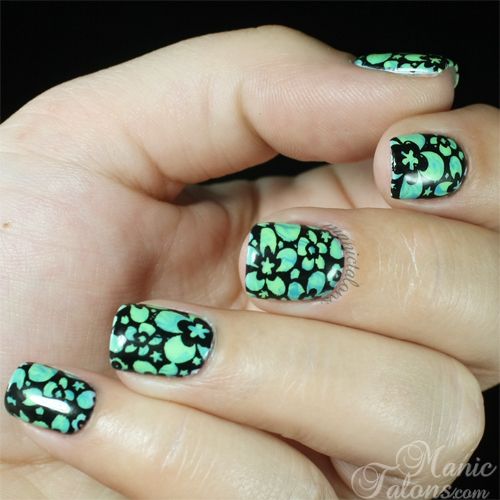
Stamping over a Marbled Purjoi One Step Base

For starters, I broke my middle nail again so I'm back to shorties.  Even worse, I have a low split on that nail that is below my smile line, so I had to do an acrylic overlay to hold it until it grows out a bit.  So excuse the fat nail.  I couldn't slim down the sides as much as I wanted since the acrylic needs to be a tad thicker to support the break.  Gah!  But at least I got a repair credit for it.  lol  I hate the condition of my nails right now.  I keep telling myself it will all be worth it once I graduate, but I really miss my long, beautiful, natural nails.  Since I've sworn off using my own hand for practice, I can see strong new growth on each nail...but it will be a while before they are back to their previous glory.  :(

Anyway, the base for this one is a fun marble with Purjoi One Step Gel in Calm Waters and Sweet as Pie.  Calm Waters is a beautiful medium blue and Sweet as Pie is a slightly bright lime green.  As I mentioned earlier, I'll swatch them for you soon.  Purjoi One Step Gels are super easy to marble since they are thicker.  I applied and cured a coat of Purjoi French White as my base for the marble.  The I applied one coat of Calm Waters.  I added a few blobs of Sweet as Pie to the wet layer of Calm Waters and swirled them together with a dotting tool.  Once they were sufficiently swirled, I cured them.  I then stamped with an image from MoYou London Pro 13 (XL) and Mundo de Unas Black.  It definitely isn't Easter-y, but I love how it turned out!
Stamping over a Marbled Purjoi One Step Base

Speaking of Purjoi, I'm hosting a PurJoi giveaway on Instagram!  Swing by my IG account and look for the following photo to learn how you could win 2 Purjoi colors of your choice!
Purjoi Instagram Giveaway Image

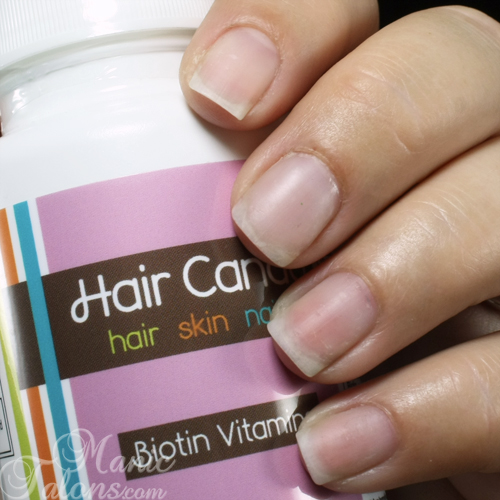
Finally, I have an update on my progress with the Hair Candy vitamins I received to review.  You may remember I shared a completely unedited (other than crop and watermark) photo of my nails in my Week 14 update.  Not only are my nails wrecked from experimenting on my own hand, but the skin around my nails was in super sad shape.  I've been taking the vitamins for 3 weeks now and I have a progress photo to show you.  Like before, this is completely unedited other than cropping and rotating.  You'll notice my poor broken middle nail that is being supported by a clear acrylic overlay.  All of my other nails are naked.  I don't really see a difference in my nails yet (totally expected since you can't really heal damage to dead cells), but my skin is definitely improving!  It's still rough, but no where near as bad as it was.
Hair Candy Vitamins Nail Progress Week 3

Here's a side-by-side comparison with the first week and now.  The improvement is undeniable!  As with the before shot, I did not apply lotion or oil before taking this photo.  I washed my hands and allowed them to dry.  That's all. 
Hair Candy Vitamins Nail Progress Comparison

I have 5 more weeks to go on my trial, but I'm excited by the results so far.  I haven't changed anything else in my routine other than adding the vitamins.  Given, the main ingredient in Hair Candy is Biotin, which is known for helping hair, skin and nails.  But Hair Candy also has a nice mix of other vitamins too and I wasn't taking a multivitamin before starting this one.  I can definitely tell a difference in my energy levels too.  I'll keep you posted as I continue my trial.  :)

That's all for this week.  Don't forget to swing by my IG account and enter my Purjoi giveaway!

~Michelle

*This post uses Purjoi and Amazon Affiliate links.  Purchases through these links generate commissions that help fund this site.  The Hair Candy sample reviewed in this post was provided by Hair Candy for my honest review.  
 
Read more ...

Friday, March 27, 2015

Cuccio Colour Veneer Venice Beach Collection

Press Sample

Cuccio Colour Veneer Venice Beach Collection Swatches

Hello Loves!  I have the new Cuccio Colour Veneer Venice Beach Collection to share with you today.  This is one of the two new collections for Spring/Summer 2015.  It consists of 4 stunning creams, 2 shimmers, and 2 super fun glitters.  I'm loving Cuccio Colour Veneer more and more each time I apply one! Want to see them?

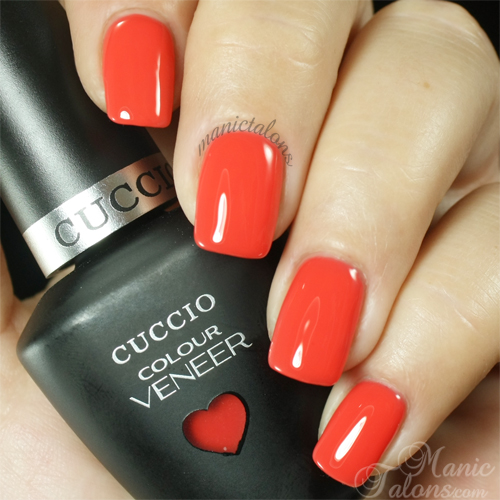
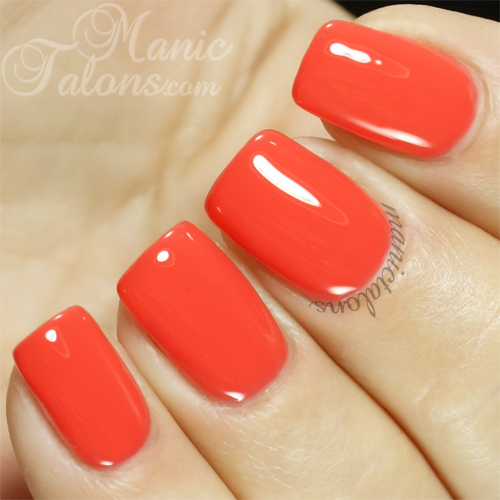
California Dreamin' is a stunning orange leaning coral cream.  It is opaque in two coats and applies beautifully.
Cuccio Colour Veneer California Dreaming Swatch

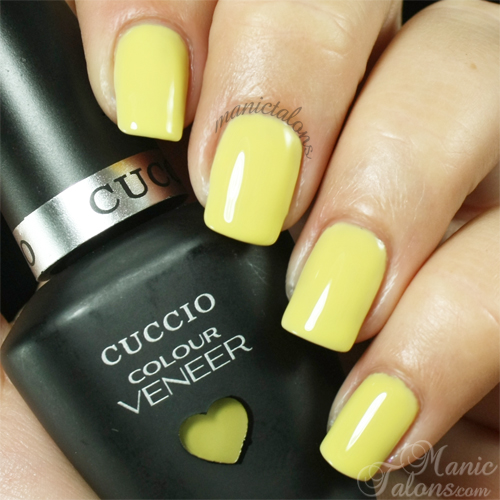
Good Vibrations is a soft, banana yellow cream.  Or is it a soft sunshine yellow?  Heck, I don't know, but it is opaque in two coats and also applies nicely.  It is a little brighter in person than it appears against my pale skin.
Cuccio Colour Veneer Good Vibrations Swatch

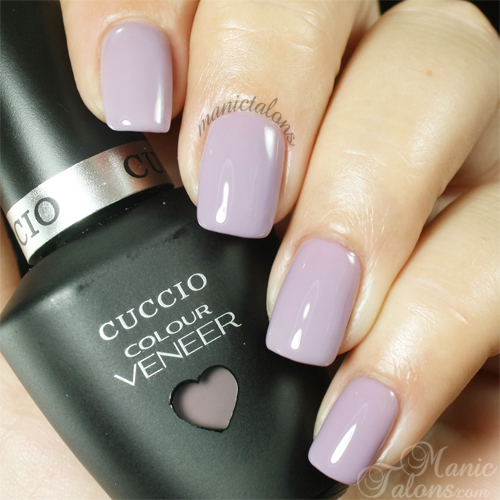
Soul Surfer is a sweet, slightly muted lavender cream.  Like the two before it, she is also a two coater and applies beautifully.
Cuccio Colour Veneer Soul Surfer Swatch

Ah yes...the color I hate to love.  You guessed it...Muscle Beach is a green leaning teal cream.  Another two coater with awesome application.  And once again, my camera refused to capture it accurately.  I fought with it for a week and just couldn't get it right.  Such a shame, because this is the most beautiful color in the entire collection!  So, here's what I ended up with, but it is much more vibrant in real life.  Over the week I've worn it, I've gotten so many compliments on the color!
Cuccio Colour Veneer Muscle Beach Swatch

Angela from the Cuccio Swatch Group on Facebook snagged this shot of her swatch with the closest Pantone color match and gave me permission to share it with you.  Hopefully this will help you visualize the color a bit better if you look up that Pantone color.  :)  It still drives me nuts that cameras hate to pick up the greens in these teals!
Cuccio Muscle Beach with Pantone Reference

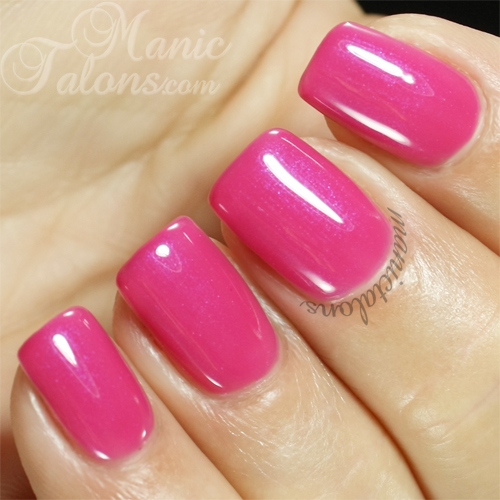
Moving on to the shimmers, Pink Cadillac is a sweet, medium pink with a purple flash.  This is probably my second favorite color in the collection and is also a two coater.
Cuccio Colour Veneer Pink Cadillac Swatch

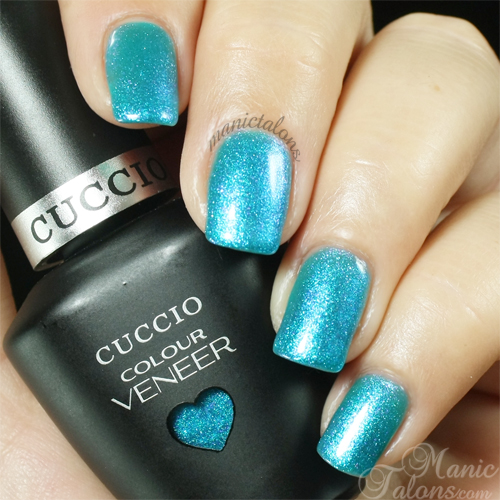
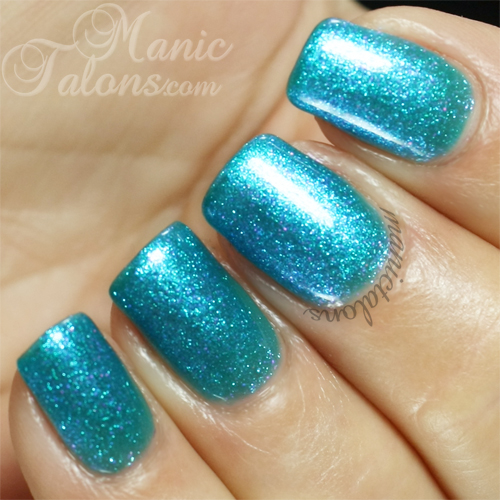
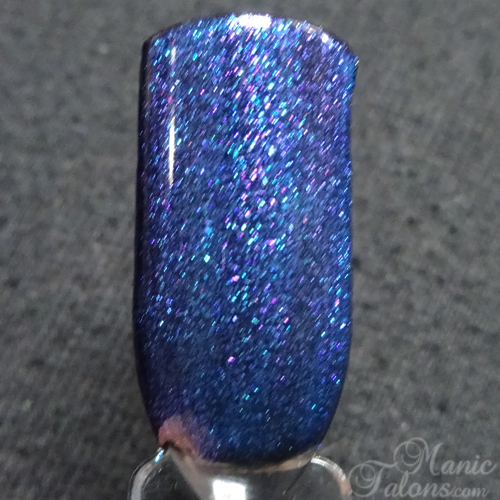
Roller Skate is a bit different than the others in that I needed 3-4 coats for opacity, but this beautiful blue has a purple shift that my camera wouldn't capture.  Layered over a darker color, the shift pops much more.
Cuccio Colour Veneer Roller Skate Swatch

I layered it over a black base here to try and capture the shift.  You can see the purple specks a little better, I think?  I had to soft focus a bit to capture it.
Cuccio Colour Veneer Roller Skate over Black

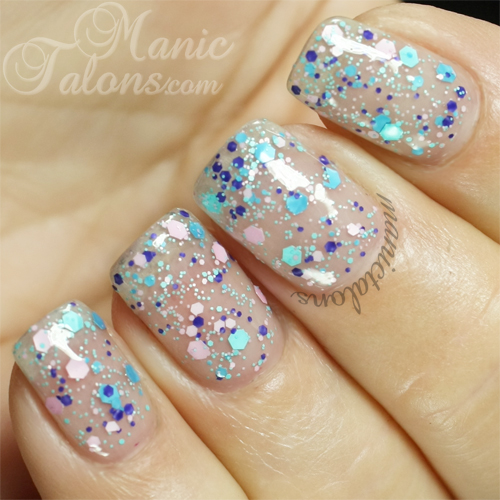
Ready to see the glitters? A Star is Born is a clear base with a mix of multiple sized glitters in light pink, light blue and dark purple.  Super fun, right?  I love this one for spring!  This is two coats.  It did require a little bit of glitter placement, but application was easy enough for a chunky glitter.
Cuccio Colour Veneer A Star is Born Swatch

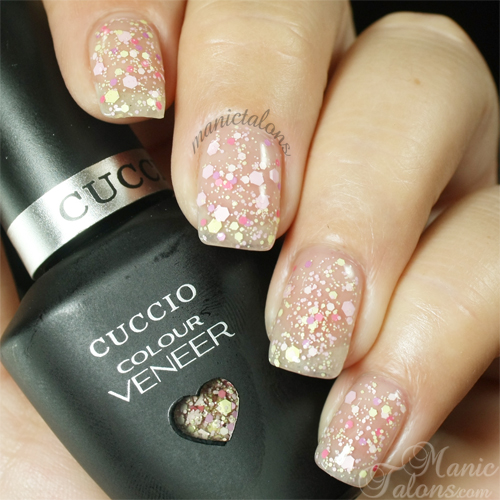
The second glitter in the collection is Mimes and Musicians.  This one has multiple sizes of glitter in light pink, yellow, pastel purple and dark pink in a clear base.  Application was the same as A Star is Born.
Cuccio Colour Veneer Mimes and Musicians Swatch

What do you think?  I'm personally really digging the glitters.  They remind me of the combinations we see from Indie polish makers for regular lacquer, and I'm super excited to see them in a gel polish!  If they haven't already, these beauties should start showing up at your favorite distributor very soon!  Of course, they are available now through Cuccio Naturale's website here.

~Michelle

*The Cuccio Colour Veneer Venice Beach Collection featured in this post was provided by Cuccio Naturale for my honest review.  All links included in this post are courtesy links and do not benefit ManicTalons.com.
Read more ...
Wednesday, March 25, 2015

BMC Hawaiian Escape and Sedona Collections

Press Sample Affiliate Links

BMC Hawaiian Escape and Sedona Collections

Hello Loves!  As promised, I have TWO Bundle Monster Gel Polish collections to show you today:  The Hawaiian Escape Collection and the Sedona Collection.  Let's start with Hawaiian Escape and end with Sedona.

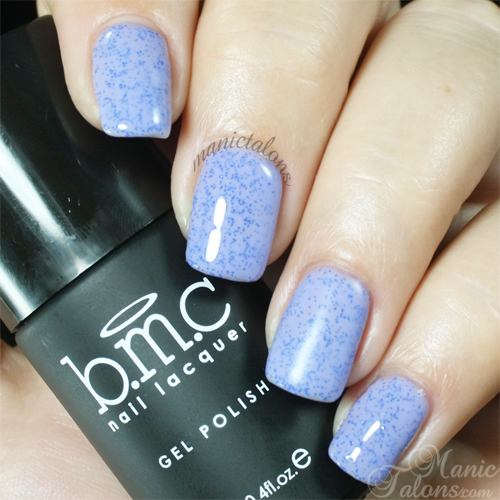
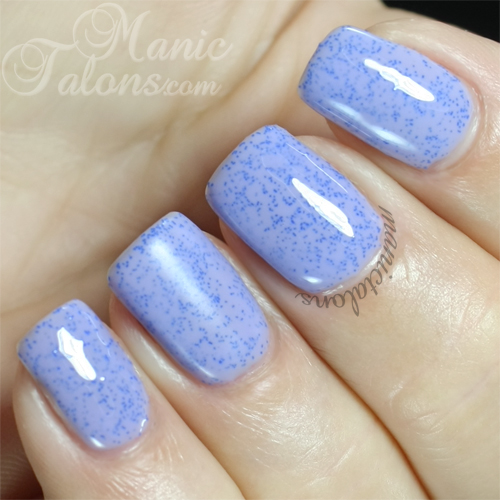
To my knowledge, the Hawaiian Escape Collection is the first gel polish collection of it's kind.  To create the illusion of texture, this collection actually has sand in it!  The result is similar to what you might get if you applied a top coat over one of the OPI Liquid Sand polishes:  Depth and texture with a smooth finish.  They make me think of little, speckled Easter eggs!

Before I show you the swatches, I should mention a few things:
  • These polishes are not textured to the touch.  They only look textured.
  • They are designed to be one coaters.  The polish itself is quite thick.  Apply them in three, even strokes for even sand coverage.
  • After you cap the free edge, you might need to press the edge with a dry brush to remove any sand that is sticking to the edge.  Otherwise, the tips of your nails will be a little rough and uneven.
  • Your coats might need to be a little thicker than you would usually apply due to the sand.  I haven't found the thicker coats to be an issue for wear.

Ready to see them?

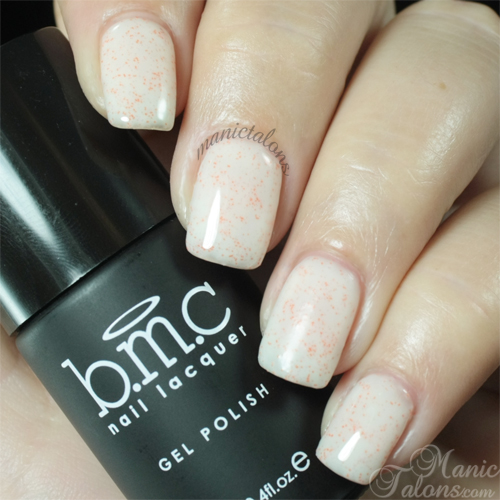
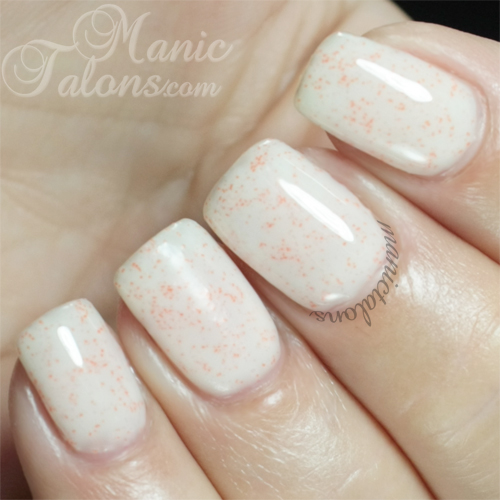
The first polish in the collection is a pale, peachy beige base with orange sand called Coco-Nutty.  The base in this one is what is often referred to as a "crelly" finish in the Indie Polish world.  It isn't an opaque cream, but it isn't a jelly either.  It's a semi-sheer, "squishy" finish.  For this swatch and the others in this collection, I used a regular gel top coat on the index, middle and pinkie nails.  I used a matte top coat on the ring finger to show you how they look matte.  :)  (P.S.  I'm nursing a few low splits, so I'm wearing a gel overlay under the gel polish in these photos - this makes it appear a little thicker than it would be without the overlay.)
BMC Gel Polish Coco-Nutty Swatch

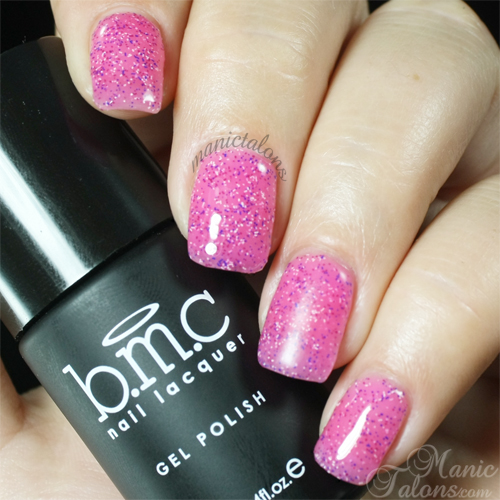
The next polish is a beautiful, fuchsia pink jelly base with dark purple, pink and white sand called Guava Drop.  This one might be my favorite of the collection and is much prettier in person than in my pictures.  The depth from the jelly base freaked my camera out a tad.  It couldn't decide where to focus!  lol
BMC Gel Polish Guava Drop Swatch

Papaya Passion is an almost neon orange crelly base with red sand.  I couldn't get this one to photograph quite right.  It is a bit brighter and less pastel in person.
BMC Gel Polish Papaya Passion Swatch

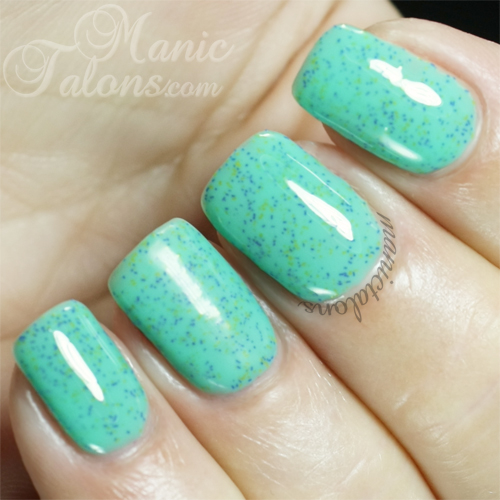
Poha Picker is a slightly blue leaning, green crelly base with dark blue and yellow sand.  The base makes the yellow sand look neon green.  :)
BMC Gel Polish Poha Picker Swatch

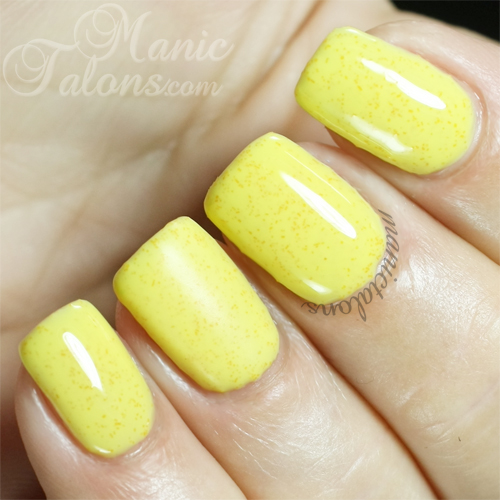
Lilikoi Lover is a pastel yellow base with orange sand.  I found the sand less noticeable in this one.  It kind of fades into the base.  This one also gave me trouble with application.  I ended up using two thinner coats to get even coverage.
BMC Gel Polish Lilikoi Lover Swatch

Finally, Kula Lavender is a pastel purple base with dark blue sand.  This is my second favorite in the collection.
BMC Gel Polish Kula Lavender Swatch

What do you think of these super unique gel polishes?  Would you wear them?  I think they're adorable!  You can pick up the set or the singles on Bundle Monster's Website here or on Amazon here (the Amazon listing shows Poha Picker first, but the other colors and the set are an option under the same listing).

Moving on to the Sedona Collection.  Sedona is made up of three thermal gel polishes.  Bundle Monster is killing it with the thermals lately!  Like previous collections, Sedona does not disappoint.  All three of the shades in this collection are tri-colored thermals.  I have swatched them in their primary phases (warm, transition and cold) but will show you the super cold phase on swatch sticks at the end.  The super cold phase really only shows up in cold winter weather or in the presence of ice water.  ;)  Ready to see them?

I'll start with the one that many of you have asked about.  Purple Rain is a soft, pastel purple in the warm phase and a deep, red toned purple in the cold phase.  It has an iridescent green shimmer that adds a subtle sparkle.  It is opaque in two coats in both the warm and cold phases.
BMC Gel Polish Purple Rain Swatch

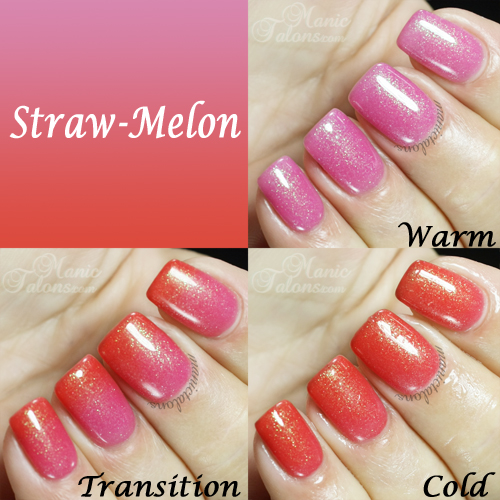
Straw-Melon is a soft, shimmery pink when warm and a hot, strawberry red when cold.  Like Purple Rain, Straw-Melon also has an iridescent green shimmer.  Straw-Melon is also opaque in two coats in both phases.
BMC Gel Polish Straw-Melon Swatch

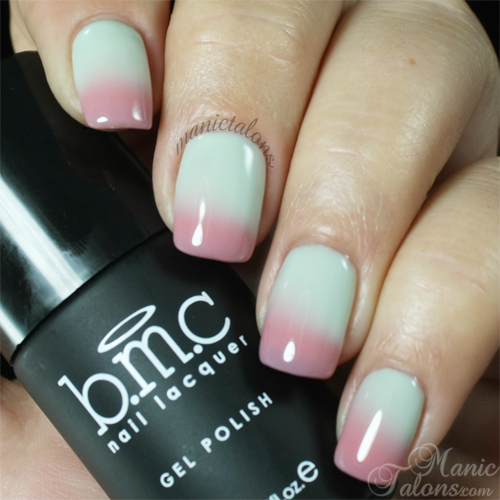
Finally, Summer Daydreams is a soft, pastel/mint green in the warm phase and a soft, pastel pink in the cold phase.  This one is a true cream.  Summer Daydreams was a little trickier to apply for me.  I found it needed 3-4 coats to be fully opaque without streaks.  The end result is definitely worth the extra coats in my opinion.  :)
BMC Gel Polish Summer Daydreams Swatch

As I mentioned above, all three of these shades are tri-color thermals.  In extreme cold (or exposure to ice water), they take on another color.  Since it is a bit warmer here now and I didn't want to completely waterlog my fingers, I decided to show you on swatch sticks.  :)

From left to right:  Summer Daydreams takes on a blue toned purple in extreme cold.  Straw-Melon takes on a deep, reddish brown in extreme cold.  And Purple Rain takes on a deep wine shade in extreme cold.  I can't wait to wear these next winter!
BCM Sedona Collection Tri-color Thermal Effects

Purple Rain and Summer Daydreams are currently out of stock as single polishes on Bundle Monster's website and on Amazon.  They do appear to be available as part of the three piece collection (linked above).  However, they should be back in stock as singles sometime in the next few weeks.  So if you want them, keep an eye out for the restock. :)

~Michelle


*The Bundle Monster Hawaiian Escape and Sedona Collections featured in this post were provided by Bundle Monster for my honest review.  This post uses Amazon Affiliate Links.  Purchases through these links generate commissions that help fund this site.  All other links are courtesy links and do not benefit ManicTalons.com
Read more ...

Monday, March 23, 2015

The Nail School Chronicle: Week 16


Hello Loves!  Another Monday is upon us, and you know what that means - another nail school update!  Goodness...I'm not even sure where to start.  We had another nail art contest...plus the usual repetition stuff...and oh yeah...Bob.
Who is Bob?  Well, you see...what happened was...we came in Monday morning to find a new addition to the nail area.  Someone had placed a very sad looking tree beside the classroom door.  When I say sad, I mean just lost your puppy sad.  I didn't think to get a full picture of it (or any picture, really...but I borrowed one from Nicole).  Anyway, this is a very sad tree with a serious gangster lean.  You pretty much have two choices - turn it so that it leans out into the walkway or turn it so that it rests against the wall.  Either way, we kept running into this danged tree as we tried to enter the classroom.  So they moved it.  Where did it end up?  Right beside the nail station where I usually sit.  After continuing to run into the freaking thing, I decided it needed a name.  Bob.  Yes, Bob.  Why did I name it Bob?  Because every time I left my station for any reason, I found myself having to bob and weave to keep from ending up with a tree in my face and Weave would be a really strange name for a tree. :)  You might think I would learn after running into it the first time, but no.

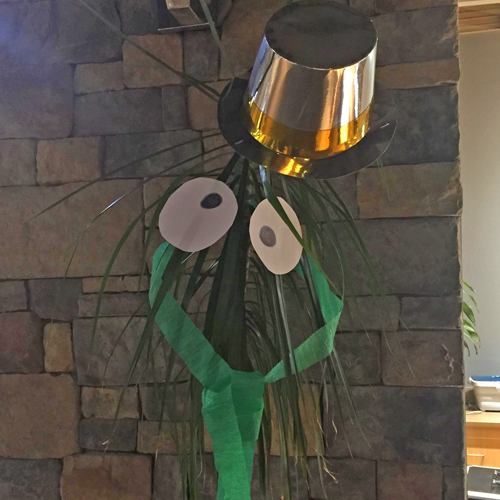
So Tuesday rolls around, and I'm still running into that stupid tree.  The entire building was decorated for St. Patrick's Day, so I decided Bob needed a little sprucing up too.  With a little help from Nicole, Bob got a face lift...err...Bob got a face.  lol  Meet Bob.  Would you believe I still ran into him even with the silly hat?
Bob the Sad little Tree

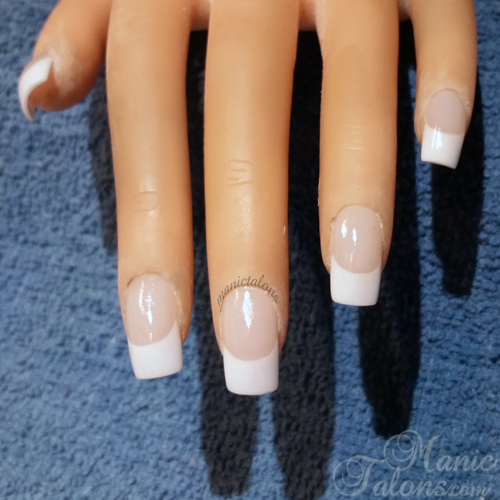
Ok, moving on.  I figured it's time for another then and now comparison on my acrylic work.  I still hate acrylic, but I've been working on my sculpts using the reverse method.  My instructor can usually look at a practice hand and immediately tell if we used tips or sculpted over forms.  I took this hand to her and she asked if I used tips.  Whoo Hoo!  I take that as a HUGE compliment and an indication that my shaping on my sculpts has greatly improved.  So, here they are - basic pink and white sculpted acrylic using the reverse method (reverse is where you shape the pink first, file the smile line, then sculpt the free edge in white over the form...standard method sculpts the tip first and then adds the pink).  Given, they could use a little more buffing or a gel sealer, but I'm pretty pleased with them.  Finally, a set of nails I would actually pay for! 
Pink and White Acrylic Sculpts with Reverse Method

And just for a fun comparison, here's the first set of sculpted pink and whites I did 15 weeks ago.  I'd say I've improved 1000 times over, wouldn't you?  lol

Moving on...the nail art contest this week was St. Patrick's Day themed.  There were some really fun ideas in the competition.  Want to see them?  I can't remember who did what except for two of them.  Sorry about that.  If any of my classmates are reading, please let me know which hand is yours in the comments and I'll edit the post to give credit!  I also didn't have much time to snap pictures and a few of them ended up a little blurry.


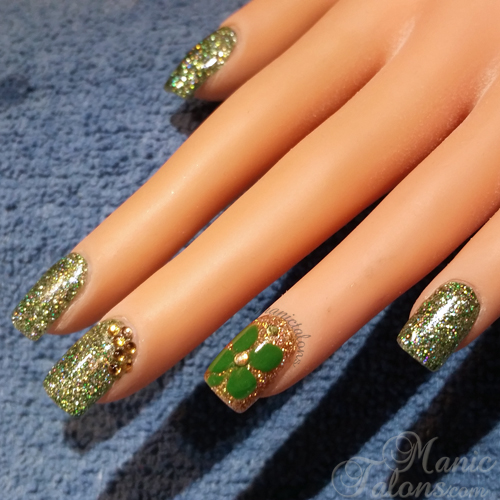
Now for the ones I know:  This one is mine (though I'm sure you could have guessed).  I don't know why, but I tend to use these nail art contests to try new things.  Crazy, right?  I mean, it would make more sense to stick with what I know and have mastered, but I've pretty much accepted that I'll always lose to Nicole anyway.  Might as well try something new.  lol  For this one, I used tips and and my ArtsyFartsy Crafts glitters for an overlay.  The middle finger has a few gold crystals, but the ring finger is my true pride and joy.  That's an inlaid clover that I sculpted out of colored acrylic.  I added a few crystals for accents, then encased the entire thing in clear acrylic so the surface of the nail is super smooth.  In hindsight, I should have added some accents to the clover with acrylic paint before encasing it with clear.  Live and learn.  This is the first time I've attempted an inlay, and I'm pleased with how it turned out.  I was even more pleased when I saw the director of the school pick up my hand and run her fingers over the nails during the judging (judging was by instructors, staff, and students from other departments).  Oh, and I won 2nd place.
Glittery Acrylic Nails with Inlaid Acrylic Clover

Here's an angle that shows the clover a little better.
Glittery Acrylic Nails with Inlaid Acrylic Clover

Finally, here's Nicole's mani.  She broke out her water marbling skills and those are always a crowd  favorite.  :)  To be honest, I'm super ok with losing to Nicole.  She does great nail art with polish...and we all know I'd stop her butt in a gel polish competition.  Yep, I know "thems fightin' words."  I'm not scared.  lol 

We'll see what happens for our next competition.  It's an April Fools/Easter themed competition and it is bound to have some crazy aspects.  Ms. Rhonda has already hinted that she has a few tricks up her sleeve.

That's all for the school update.  How about a little blog update?  I know I promised last week that I would show you the BMC Sedona thermal collection.  Yeah, it didn't happen.  Y'all, I'm freaking exhausted.  I had the swatches done, but I didn't get them edited in time to post on Friday.  People often ask me how I do it - full time student, mother and blogger.  The answer is simple...sometimes I don't.  I usually swatch on the weekends - some Saturdays I don't even leave the house.  Then I edit and write late at night throughout the week.  I don't sleep much, and it catches up with me sometimes.  Anyway, I did get those edited for this week.  Since I'm dying to show you the Hawaiian Escape collection too, I decided to do a double feature.  So check in Wednesday to see both the Hawaiian Escape AND Sedona Collections from Bundle Monster.  And yes, the photos are already edited and I'm starting the writing part tonight so it really will go live on Wednesday morning.  ;) Here's a little teaser.

~Michelle


Read more ...