Press Sample
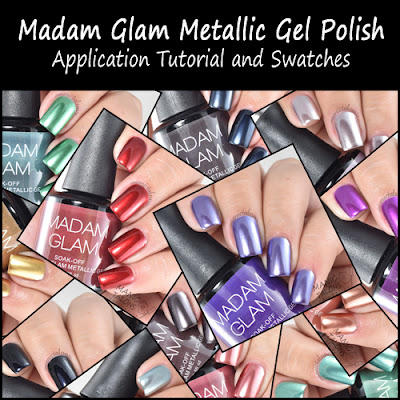
Hello Loves! I have some of Madam Glam Metallic Gel Polishes to show you today. Laura at Madam Glam tells me that people are struggling with these, so I'm also going to walk you through the application. First things first, this is NOT a traditional gel polish. Metallic Gels are actually not gels, but a gel and lac system. The Metallic Polishes are micro pigments suspended in a very thin base. The base will start to air dry but they need to be cured to fully set them. They also pair best with a No Wipe Top Coat above and below the metallic layer. But I'll get into all that in a few minutes. Let's take a closer look at the Madam Glam Metallic Gels.
This collection consists of 15 colors currently. I have 13 of them to show you. The other two were out of stock, but I'll have those for you soon as well. As I mentioned above, these are not your typical gel polish and do require a very different and longer application process. But the colors are fantastic and the finish is quite reflective. They aren't quite mirror finish, though you can see clear reflections in some of the darker colors. I would say they are definitely metallic and fall somewhere between chrome and finely brushed metal. Let's take a look at the swatches, then I'll finish up with the application techniques. All of the swatches pictured here are over a clear base (no black or cream gel polish under the Metallic layer).
First up is a gorgeous, royal purple called Chiquitita. The light reflections in this one show a bit of pink around the edges, giving it amazing depth. Coverage is quite nice over a clear base.
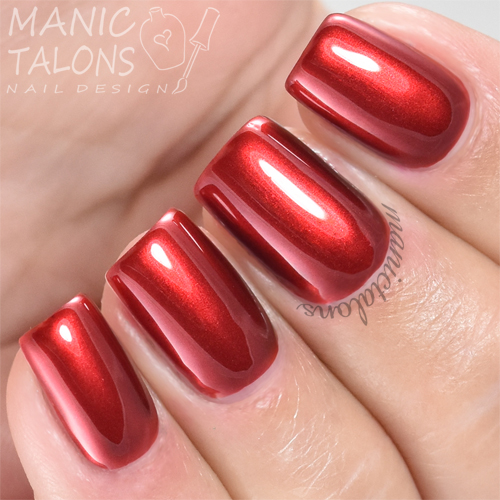
Get To The Point is definitely up there in my favorites of the collection. This deep, glowy red just makes my heart smile. Coverage is opaque over the clear base.
Ice Blue is exactly that - an icy blue chrome. I found this one a little less forgiving than some of the other colors. While it does provide adequate coverage over a clear base, I would likely layer it over a cream for better coverage.
Life On Mars falls somewhere between a rusty red and a rose gold. Coverage is ok with this one over clear, but would be better with a solid color under it. Also, note the corner of my ring finger. I let the top coat sit a little too long and the finish started to cloud up.
If you prefer more of a dark grey, Losing Control is your color. Coverage was great over clear, but I bet it would be even more amazing over black.
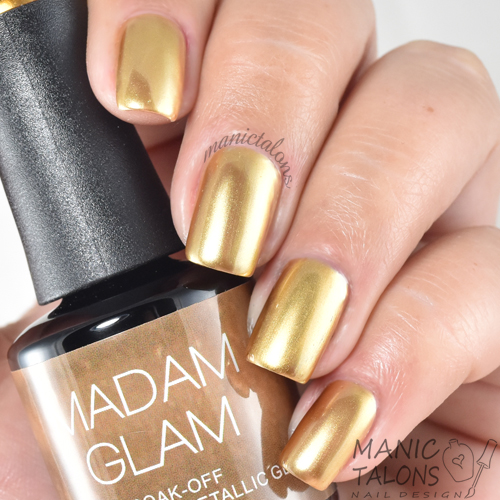
Metallic Gold is exactly that - a metallic gold shade. Again, nice coverage over clear.
Peppermint is...yeah, I don't really know what to call this one. I wanted it to be green, but it's actually more of a minty blue. Application was a little tricky with this one, so I would layer it over a cream base for better coverage.
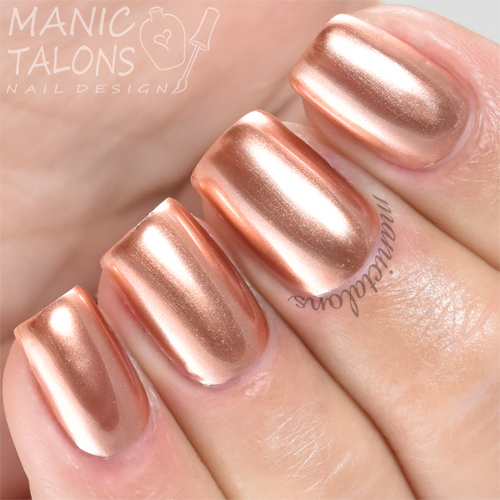
Play Date has a muted, coppery tone. This one applies very frosty but cures to a nice metallic sheen. Coverage is perfect over a clear base.
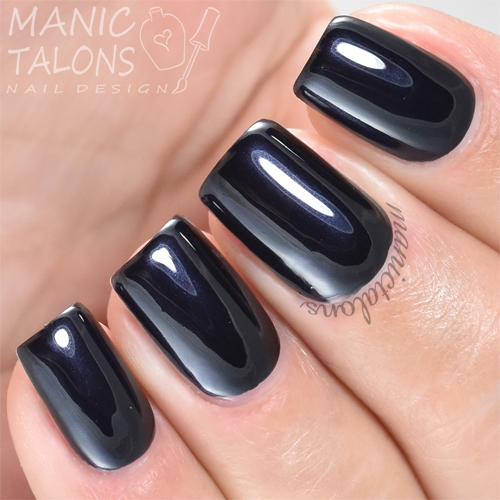
Private Jet is a deep, blue toned grey. Again, perfect coverage. I would likely use this on in place of black.
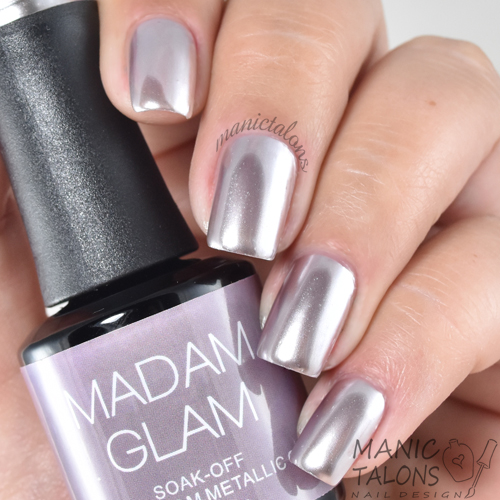
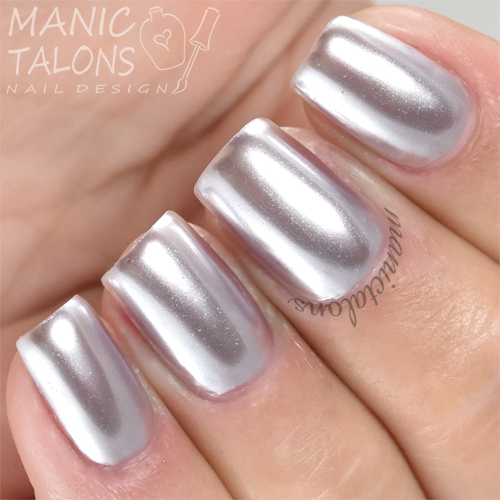
Say I Do is your basic silver chrome with lavender undertones. Application was a little tricky and opacity is lacking. The finish is quite nice, but it definitely needs undies of some sort for full coverage.
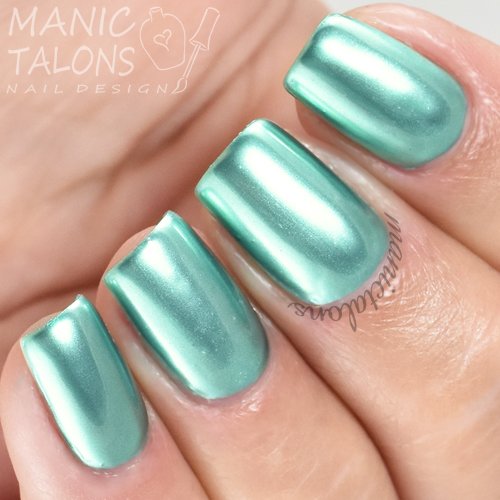
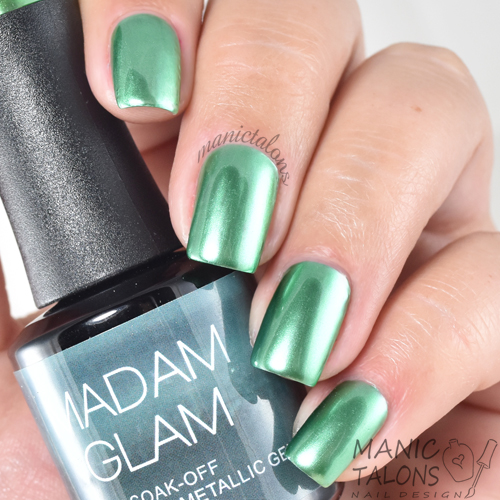
Teasing Teal is a gorgeous, sea green teal. As you can see, the reflective properties in this one are impressive. You can make out my head behind my camera tripod on the middle nail in the first photo. lol
Trip to Florida is a periwinkle leaning purple. This is the softer, more blue toned purple compared to Chiquitita.
Finally, Women in Black is a deep black with a metallic finish. The metallic effect on this one is subtle. In most lighting, it looks like a very deep, wet black gel polish.
Now that you've seen them, let's talk a little more about application. I have good news. These are no where near as difficult to apply as some of the other gel and lac systems out there (including the one I reviewed previously). You don't have to be near as careful with your brush strokes. They can overlap each other without causing the pigments to pull away from each other. Whoo Hoo! But, with that said, they do require a little work. Let's start with some tips.
First things first, you CAN NOT apply these over a traditional base gel with a tacky layer. They will wrinkle. They must be applied over a layer of top coat. No Wipe Top Coat works best, but you can use a traditional gel polish top coat if you carefully remove the tacky layer. Whichever you choose, the gel under metallic layer must be smooth and dry.
Second, these should be limited to ONE THIN COAT. You can do more than one, but it will disrupt the finish and make it cloudy. One coat is all it takes. Of course, since the metallic layer is super thin, this means a finished manicure will not feel as strong as a traditional gel polish manicure. So I recommend a few layers of gel polish between the base coat and the top coat before the metallic gel. I did not use a base color because I am wearing a hard gel overlay, but it would definitely help make these feel more normal. The extra gel polish layers also aid in removal. I'll talk about that in a few.
Third, they need to cure for 2 to 3 minutes, regardless of what type of lamp you use. They will air dry, but the UV from the lamp speeds the process and helps the pigments settle into a smooth finish. And trust me, you want them to be completely dry before you apply the top coat. If you don't, it will smudge and cloud the finish or cause the metallic layer to wrinkle.
Fourth, No Wipe Top Coat is a must. I've tried every top coat in my collection, and the traditional gel polish top coats wreck the finish. I have no clue why. They just do. As for the No Wipe Top Coats, the thinner consistency ones seem to work best. I used the Madam Glam No Wipe Top Coat for my swatches, but I did find it a little thick so I warmed it up to make application smoother.
Finally, you can work hand by hand or even both hands at a time until you get to the final top coat step. Then you have to work finger by finger. Yep, you read that right. After the Metallic layer is set, you have to apply your No Wipe Top Coat and cure it one finger at a time. The goal is to apply the top coat and cure it as quickly as possible. If it sits on the nail, it will start to lift the pigments and cloud the finish.
Got all that? You sure? Ok, keeping the above tips in mind, let's break it down from start to finish. I'll type out the instructions with additional quick tips below, but here's an info-graphic I put together that you can save to your phone or computer as a quick cheat sheet. ;)
Ok, so step by step with more detail:
Let's talk about removal for a second. If you are familiar with No Wipe Top Coats, you know that you have to file all the way through them in order to soak off quickly. (If you didn't know that, now you do!) As you can imagine, this makes removal a little difficult since there are two layers of No Wipe Top Coat involved in the application process. You have to file through BOTH top coat layers. If you don't, it will soak off in layers and take ages. The challenge here is to file through the top coat without filing all the way through to your nail. Unless you are confident in your filing techniques, I strongly recommend those extra layers of gel polish between the base gel layer and first top coat layer. This gives you a buffer so you'll know where to stop filing. Also, some of the Metallic Gels will stain. The extra layers of gel polish will protect your nail, but you may still see some staining during soak off. I experienced it most with the red.
I hope this helps! Gel and lac systems are a bit tricky at first, but the results are well worth the extra effort. :) If you're up for the challenge, you can purchase the Madam Glam Metallic Gels and No Wipe Top Coat Here.
Of course, if you have any questions or need help trouble shooting these, feel free to comment below, reach out via facebook, or email me! I'm always happy to help.
Finally, a special Thank You to Angela of Social Claws for sharing her experiences and experiments with gel and lac systems over the years. Her tips and tricks helped me quickly determine the best application techniques for this particular system. If you haven't already, be sure to check out her facebook for product reviews, shelter kitties, and her crystal product line Ice.
~Michelle
*The Madam Glam Metallic Gel Polishes featured in this post were provided by Madam Glam for my honest review. All links within this post are courtesy links and do not benefit ManicTalons.com.
Hello Loves! I have some of Madam Glam Metallic Gel Polishes to show you today. Laura at Madam Glam tells me that people are struggling with these, so I'm also going to walk you through the application. First things first, this is NOT a traditional gel polish. Metallic Gels are actually not gels, but a gel and lac system. The Metallic Polishes are micro pigments suspended in a very thin base. The base will start to air dry but they need to be cured to fully set them. They also pair best with a No Wipe Top Coat above and below the metallic layer. But I'll get into all that in a few minutes. Let's take a closer look at the Madam Glam Metallic Gels.
This collection consists of 15 colors currently. I have 13 of them to show you. The other two were out of stock, but I'll have those for you soon as well. As I mentioned above, these are not your typical gel polish and do require a very different and longer application process. But the colors are fantastic and the finish is quite reflective. They aren't quite mirror finish, though you can see clear reflections in some of the darker colors. I would say they are definitely metallic and fall somewhere between chrome and finely brushed metal. Let's take a look at the swatches, then I'll finish up with the application techniques. All of the swatches pictured here are over a clear base (no black or cream gel polish under the Metallic layer).
First up is a gorgeous, royal purple called Chiquitita. The light reflections in this one show a bit of pink around the edges, giving it amazing depth. Coverage is quite nice over a clear base.
Get To The Point is definitely up there in my favorites of the collection. This deep, glowy red just makes my heart smile. Coverage is opaque over the clear base.
Ice Blue is exactly that - an icy blue chrome. I found this one a little less forgiving than some of the other colors. While it does provide adequate coverage over a clear base, I would likely layer it over a cream for better coverage.
Life On Mars falls somewhere between a rusty red and a rose gold. Coverage is ok with this one over clear, but would be better with a solid color under it. Also, note the corner of my ring finger. I let the top coat sit a little too long and the finish started to cloud up.
If you prefer more of a dark grey, Losing Control is your color. Coverage was great over clear, but I bet it would be even more amazing over black.
Metallic Gold is exactly that - a metallic gold shade. Again, nice coverage over clear.
Peppermint is...yeah, I don't really know what to call this one. I wanted it to be green, but it's actually more of a minty blue. Application was a little tricky with this one, so I would layer it over a cream base for better coverage.
Play Date has a muted, coppery tone. This one applies very frosty but cures to a nice metallic sheen. Coverage is perfect over a clear base.
Private Jet is a deep, blue toned grey. Again, perfect coverage. I would likely use this on in place of black.
Say I Do is your basic silver chrome with lavender undertones. Application was a little tricky and opacity is lacking. The finish is quite nice, but it definitely needs undies of some sort for full coverage.
Teasing Teal is a gorgeous, sea green teal. As you can see, the reflective properties in this one are impressive. You can make out my head behind my camera tripod on the middle nail in the first photo. lol
Trip to Florida is a periwinkle leaning purple. This is the softer, more blue toned purple compared to Chiquitita.
Finally, Women in Black is a deep black with a metallic finish. The metallic effect on this one is subtle. In most lighting, it looks like a very deep, wet black gel polish.
Now that you've seen them, let's talk a little more about application. I have good news. These are no where near as difficult to apply as some of the other gel and lac systems out there (including the one I reviewed previously). You don't have to be near as careful with your brush strokes. They can overlap each other without causing the pigments to pull away from each other. Whoo Hoo! But, with that said, they do require a little work. Let's start with some tips.
First things first, you CAN NOT apply these over a traditional base gel with a tacky layer. They will wrinkle. They must be applied over a layer of top coat. No Wipe Top Coat works best, but you can use a traditional gel polish top coat if you carefully remove the tacky layer. Whichever you choose, the gel under metallic layer must be smooth and dry.
Second, these should be limited to ONE THIN COAT. You can do more than one, but it will disrupt the finish and make it cloudy. One coat is all it takes. Of course, since the metallic layer is super thin, this means a finished manicure will not feel as strong as a traditional gel polish manicure. So I recommend a few layers of gel polish between the base coat and the top coat before the metallic gel. I did not use a base color because I am wearing a hard gel overlay, but it would definitely help make these feel more normal. The extra gel polish layers also aid in removal. I'll talk about that in a few.
Third, they need to cure for 2 to 3 minutes, regardless of what type of lamp you use. They will air dry, but the UV from the lamp speeds the process and helps the pigments settle into a smooth finish. And trust me, you want them to be completely dry before you apply the top coat. If you don't, it will smudge and cloud the finish or cause the metallic layer to wrinkle.
Fourth, No Wipe Top Coat is a must. I've tried every top coat in my collection, and the traditional gel polish top coats wreck the finish. I have no clue why. They just do. As for the No Wipe Top Coats, the thinner consistency ones seem to work best. I used the Madam Glam No Wipe Top Coat for my swatches, but I did find it a little thick so I warmed it up to make application smoother.
Finally, you can work hand by hand or even both hands at a time until you get to the final top coat step. Then you have to work finger by finger. Yep, you read that right. After the Metallic layer is set, you have to apply your No Wipe Top Coat and cure it one finger at a time. The goal is to apply the top coat and cure it as quickly as possible. If it sits on the nail, it will start to lift the pigments and cloud the finish.
Got all that? You sure? Ok, keeping the above tips in mind, let's break it down from start to finish. I'll type out the instructions with additional quick tips below, but here's an info-graphic I put together that you can save to your phone or computer as a quick cheat sheet. ;)
Ok, so step by step with more detail:
- Prep your nails as you usually would for a gel polish manicure. Apply and cure your base gel according to the directions.
- (Optional) Apply a black gel polish or coordinating cream gel polish color. Cure as directed. I recommend two coats to help build up the nail and add strength. If you have ridges or delamination, you definitely don't want to skip this optional step. The goal here is not only added strength, but to provide a smooth, glassy surface for the Metallic Gel. Note: If you decide to apply a colored gel polish, leave a small margin around the cuticle area and side walls - you'll need to keep this area clear during the Metallic layer so the top coat can bond to it. If you don't leave the margin in the color coat, you'll have a color halo around your metallic coat. ;)
- Apply an even layer of top coat. No Wipe Top Coat works best. Check carefully to make sure there are no pits, skips, or bubbles before curing. Remember, smooth as glass. Cure according to directions.
- Apply a thin, even coat of metallic gel. Remember to leave a margin around the cuticle area and side walls. Oh, and when I say thin, I really mean THIN. Try to keep it to three strokes. Try not to brush back over the strokes. If your initial strokes overlap, that's fine. But don't stroke over a finished stroke to smooth it. Don't worry if you see brush strokes. They will disappear when the Metallic layer cures. DO NOT cap the free edge. Some of the metallic gel will naturally overflow the tip, so you're covered.
- Cure the Metallic Gel for 2-3 minutes. The cure time is the same for CFL UV and LED. When the Metallic Gel is set, it should be smooth and look metallic. But most importantly, it should be dry and tack free. Helpful Hint: The metallic layer doesn't cure like a traditional gel. Rather, it sets or dries under the light. If you aren't happy with the finish for any reason, you can remove it at this point with a lint free wipe and polish remover (oil free) and try again.
- Apply your No Wipe Top Coat to ONE NAIL. Try to apply evenly with three strokes. Try to avoid brushing over the wet stop coat. Over-brushing will cloud the finish. Do NOT let the top coat sit on the nail for longer than absolutely necessary. Cure as directed. To simplify: stroke, stroke, stroke, cap, cure. Repeat one nail at a time for the remaining nails.
Let's talk about removal for a second. If you are familiar with No Wipe Top Coats, you know that you have to file all the way through them in order to soak off quickly. (If you didn't know that, now you do!) As you can imagine, this makes removal a little difficult since there are two layers of No Wipe Top Coat involved in the application process. You have to file through BOTH top coat layers. If you don't, it will soak off in layers and take ages. The challenge here is to file through the top coat without filing all the way through to your nail. Unless you are confident in your filing techniques, I strongly recommend those extra layers of gel polish between the base gel layer and first top coat layer. This gives you a buffer so you'll know where to stop filing. Also, some of the Metallic Gels will stain. The extra layers of gel polish will protect your nail, but you may still see some staining during soak off. I experienced it most with the red.
I hope this helps! Gel and lac systems are a bit tricky at first, but the results are well worth the extra effort. :) If you're up for the challenge, you can purchase the Madam Glam Metallic Gels and No Wipe Top Coat Here.
Of course, if you have any questions or need help trouble shooting these, feel free to comment below, reach out via facebook, or email me! I'm always happy to help.
Finally, a special Thank You to Angela of Social Claws for sharing her experiences and experiments with gel and lac systems over the years. Her tips and tricks helped me quickly determine the best application techniques for this particular system. If you haven't already, be sure to check out her facebook for product reviews, shelter kitties, and her crystal product line Ice.
~Michelle
*The Madam Glam Metallic Gel Polishes featured in this post were provided by Madam Glam for my honest review. All links within this post are courtesy links and do not benefit ManicTalons.com.
Read more ...

