Hello Loves! So I finally broke down and took a One Move Nail Art class (aka One Stroke). This technique has been defeating me for years now. I got pretty close once, but I still wasn't happy with the results. At first I thought it was my paint. Bought new paints. Then I thought it was my brush. Bought new brushes. Then I realized it was me. Paid for a class. lol I should have taken a class sooner. Would have saved me a ton of headaches! Let me start by talking about the class a little. Then I'll talk a little about the tips and tricks I learned that made all the difference for me and show you some closer shots of the art above.
So, the class was One Move Nail Art by Crystal Nails Educator DeeDee Desbiens. I woke up Monday morning with a killer migraine and drove 2 hours in heavy traffic to attend this class. I wasn't about to miss it. Y'all, I can't even begin to tell you how amazing DeeDee is as an instructor. Just Wow. She broke everything down to the basics - from how to hold the brush to how wet your brush should be. She showed us basic strokes and moves along with a few designs. I was then able to use those moves to create all of these looks! Squee! If you ever have a chance to attend a class with DeeDee, do it! Trust me. Just do it.
The class was hosted by another well known Educator - Michele Baker with American International Industries (the makers of IBD, EZFlow, Supernail, China Glaze and many more). Michele is also a licensed instructor in GA and a nail art competitor in the 3D Acrylic area. Not only did I have the pleasure of attending the course with DeeDee, but I sat at the table across from Michele. Needless to say, I learned a lot from both of them. Here's a picture of the three of us. Michele is on the left, DeeDee in the middle, and I'm on the right. Michele is teaching a 3D Acrylic class at the Nail Tech Event of the Smokies in 2016. If you're planning to attend, you won't want to miss her class. I'll share more details on that when they are published. :)
Ok, so let's talk about One Move Nail Art. I tried it several times before taking the class. More than I ever shared here. This is the last attempt that I shared and my best result prior to taking this class.
Ok, so it isn't horrible...but you can see where the colors didn't blend very well and the the strokes aren't smooth at all. That brings me to several points I learned in the class that changed the game for me.
- The Surface Matters! Paint doesn't stick to a smooth surface. So if you're doing one stroke over regular lacquer, try a matte topcoat first. If you're doing it over gel polish, apply your top coat, cure it, then buff the shine off of the nail. Don't worry, it will restore beautifully when you top coat at the end. For those who have had issues with the top coat chipping over acrylic paint, buffing helps with that too since it gives the top coat something to grab.
- The Paint Matters! I tried several brands of craft and nail acrylic paint. With most of them, you have to go over your design twice for it to be opaque. The risk there is that you can accidentally pull up the first layer when trying to add the second. Introducing Crystal Nails One Move Acrylic Paints. These babies are super pigmented and are opaque in one coat! I love love love them. I only have 5 right now but will be buying more very soon.
- The Brushes Matter! Ok, I bought one of these brushes several months ago thinking it would solve my problems. It didn't. But once I paired it with the others tips in this list, it made all the difference in the world. The Crystal Nails One Move brushes are awesome. I used the 2 and 4 with the slanted tips. The slant makes things so much easier! Especially when it comes to loading paint. Dark on the short side, light on the long side.
- Keep your brush wet! If the brush dries out, the paint won't flow and you'll get the skipping like I had in the photo above. This is the hardest part for me. My brush ends up drying out quickly. Or I get it too wet an the water down the paint. But practice makes perfect. :)
- Color Selection Matters! For One Move to work, you need a dark and a light color. If the colors are too close, you won't see the gradient effect that makes the one move technique so freaking awesome.
- One Move doesn't mean you only use one brush stroke. The name is completely misleading. You have to pick your brush up several times for many of the strokes that make the flower petals and leaves. Yeah, that one seems like a no brainer, but I wish someone had mentioned it to me! lol
- Finally, Don't Judge Until You Topcoat. The topcoat makes a world of difference when it comes to working with acrylic paint. Things that don't look smooth magically blend when you add the top coat to the design. So if things don't quite look right, the top coat will probably smooth it out.
As you can see, these brushes are quite small. These are the size that you'll use most for nail art. I also have the Crystal Nails 1 brush, but it is really for larger flowers and doesn't fit well on most nails. I took a shot of the brushes with a quarter so you can get a better idea of the size. The brush on the left is the #4 brush and is used for small flowers, buds and leaves. The brush on the right is the #2 brush and is used for most flower petals. As you can imagine, loading the brush with paint can be a challenge since they are so small, but it didn't take me long to get the hang of it. Just a tiny dip on each corner, then blend the colors by stroking them on a flat surface or the back of your hand.
Ready for a closer look at my swatches? This first one uses the daisy design that DeeDee taught in class. This is one of the hardest for me since the petals require the slightest movement to form them. Oh, and can I just say that macro photography is cruel?!?! You can see every little mistake in my strokes. I promise, they look much better when they aren't blown up. lol
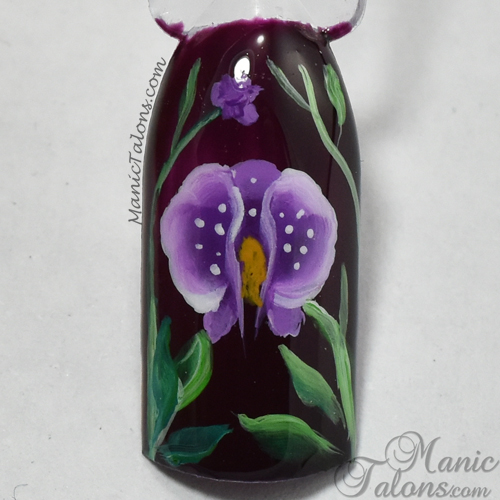
This next one is one I found on YouTube. It's supposed to be an orchid. I think I need to practice this one a little (or a lottle) more.
I have been attempting this next design for over a year, so I'm super thrilled with how it turned out. The calla lily on the side needs a little refining, but the main flower turned out great. Note, the green I used here is not a Crystal Nails One Move paint. You can see the difference between the opacity of the green and the white, which is a CN One Move paint.
DeeDee focused mostly on fantasy flowers during class- meaning flowers that are obviously flowers but not actually a flower that exists in nature. This is a combination of two of the fantasy style flowers she showed us.
Of course we learned to do roses. I mean, no one move class would be complete without them right? I really like how this one turned out, but there isn't enough contrast between the white and the yellow in the middle of the rose. This is what I mentioned in point 5 above.
Ah yes, much better. This pink rose was created using red and white. My brush started to dry out in the middle of the large rose.
I absolutely LOVE this poppy design. I should have used a lighter background color, but the poppies turned out so freaking cute! I created them with black and red and then added a little yellow to the centers.
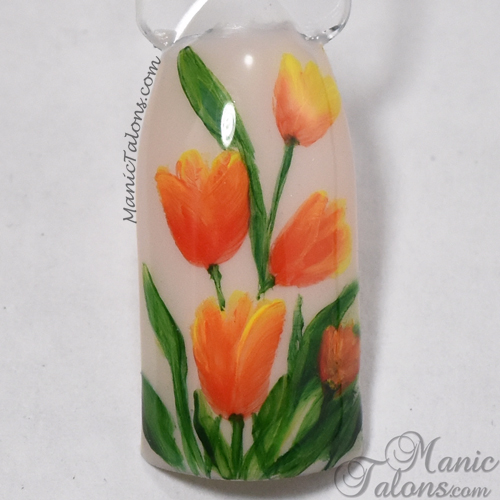
Tulips anyone? The colors in this one make my heart smile. The only thing I wish I had done differently is I should have painted the small blossom on the bottom right before I added the leaves. Painting over them made it darker and my paint started pulling up.
Finally, I have these sweet little roses with a butterfly. On this one, I forgot to buff the swatch before painting. You can see where I had problems with my brush sliding around a little and the paint getting out of control. So remember to buff that surface! But I adore the overall design and that butterfly was so freaking easy!
Ok, so I think it's safe to say that I finally "get" the concept behind One Move or One Stroke Painting thanks to spending a few hours in class with DeeDee. Don't be surprised if you see a lot of One Move art from me in the future. I can't get enough of this technique! Practice makes perfect, and I'm a practicing fool over here. lol
To see more nail art from the master herself, be sure to follow Crystal Nails DeeDee on Facebook and @CrystalNailsDeeDee on Instagram. I'm telling you, she's amazing. Her gel art is incredible too, but I couldn't afford both classes. Next time! If you want to pick up any of the brushes or paints I featured here, you can find them in DeeDee's Crystal Nails webshop here.
~Michelle
*All products featured in this post were purchased by me. All links within this post are courtesy links and do not benefit ManicTalons.com.


Gorgeous Michelle!
ReplyDeleteFabulous darling! I was so excited when I saw this post on IG that I ran right over to the blog. I really want to do some one stroke nail art myself but I've found myself really struggling with brushes and technique. And yes macro photography is always cruel I've noticed it myself since I transitioned over to a macro lens. Every flaw becomes magnified times 1 million but these are still really beautiful! Thanks for sharing :)
ReplyDeleteso gorgeous, all of them! I would love to try this, but I'm not as artistic as you. I see no flaws at all! Only beauty.
ReplyDeleteYou're so talented
ReplyDeleteWow - these look great! I think I need one of those tiny brushes.
ReplyDeleteThese are really beautiful; you have certainly mastered the technique. I wish DeeDee taught classes in the UK!
ReplyDeleteThis totally needs a YouTube video. :) I can't even begin, but this post almost makes me want to try! They look especially lovely all lined up in that first shot.
ReplyDeleteI was so inspired by this post that I bought 5 Crystal Nails paints and three brushes. Couldn't wait for them to arrive. (shipping time ended up being super fast) Watched a bunch of YouTube videos, reread your post a few more times, and gave it a go. My first attempt at a rose was so funny, I couldn't even tell what it was supposed to be when I was done! But by the fourth try I was starting to get it, and my daughter thought the flowers on the swatch stick were stickers, and my husband said "that's pretty." I would love to take a class someday. Thank you for this fantastic post and for your entire blog. You and Andrea taught me everything I know about gel polish and nail art.
ReplyDelete