Wednesday, February 4, 2015

KBShimmer Spring 2015 Collection: Complete Review

Press Sample Affiliate Links

KBShimmer Spring 2015 Collection Swatches

Hello Loves!  I have the complete KBShimmer Spring 2015 Collection to show you today.  This collection is made up of 12 awesome spring shades that will be available for purchase at www.KBShimmer.com on February 6, 2015.

The collection consists of 4 gorgeous holos, 7 glittery crellies, 1 flawless cream, and holiday themed nail vinyls.  The polishes retail for $8.75 each with the exception of Eyes White Open which is $7.50.  The nail vinyl sheets are $5 each and are loaded with images.  Ready to see some swatches?  Fair warning: This is a picture heavy post.  It might be a little slow to load, but I promise it is worth waiting for!

Let's start with Eyes White Open.   Eyes White Open is a basic two coat white cream.  I found application to be quite nice, which is amazing considering I'm horrible at applying traditional polishes and usually find creams particularly difficult.
KBShimmer Eyes White Open Swatch

You know how much I love holographic polishes, so let's take a look at those next.  First up is Blush Money.  Blush Money is based on 2015 Pantone Color Strawberry Ice and is described as a peachy rose that has a golden shimmer indoors and a subtle linear holographic effect in sunlight.  My camera picked up the shimmer as more silver than gold, but in person it is definitely golden.  Application is typical of KBShimmer holos - they almost apply themselves.  I found Blush Money to be opaque in two coats.
KBShimmer Blush Money Swatch

Ins and Sprouts is a pale citron green with a very strong linear holographic effect.  Two coats offers opaque coverage.  I love this one so much, but it doesn't love me.  Oh well.  I'll wear it anyway because it's that gorgeous - even if it does freak out my skin tone.  lol
KBShimmer Ins and Sprouts Swatch

Blue-d Lines is a pale, almost dusty blue linear holographic polish.  This one is also opaque in two coats and makes my heart flutter!  KBShimmer doesn't disappoint with the holos!
KBShimmer Blue-d Lines Swatch

The final holo in the Spring 2015 collection is Thistle Be The Day.  Like the previous two, this pinkish purple, thistle inspired, linear holographic polish is opaque in two coats.  I have no words to describe it, but you can bet that I'll be wearing it around Easter!
KBShimmer Thistle Be The Day Swatch

Ready to see some crellies?  First up is Meow or Never.  Is that not the cutest name?!?!  Meow or Never is based on the Pantone spring color Glacier Grey and consists of a pale grey base with periwinkle, grey, purple and sky blue glitter.  I found this one to apply nicely with very little need for glitter manipulation.  No fishing needed either.  It is opaque in 3 coats, but could be a 2 coater if your application skills are better than mine.  ;)
KBShimmer Meow or Never Swatch

Sweet Egg-scape is a pale, bubblegum pink base with pastel aqua star glitters, coral triangles, lavender dots, red squares and silver holo hexes.  Three coats are recommended and I did have to fish a little for the stars but the other glitters were no problem at all.
KBShimmer Sweet Egg-scape Swatch

I admit, I had to have Cool Hand Cuke based on the name alone (Cool Hand Luke is one of my favorite movies!).  This minty green polish is loaded with pastel circles, triangles, stars and hexes and topped off with a scattered holographic sparkle.  Three coats are recommended and application was similar to Sweet Egg-scape - I had to fish for the stars but the other glitters behaved themselves.
KBShimmer Cool Hand Cuke Swatch

Funky Cold Patina is a cool turquoise base with metallic blue, copper and purple glitters.  This one is also a recommended three coater, but I found it to be opaque in two.  The glitters behaved themselves in this one so I didn't have to fish at all.  And how in the world does Christy come up with these names?  This collection is loaded with polishes I needed for the name as well as the color!
KBShimmer Funky Cold Patina Swatch

Wind Swarm is a pale sky blue crelly based on the Spring 2015 Pantone color Aquamarine.  It includes a mix of purple, gold, white and pink glitters of various shapes and sizes with a hint of micro glitter for added sparkle.  This one is also a three coater for opacity.  No fishing needed here either.
KBShimmer Wind Swarm Swatch

I'm So Sweet Pea has a similar base to Meow or Never, but this one is a pale purple with pink, mint, purple and turquoise glitters.  I swatched three coats here.  The glitters are also well behaved in this one.  True story - I swatched it four times before taking a single photo.  I don't know why, but I can't seem to swatch traditional polish without dinging the first color in the session multiple times.
KBShimmer I'm So Sweet Pea Swatch

The final shade in the Spring 2015 Collection is To Peach His Own.  This pale peach base includes lime green, gold, violet and magenta holographic glitters.  I found it covered best with three coats and had no issues with the glitters.  It is almost a nude on my skin tone, so it appears to be a subtle shade with glitter overload on me.  It was also a sneaky one!  I thought I had swatched them all and went ahead and removed my gel extensions.  Then I looked down and saw her hiding on my desk behind my top coat.  So that's my excuse for the one odd ball photo with shorties.  ;)
KBShimmer To Peach His Own Swatch

Finally, I also have the sheet of Spring Nail Vinyls.  I used them in an awesome mani that I really want to show you, but there's just one little problem.  I usually shoot with my camera tethered to my computer so the images go straight to my hard drive.  For some reason, I decided to take these without being tethered so they ended up on my memory card.  I remember swapping the memory cards in my camera, and I remember putting that card somewhere so I wouldn't lose it.  But I can't for the life of me remember where I put it!  I promise I'll share them in a separate post as soon as I find that stupid card.  In the mean time, here's the photo from the KBShimmer press release.  Look at those precious little bunnies!  Gah!
KBShimmer 2015 Spring Nail Vinyl Sheet

Which of the KBShimmer Spring 2015 Collection polishes is your favorite?  I'm having a hard time choosing one this time.  I adore the holos and its a toss up between Meow or Never and Cool Hand Cuke for me out of the crellies.  :)

Oh, and I've always wanted to do a bottle pyramid shot, so here you go.  Isn't it pretty?  I'm super proud of my stacking skills.  I only knocked it over once while trying to build it.  lol
KBShimmer Spring 2015 Collection Bottle Shot

Be sure to pick up your favorites from KBShimmer this Friday!  They will also be available on Amazon and on Harlow and Co for international fans.

~Michelle

*The polishes featured in this post were provided by KBShimmer Bath and Body for my honest review.  This post uses Amazon Affiliate Links.  Purchases through these links generate commissions that help fund this site.  All other links are courtesy links that do not benefit ManicTalons.com.


Read more ...

Monday, February 2, 2015

The Nail School Chronicle: Week 9

Affiliate Links


Hello Loves.  It's time for another Nail School Chronicle update.  This past week has definitely had its ups and downs.

So how was my first week as a Senior on the floor working with clients?  Interesting with a side of sad news (details on that later in this post).  My first assignment was a student from the cosmetology department.  She asked for an acrylic overlay.  Easy enough.  So I get my supplies and get started.  One hand in, I realize that while she said overlay, she actually wanted a set of pink and white sculpts.  Oh boy.  So I change gears, file the overlay thin and start on a full set of pink and whites.  No big deal.  I can handle it.  Then she tells me she has a test in an hour.  Yikes!  No stress, right?  So when I finish, she tells me she wants them polished.  That kind of defeats the purpose of pink and whites, but ok.  I'll go with it.  Oh, and did I mention she graduated this week, so I was basically doing her graduation nails?  Of course, I find this out after having to switch gears twice.  Gah!  Lesson learned:  ask more questions BEFORE I start.  I'm not super pleased with how they turned out, but they aren't too bad and she is happy with them.  The polish is the lacquer version of Daisy Sapphire Stone.  I also learned that getting clients to pose their hands is difficult - especially when you need them tight for a square crop.  lol
Sculpted Acrylic with Daisy Sapphire Stone Lacquer

I had a few other clients throughout the week, but I forgot to get pictures of the finished manicures.  I know, major blogging fail.  So, what did I do?  One spa pedicure, two basic pedicures, one Shellac mani (the client's first ever gel polish experience and she loved it), one basic mani, and one set of white tips with an acrylic overlay.  Everything went smoothly for the most part.  I dropped my first bottle of polish during one of the pedicures.  Oops.  It didn't break, but polish went everywhere and there wasn't enough left in the bottle to finish.  I had to start over with a new color.  Thankfully, the client has been coming to school for 18 years and was very understanding.

I finished the week with a Mommy Daughter appointment with an old friend.  It was super nice to catch up.  I did remember to get photos of these.  Let's start with the daughter.  She's 9 years old and full of energy.  Whoa!  It was definitely an experience to do a mini-mani on a little girl who wouldn't sit still.  We ended up using Dance Legend 172 for the base.  Its a silver to purple thermal and she was thrilled.  She also wanted crystals and pink and red flowers.  The crystals were easy, but the flowers...yeah...not my best work.  It's nearly impossible to paint little petals on a moving target.  lol
Flowers for a 9 year old girl

Her mom's nails were much easier for me.  She wanted gel nails and I decided to go with sculpts.  I used my Akzentz Pro-formance gels.  I've used these a few times on myself and love them!  They come in several levels of viscosity ranging from sculpting gel that doesn't level at all to enhancement gel that levels beautifully.  I find using a combo works best for me.  Once I finished, she decided she wanted a design on the tips.  No problem!  I had my Cici&Sisi plates in my car, so I ran out and grabbed them and then stamped the tips with this cute heart design from Cici&Sisi 05 with  Maybelline Bold Gold.  I think they turned out great.  The shape could be a little better refined, but my stupid forms kept popping open in the lamp.  Note to self - get better forms.
Sculpted Gel Nails with Cici&Sisi Stamped Tips

That pretty much sums up my week.  I promise I'll do better about getting pictures next week.  Now for the sad news:

The following is the hardest thing I've had to write to date.  I don't usually share the deeper personal stuff here.  This is my escape from life, so other than complaining about a sick kid here and there, I try to keep it light.  This, unfortunately, is not light.  At least not for me.  Long story short, I'm facing the very difficult realization that The Nail School Chronicle may never be complete.  Unless a miracle happens, I will have to drop out of school soon.  Too many hard hits have left us without the ability for me to continue to be out of work while seeking my license.  I haven't shared the full story before now, but you deserve to know why this series will soon come to a premature close.


2014 was the hardest year of my life.  The company where I worked for over 10 years underwent a major restructure and my position was eliminated.  I was offered a different position and took it, but it didn't work out.  I was devastated.  I fully expected to retire from that company.  We took a MAJOR financial hit. 

We considered our options for a few weeks.  I had been talking about trying to get my license for a long time, so we decided to make that a reality.  It wouldn't be easy.  The closest school that offers Nail Technology courses requires a 3 hour daily commute.  I couldn't do it and work too.  Keith works his tail off, but he doesn't make enough to support us on his own.  So we made the difficult decision to tap our savings and cash out my meager 401k.  We would be cutting it close, but if we held our breath, cut back our expenses, and Keith picked up extra hours at work we would have just enough to money to float us until I graduate.  Every cloud has a silver lining, and this was mine.  As you know, I was beyond excited.

Then things started falling apart.  The kids caught every virus that came within 100 yards of them.  Over the course of two months, we dealt with fevers, colds, ear infections, bronchitis, stomach viruses, and the flu.  The kids have been to the doctor every week since I started school.  The pharmacist can set his watch by our visits.  Medical expenses knocked a hole in our budget.  Keith's wreck was the straw that broke the camel's back.  With 9 broken ribs, he couldn't pick up those extra hours.  He's getting better, but he's still on light duty and under a physician's care.  So we now have a hole in our budget with no way to fill it.  I have been looking for a part time job, but my hours are limited thanks to school and the kids.  Of course, we're seeking lost wages from the insurance company, but there's no chance of a settlement until much later this year.

So where does this leave me?  With a choice that isn't a choice at all.  When faced with a decision between finishing school and keeping our house, there's only one answer.  Unless we can come up with the money to cover our mortgage and utilities for the next 4-5 months, I have to drop out of school and go back to work.  My family comes before my dreams.

I don't even know what to say.  I feel like I have failed you as well as myself.  We chased every lead we could find.  We applied for loans only to be declined due to lack of income.  We have exhausted my financial aid options.  Since the house is only in Keith's name, the mortgage company won't work with us based on my lost wages.  We've sold everything there is to sell to get us this far.  I'm planning a major destash of everything I purchased myself in an attempt to get a few more weeks in before I have to drop out (details on that soon).  The closer I can get to graduation, the greater the chance I can return and finish later.  But honestly, even that looks pretty grim right now.

I'm trying to keep my cool, but I'm honestly falling apart.  There is no doubt in my mind that I have the talent needed to be great in this industry.  If I could just get past this 6 month course, the opportunities are limitless.  I had planned to get my license, work in the industry for a few years, then go back and get my instructor's license.  Now, I don't know if any of that will happen.  The odds are stacked against us.  It sucks so bad to be so close to obtaining my dreams yet have them so far out of reach.  Its absolutely crushing.

So what happens now?  I honestly don't know.  I'm going to ride this crazy train as far as it will go.  I might have to drop out at the end of this week.  Or I might be able to squeak out a few more weeks.  We have applied for a loan against Keith's settlement, but the maximum they will loan (if we even get the max) will only buy me a few more months.  The future is uncertain.

I've started a Go Fund Me account.  That in itself is extremely difficult for me.  I was raised that you make your own way in the world and never ask for help.  But after talking to a few friends, readers, and other bloggers, I decided to create the account and share the link.  To quote one of my friends/readers, "You have given so much to your readers through your blog.  What right do you have to deny them the chance to give back if they want to help?"  I admit, it hurts my pride.  My goal with Manic Talons is to share my knowledge, swatches and art with the world and nothing more.  But I can't argue with her logic and this is not a time for pride.  Who knows, maybe someone reading this has the ability to sponsor the next female Tom Bachik.  (Humility is best served with a heafty dose of humor, right?)

 
I know I sound pretty calm, but in all honesty, I'm feeling sad, defeated, and...well...angry to see this dream slipping away.  But I'm also proud of how far I've come, even if I can't go all the way.  Either way, miracle or not, license or not, career change or not, Manic Talons will go on.  I started as a DIYer and will continue as one if I can't get my license.  This blog is the only escape and creative outlet I have right now so its not going anywhere.  And for now, the Nail School Chronicle will continue...until it doesn't.  I promise I won't go deep and depressing on you again.  I just needed to get it off my chest. ~Michelle    *This post uses Amazon Affiliate Links.  Purchases through these links generate commissions that help fund this site.  
Read more ...

Friday, January 30, 2015

IBD Just Gel Polish Gel Art Kit Review

Affiliate Links

IBD Just Gel Polish Gel Art Kit Review

Hello Loves.  I have a full review of the IBD Just Gel Polish Gel Art Kit for you today.  This one has been out for a while, but I found a great deal on Amazon and couldn't pass it up.  The Gel Art Kit consists of 6 bottles of polish and a dotting tool.  The polishes have really difficult to remember names.  Ready to hear them?  They are:  Just Black, Just White, Just Yellow, Just Green, Just Red and Just Blue. ;)

So how are these Gel Art Polishes different from the regular Just Gel Polishes?  Several ways!

The Bottles:  The bottles are half the size of a regular Just Gel Polish bottle at 0.25 fl oz.  Here's a comparison shot that shows the difference.  The smaller bottle makes sense considering these are thicker polishes that require less coats and are intended for nail art.
Ibd Just Gel Art Polish Bottle Size Comparison

The Brushes:  They come with a built in striping brush as opposed to the larger polishing brushes.  I found the striping brushes to be a great length and very easy to work with, though I did have to trim a few of them as they had uneven tips.
Ibd Just Gel Art Polish Brush

The Formula:  Each of these Art Gel Polishes are a thicker, one coat formula.  They are UV/LED compatible (of course, that part isn't different - the Just Gel Polishes are also UV/LED).  You know I had to put them to the test.  For the most part, they didn't disappoint.  I started with a few swirls.  Needless to say, I didn't keep this one for long.  The red nail looks like my cuticles are bleeding.  lol
IBD Just Gel Art Polishes over White

Here's a closeup of each of the colors on my nails.  The black is a little weak in spots, but I could have easily fixed those lines before I cured.
IBD Just Gel Art Polishes over White

And since I only have 5 fingers, I did a quick swatch with a black base so you can see the white too.
IBD Just Gel Art Polishes over Black

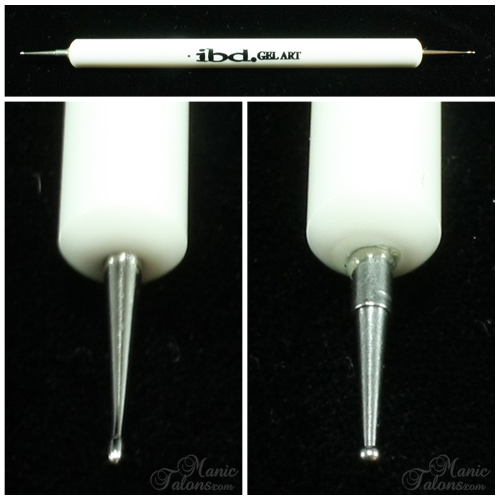
The Dotting Tool:  The dotting tool that comes with the kit is pretty basic.  The handle is acetone resistant plastic and it has two ends with different sized tips.  One is a super fine tip for creating the tiniest dots imaginable.  The other is a slightly larger bulb tip that is used for small dots and accents.  This one is also great for fine lines.
IBD Just Gel Polish Gel Art Kit Dotting Tool

Playing is playing, but let's see how they do in an actually mani with thick and thin lines over various colors.  You know, something with a bit more detail and less bleeding cuticle effect.  How about Argyle and Roses?  Yeah, I know...strange combination, but I love how it turned out.  lol
Argyle and Roses Manicure with the IBD Just Gel Polish Gel Art Kit

As you can see, the white is a little weak but the other colors perform quite nicely with just one layer.  Let's take a closer look.  I wish I had been able to work more yellow into the design, but I just couldn't find a way other than accent dots.
Argyle and Roses Manicure with the IBD Just Gel Polish Gel Art Kit

Overall, I'm impressed with the IBD Just Gel Polish Gel Art Kit and can definitely see myself using them regularly.  It is also a really great kit for anyone who is just starting out with gel polish nail art.  I hope IBD comes out with a greater range of colors soon.  I would love to see some secondary and tertiary colors.  Sure, I could mix them myself, but that defeats the purpose of the built in striping brushes, which is a feature I really like.  It not only saves time, but it also saves product since I don't have to decant a bit on a pallet and use a separate brush.

If you're wondering about that awesome holographic glitter base, let me tell you what happened there.  You see, I started out with a base of IBD Just Gel Patchwork.  I was looking for a glitter for an accent nail and realized I had this jar of microfine Supernail Glitter in Silver Rush that I picked up months ago but never opened.  I popped it open and dusted it onto a nail.  You know how much I love my glitter and my holos, right?  I had no clue this little jar held this much bang.  The pictures don't really do it justice.  Its mesmerizing.  Yeah, so I got a little light headed, my eyes crossed, and before I knew it I had glitter dusted every nail.  Funny how that happens to me sometimes.  Anyway, that's my story and I'm sticking to it.

As I mentioned in the beginning of this post, I found a great deal on this IBD Just Gel Polish Nail Art Kit on Amazon.  The last I checked, they had a limited number remaining, so if you want one, grab it while you still can here!

~Michelle

*This post uses Amazon Affiliate Links.  Purchases through these links generate commissions that help fund this site.  All products featured in this post were purchased by me.

Read more ...

Wednesday, January 28, 2015

LeChat Perfect Match Rosemantic Review

Affiliate Links Gift

LeChat Perfect Match Rosemantic Review

Hello Loves!  I don't think I've mentioned it here, but I recently joined the admin team in a facebook group dedicated to LeChat Perfect Match called LeChat Perfect Match Swatches.  One of my fellow admins was given a gift of the new Limited Edition LeChat Perfect Match Rosemantic from LeChat and passed it along to me to review.  Rosemantic is the first LeChat Perfect Match of it's kind.  Not only is it a thermal polish, but it is also scented.  But that's not all!  This is the first LeChat Perfect Match Mood to come with a matching Dare to Wear Lacquer that is also a mood polish!

Let's start with the Gel Polish and then touch on the Dare to Wear lacquer.  Rosemantic is a pink to red thermal cream.  It offers full coverage in the cold phase in two coats but needed three to be completely opaque in the warm phase.  With that said, my coats are super thin so you might be able to get away with two.
LeChat Perfect Match Rosemantic

As I mentioned previously, it is scented!  Rosemantic smells like, you guessed it, roses.  The fragrance is quite strong and lasted for the duration of my manicure.  I'll touch more on that in a minute.  I completely forgot to get a shot of the warm phase on it's own so I don't have a collage of the phases for this one, but here are the cold and transition shots.
LeChat Perfect Match Gel Polish Rosemantic Cold
LeChat Perfect Match Gel Polish Rosemantic Transition

There's an interesting thing about the Rosemantic Gel Polish.  It is a different color in the warm phase depending upon how you cure it.  When cured in an LED lamp, it is the pink featured on the bottle and in my swatch above.  As a user in the LeChat Perfect Match group discovered, it is a completely different color when cured with a CFL UV lamp.  When cured in the CFL UV lamp, the warm phase takes on a very peachy tone.  In the photo below, I cured the first (left) swatch in my Thermal Spa CFL UV lamp and the second (right) swatch in my Harmony 18G LED lamp.  Note that the left swatch is not pink toward the edge.  It is picking up the reflection from the pink swatch beside it.
LeChat Rosemantic cured in CFL UV vs LED

At first, I expected this to be the result of the longer cure times and predicted that Rosemantic would fade to the peachy color with wear.  I was wrong (proof I'm not perfect lol).  When cured in LED, it stays true to the pink color you see here.  The change also only seems to impact the warm phase as the cold (red) is a match regardless of how you cure it.  The red might be a tad peachier when cured in the CFL UV lamp, but I can't really tell a difference with my eyes.
LeChat Rosemantic cured in CFL UV vs LED

Let's talk about the Dare to Wear lacquer version really quick.  I wore it on my toes for a while and found the color to be true.  Application was smooth and coverage was nice with two coats.  I have no clue if the fragrance stuck around since I'm not exactly flexible enough to sniff my toe nail polish, but I do know that it stayed around on a swatch stick for quite a while.  I'm also not going to show you a picture of my toes, so how about a swatch stick picture?
LeChat Perfect Match Dare to Wear Lacquer Rosemantic

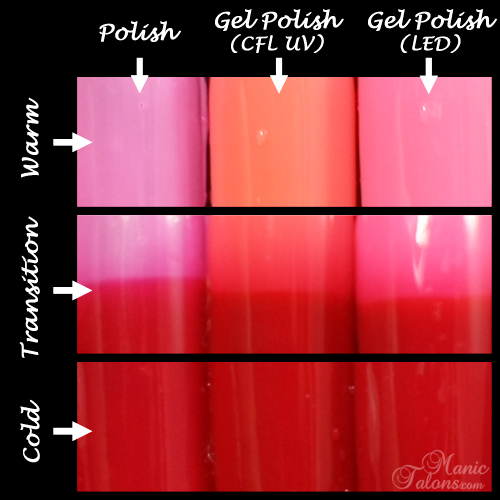
You might notice that the color of the warm phase on the lacquer looks different than the color of the warm phase for the gel polish (both CFL UV and LED versions).  You're right.  It is different.  I put together this cute little grid that shows the Lacquer, CFL UV cured gel and LED cured gel side by side.  As you can see, the cold phase is pretty much a dead on match, but there are definite variations in the warm phase.  The polish seems a bit more purple, the CFL UV is peachy and the LED is pink.
The Many Faces of LeChat Rosemantic

Ok, now that you've seen the variations, are you ready for my thoughts?
  • The lacquer doesn't match perfectly, but I'm totally ok with that since I rarely match my toes to my hands anyway.  Plus, unless you touch your toes a lot, I don't think they are different enough that anyone would notice.  I found it to be very shifty and definitely lives up to the thermal shifts we expect from the LeChat Mood gels.
  • The scent is a bit strong for me.  Or maybe it's that I'm not a huge fan of rose fragrances.  Either way, my hands are near my nose a lot as a smoker and I found it to be stronger than I prefer.  This is after just one layer of top coat.  I did end up stamping over it and adding two more layers of top coat over the stamping (pics in a moment).  After the third layer of top coat, the scent was barely noticeable.  So if you aren't a fan of rose fragrances, don't let that deter you on this one.  A couple of layers of top coat will mute it enough that you won't notice unless you pick your nose.  ;)
  • As long as you cure the gel polish in an LED lamp, the color stays true as a pink to red thermal.  If you cure in a CFL UV lamp, the color stays true as a peach to red thermal.  It doesn't change during wear that I could tell.  While some people might consider this a flaw in the color, I kind of like it.  Its like having two different gel polishes in the same bottle.
  • If you wear enhancements, I should warn you that the enhancement (acrylic or gel) will absorb the fragrance.  I noticed it was super strong while I was filing off the color and could still smell roses after I applied a different gel polish.
  • Finally, I only got 8 days of wear on my natural nails (right hand).  I don't know if the gel polish itself failed or if I was extra hard on my nails during school that week, but on the 8th day it peeled off of two nails in sheets.  I could speculate as to the cause, but I won't since I don't really know for sure.  ;)  I do know that my left hand was flawless at 12 days when I decided to change it, but my left hand is the one with gel extensions on two nails and gel overlays on the other three.

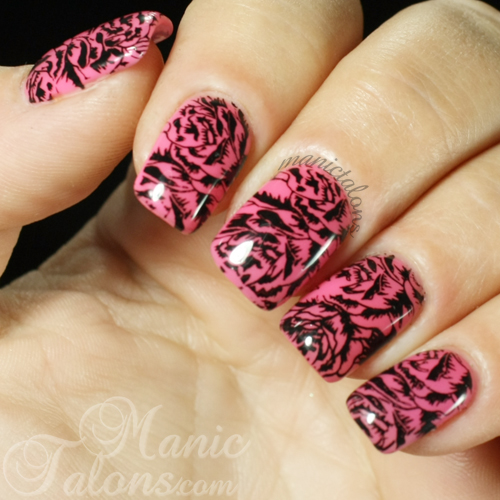
Ready to see Rosemantic with stamping?  I admit, I wasn't very creative with this one.  It is the color of roses.  It smells like roses.  You know I had to stamp it with roses.  lol  The stamping polish is Mundo de Unas black and the stamp is SE02B from the Pueen Encore Collection.  I adore the Encore collection for the endless possibilities!  Since I forgot to photograph all of the phases without the stamping, I have all three stamped phases to show you.  We'll start with warm and end with cold. 
LeChat Rosemantic Stamped - Warm
LeChat Rosemantic Stamped - Transition
LeChat Rosemantic Stamped - Cold

What do you think?  Is LeChat Rosemantic scented mood polish a must have for your collection?  I definitely see it as being a popular color for Valentine's Day.  :)

Also, if you love LeChat, I invite you to join the LeChat Perfect Match Swatches facebook group!  It is a closed group for members only, but we welcome DIYers and Pros alike.  It's all about swatches of LeChat gel polish (Perfect Match and Nobility) and sharing the "LeLove".  :)

~Michelle

*This post use Amazon Affiliate Links.  Purchases through these links generate commissions that help fund this site.  The LeChat Rosemantic that is featured in this post was provided to a friend as a press sample from LeChat.  It was passed along to me as a gift.  Thanks Angela!

Read more ...