Showing posts with label Revel Nail. Show all posts

Monday, May 11, 2015

Revel Nail Spring Collection 2015: Part 1

Press Sample

Revel Nail Spring 2015 Collection Part 1

Hello Loves!  Revel Nail has released 20 new colors in their gel polish line for spring.  This collection is unlike the other two Revel Nail releases.  How?  Well, the previous collections are creams and shimmers, many of which are opaque in two easy coats.  This collection consists mostly of jellies, crellies and glitters!  The 10 I chose to swatch for you today are the jellies and crellies.  Yes, that means Part 2 will be loaded with glitters.  ;)  The collection is also named after famous cities, which I think is kind of adorable.  Ready to go on a color packed journey?

The first stop on our little tour is BerlinBerlin is a gorgeous blue jelly base with scattering of silver glitter.  As is typical with a true jelly base, she starts out weak and builds to a rich color with additional coats.  I personally am not a fan of VNL (visible nail line), so I swatched three coats to minimize the visible line, though it is still there.  I have some wicked strong VNL anyway, so it might be opaque for you in three coats.  But look!  Isn't she incredible?  Like a night sky with twinkling stars.
Revel Nail Gel Polish Berlin Swatch

The next stop on our little journey through the colors is Buenos AiresBuenos Aires is a beautiful hot pink jelly base that is so loaded with shimmer it becomes completely opaque in three coats.  This one positively glows!
Revel Nail Gel Polish Buenos Aires Swatch

I should probably mention now that I'm directionally challenged and the last person you would ever want to plan a multi-city trip around the world.  Yep, I admit it...I didn't break out a map or anything.  Nope, these babies are in alphabetical order.

So, where are we headed next?  How about Dubai?  I have to admit, I'm not in love with this one on its own (remember, I hate VNL), but it has huge potential for nail art.  Say it with me now..."Leadlight Stamping Technique".  Dubai is what I would call a highlighter yellow jelly.  I don't believe it would be opaque in any number of coats.  I have swatched three below. 
Revel Nail Gel Polish Dubai Swatch

Let's hop on over to LondonLondon is what I would call a crelly with shimmer.  For those who are not familiar with the term, crelly is a cream/jelly combo.  It is sheer but builds to opacity and the result is amazing depth.  London is a medium, blue leaning purple crelly base with a subtle shimmer.  This is my kind of color!  Like the others, this is three coats.
Revel Nail Gel Polish London Swatch

Moscow is my personal favorite of this half of the Spring Collection.  This pink toned red jelly base is loaded with sparkle.  In one coat, it appears pink.  In two coats, it is a darker pink, but in three coats it becomes a nice shade of red.  I also love that it builds to almost opaque in three coats.  If you look closely, you can still see VNL, but it offers enough coverage that my heart is happy.  :)  And that depth!  Oh my goodness...it looks wet!
Revel Nail Gel Polish Moscow Swatch

Moving on to OsloOslo is a frosty metallic pastel purple.  Got all that?  Like the others, Oslo is quite sheer and needs three coats for opacity.  Please excuse the brush strokes.  Careful application would help avoid those, but it's a swatch, so yeah...
Revel Nail Gel Polish Oslo Swatch

Ready for the city of love?  Paris is a mostly sheer, milky white with a super soft pink tint.  In all honesty, this is one of those barely there colors that helps disguise imperfections in the nail while still allowing a very natural look.  I kind of love this one.  It also shows why I hate VNL so much...my natural smile lines are drunk.  It also shows off the staining under my nails from removing a black polish for a client last week.  Whoops.  lol  I swatched three coats below, but there was no difference between two and three.
Revel Nail Gel Polish Paris Swatch

Truth be told, Paris makes a great base for a french manicure.  I threw a few quick swipes of white over the tips on my previous swatch of Paris.  I then added another coat of Paris over the entire nail to soften the bright white just a tad.  Despite the thickness of the white tips (not my personal preference), I'm really happy with the resulting color.  This might be my new "go to" color for a french manicure base.  :)
Revel Nail Gel Polish Paris as French Base

Rio de Jenairo is a coral leaning pink crelly with no shimmer or glitter.  This is a bright and fun color that will easily transition into the summer months.  I found I needed three coats for full opacity, but you might be able to get away with two.
Revel Nail Gel Polish Rio de Jenairo Swatch

Stockholm is a neon green jelly.  Like Dubai, Stockholm is a true jelly but offers slightly more coverage in three coats.  I don't even have to tell you that I'm not a huge fan of this one on it's own, but I do love it over a white base.
Revel Nail Gel Polish Stockholm Swatch

We'll end our crazy journey in kangaroo country.  Sydney is an incredibly pretty, pastel mint green crelly.  Sydney is a true crelly finish in that it is slightly sheer and has that amazing wet look, but it does offer full coverage in three coats.  Oh, and you totally can't see it in my swatch, but Sydney has a very subtle shimmer as well.  If you look closely around the light reflection on the middle nail in the top picture, you can sorta see it.  It pops more in natural sunlight.
Revel Nail Gel Polish Sydney Swatch

Since there are so many true jelly finishes in this collection, I decided to try a few of them over a white base to see if I would love them without the VNL.  The answer is yes.  I certainly do love them layered over white!  Of course, a little stamping makes this skittle even more lovable.  :)

The colors used are (starting with the thumb): Buenos Aires, Dubai, Stockholm, Berlin and Moscow.  I layered two coats of each over a white base.  You can see the pink tone of Moscow much better in this picture.
Skittle with Revel Nail Buenos Aires, Dubai, Stockholm, Berlin and Moscow over White

What do you think of this first half of the Revel Nail Spring 2015 Collection?  Are you a fan of jelly finishes?  They really do have amazing potential.  Try layering glitter between coats for an amazing look (I'll show examples in a future post).  If any of these shades captured your heart, you can pick up your own individual bottles here or the whole set of 20 new shades plus top and base for just $148 here.  That's a steal!

Stay tuned for the other half of the Revel Nail Spring 2015 Collection next week.  Trust me, you don't want to miss it!  :)

~Michelle

*The polishes featured in this post were provided by Revel Nail for my honest review.  All links are courtesy links and do not benefit ManicTalons.com. 

Read more ...

Wednesday, May 6, 2015

Review: Revel Nail Dip Powders (acrylic dip system)

Press Sample

Revel Nail Acrylic Dip Powder System Review

Hello Loves!  I have something new and exciting to show you today.  Revel Nail recently released their Acrylic Dip System.  The Revel Dip Powders currently come in 65 fabulous colors!

Now, I imagine some of you are sitting here thinking "what in the world is an acrylic dip system?"  Let me tell you a little more about it.  Traditional acrylic is a liquid and powder system.  You dip your brush into liquid monomer, then drag the tip trough a powder polymer to create a bead that is applied and shaped to the nail.  I'm sure you're all familiar with it.  Acrylic Dip Systems are a little different in that they use brush on resin instead of liquid monomer.  The resin is brushed onto the nail and the nail is then dipped into an acrylic powder.  The process is repeated several times to create an acrylic enhancement - usually as a natural nail overlay or over a tip.  For those who use the acrygel technique, this probably sounds familiar to you.  ;)

Revel Nail Acrylic Dip Powder System Review

So, let's talk about the Revel Dip System.  Each of the individual bottles are conveniently labeled by the step.  Step 1 Prep is your first bottle and is used to prep the nail (after removing the shine from the nail plate and cleansing away the debris, of course).  Step 2 Pro Base is the little bottle of magic (aka resin) you apply before dipping the nail into the Dip Powder.  The Pro Base and Dip Powder steps are repeated a few times, finishing with another layer of Pro Base.  Step 3 Activator basically accelerates the Pro Base so that it is completely dry without having to wait.  Step 4 Finish Gel provides the shine and is applied after shaping and balancing the nail.  Finally, that last bottle you see in the image above is a nifty little bottle of Brush Softener.  Since dip systems use resin (basically nail glue), the brushes can get hard if they are left out of the bottle too long or come in contact with the Activator.  The brush softener dissolves the resin and restores the brush.  Genius!  Since I ran through that pretty quickly, I'll post the step by step directions at the end of the post.

For now, let's take a look at the results.  I have a few colors to show you, including the basic pink and white nail.  All of my swatches are done over my natural nail (no tips).  The Dip Powders are super fine acrylic powders - finer than the traditional acrylic powders used in L&P systems.  This makes them super easy to use with little filing after application.  I did inquire about the powders themselves, and they are standard acrylic powders - just finer.  They can be used with Revel's monomer from the traditional acrylic system if desired.  I plan to try sculpting some acrylic flowers with them to go with the overlays, but I haven't had a chance yet.

First up is the pink and white.  I'll be honest...pink and white looks really easy when you watch the Revel Nail Dip Powder demo video (later in this post).  Trust me on this one...it's not as easy as it looks!  Dipping the perfect smile line takes practice...practice I haven't quite managed to fit into my schedule yet.  lol  The pink is a soft, semi-opaque natural pink called Scarlett (D71).  The white is a bright white called Veronica (D74).
Revel Nail Acrylic Dip Powder French in D71 Scarlett and D74 Veronica

As you can see, my smile lines are all over the place.  I also found that the pink and white is a little tricky because you have to dip into both jars.  By the time I carefully dipped my smile line, the Pro Base was drying and wasn't quite wet enough to dip into the pink.  That's why the pink looks a little grainy.  When done correctly (aka quickly with the proper ratio of Pro Base to Powder), the pink is smooth.  Here's another shot.
Revel Nail Acrylic Dip Powder French in D71 Scarlett and D74 Veronica

The next color I tried is a solid combo of Michelle (D56) and Clara (D12).  Michelle is the pink and Clara is the mint green.  Application on these went much easier for me since I didn't have a smile line to worry with.  I wore this mani for over a week before removing it.  I'm happy to report that it wore beautifully, even through a week of class!  I should note that I did not use the Finish Gel with this one and opted for the Revel Tack-Free Gel Top Coat instead (it does require curing in a CFL UV lamp, but the rest of the system does not).  The Finish Gel doesn't stand up to acetone, so I needed something stronger for school.  The Tack-Free Gel Top Coat is intended for use over permanent enhancements and is not soak off, so it worked beautifully.
Revel Nail Acrylic Dip Powder in D56 Michelle and D12 Clara

I love how the dip system flatted out the wonky areas of my nails.  Remember, my nails are thin right now from overfiling, so they tend to curve more than they should.  The dip acrylic added support and lifted the tips into a very nice squoval.
Revel Nail Acrylic Dip Powder in D56 Michelle and D12 Clara

The next two swatches I have to show you are glitters!  I should also note that these are swatched using the Acrygel Technique instead of the full dip system.  Swatching acrylic is hard on my nails due to extended soaking times, but I wanted to show you true swatches so this is my compromise.  Before using the Dip Powders with the acrygel technique, I emailed Keeli at Revel Nail and asked about the safety of combining the powders with the Revel Nail Gel Polish Base Coat and Top Coat for this purpose.  She checked with her chemist and confirmed that the products are compatible and safe for use together, but she did caution that they haven't tested it and can't guarantee the wear.  For more info on the acrygel technique, check out Andrea's Acrygel post on Chickettes.

First up is a beautiful, glittery blue called Ingrid (D31).  I wore this mani for over a week as well and am happy to report that these Dip Powders are fantastic with the acrygel technique!  My nails felt strong, it wore beautifully with no lifting, and removed easily.  Plus the added bonus - the color is built right in!  No need to add gel polish over it.  The result is a super strong, beautiful mani that took no longer to apply than a traditional gel polish.  Not to mention I've never seen this depth in a gel polish.
Revel Nail Acrylic Dip Powder in D31 Ingrid

Just look at the depth in that blue glitter!  Plus full coverage.  I am absolutely in love!
Revel Nail Acrylic Dip Powder in D31 Ingrid

If the previous photo didn't convince you, take a look at this closeup.  My camera couldn't even begin to focus on the glittery goodness.
Closeup of Revel Nail Acrylic Dip Powder in D31 Ingrid

The final swatch I have for you is called Marilyn (D49).  This is a semi-sheer pink base that is loaded with red and gold glitter.  The mix of red and gold creates a glamorous, copper tone.
Revel Nail Acrylic Dip Powder in D49 Marilyn

This color isn't the best with my skin tone, but I can definitely see myself using it for accent nails in the future.  It's just so pretty!
Revel Nail Acrylic Dip Powder in D49 Marilyn

Before I go into the Dip Powder System application steps, let's talk about removal.  Since the powders are applied with resin, this acrylic overlay removes quicker than traditional acrylic enhancements.  To remove, I filed the surface with a 180 grit file to remove the Tack-Free Gel Top Coat and a little bit of the bulk from the enhancement.  I then soaked in a double bowl with pure acetone (one bowl of acetone sitting in a separate bowl of warm water) for about 30 minutes.  The enhancement turns gummy while soaking and can be pushed off.  I pushed it off in layers to speed up removal, but the total time was around 30 minutes. 

Ok, so let's go through the Dip Powder System application steps.  I'll share the Revel Nail video below as well.  A few quick notes about the video - she removes the shine from the natural nail with an efile.  I don't recommend this and would have to think long and hard before allowing anyone to use an efile on my natural nail.  It can be done safely, but it requires many years of practice with the file (no doubt the tech in the video is very experienced with her file!).  So please use a hand file to remove the shine from the natural nail if you haven't mastered an e-file yet.  I used a hand file on all of the manicures I showed you above.  Also, if you are using the powders on clients, you might want to place some in a dappen dish and discard it after use rather than dipping directly into the container to reduce the risk of cross contamination.  Another option is to sprinkle the powder over the nail, but I found it difficult to get the right ratio of Pro Base to Powder with the sprinkle method.  Also, be sure to watch the video at least once before applying the product to your nails just in case my steps below are not clear.

Application Instructions
(Note:  These instructions are for a pink and white overlay.  For solid colors, omit the steps where you dip into the white.  All other steps are the same.)
Step 1:  Sanitize hands.  Use a 240 grit (or higher) file to gently remove the shine from the natural nail.  Remove all nail debris with a nail brush or a lint free wipe
Step 2:  Apply Step 1 Prep to the nail
Step 3:  Apply an even coat of Step 2 Pro Base to the stress area of one nail (the stress area is the portion of the nail that turns white if you push down on the tip)
Step 4:  Dip the nail into the pink powder using a scooping motion
Step 5:  Tap the nail to remove excess powder
Step 6:  Repeat Steps 3-5 on the remaining 9 nails
Step 7:  Apply a second coat of Step 2 Pro Base to the first nail
Step 8:  Dip just the tip of the nail into the white powder (see the video below for tips on creating the smile line)
Step 9:  Dip the entire nail into the pink powder.
Step 10: Tap the nail to remove excess powder.
Step 11:  Repeat steps 7-10 on the remaining 9 nails
Step 12:  Repeat steps 7-11 on all 10 nails (at this point you should have three layers of powder on the nails)
Step 13:  Apply a final coat of Pro Base to all 10 nails to seal the last dip.
Step 14:  Apply a generous coat of Step 3 Activator to all 10 nails, making sure to cap the tips
Step 15:  Once the nails are dry, shape and balance the acrylic with a file.  Be sure to smooth the cuticle area if needed.  Brush away any powder with a nail brush.
Step 16:  Quickly rinse hands with water and dry.  Do not use soap.
Step 17:  Apply another coat of Step 3 Activator to all 10 nails.  Then wipe each nail with a lint free towel.
Step 18*:  If using the Finish Gel, quickly apply a coat to each nail on one hand without pausing.  Wipe the brush on a towel between nails to reduce brush stiffness.  If the brush gets stiff, allow it to sit for a few minutes in the brush softener.
Step 19:  Apply a second coat of Finish Gel to the nails on the same hand.  This coat can be slower and more precise.
Step 20:  Repeat steps 18-19 on the other hand.
Step 21:  Once the finish gel is dry, apply cuticle oil to restore moisture.

*If you opt to use the Tack-Free Gel Top Coat, omit steps 18-20 and apply a thin coat of Tack-Free Gel Top Coat instead.  Cure for 2 minutes in a CFL UV Lamp (it is not LED compatible). 

Got it?  I know the instructions look complicated when typed out like they are above, but it's really super simple.  Check out Revel Nail's video and see for yourself.  :)


And there you have it!  If you're looking for a great Acrylic Dip Powder System with a wide range of colors, Revel Nail has you covered.  And for my gel lovers out there, check these out for acrygel!  They're amazing!  I will definitely be adding more colors to my collection.  These held up to the abuse I put my hands through in class much better than my gel polish usually does!  Of course, I still love my gel polishes and don't plan to abandon them any time soon, but these will definitely be added to my regular arsenal. 

Oh, I almost forgot...I put together a shot of the colors side by side.  :)  Excuse the wonky swatch stick for Michelle.  lol  From left to right:  Pink and White with Scarlett and Veronica, Clara.  Michelle, Ingrid, and Marilyn.  Such a great group of pretty ladies.  lol
Revel Nail Dip Powder Swatches


Revel Nail also offers several packages for the Dip Powder System as well as individual listings.  Check them out on Revel Nail's Website here!

~Michelle

*The Revel Nail Dip Powder Acrylic System featured in this post was provided by Revel Nail for my honest review.  All links within this post are courtesy links and do not benefit ManicTalons.com.

Read more ...

Monday, April 13, 2015

The Nail School Chronicle: Weeks 18 and 19

Press Sample

The Nail School Chronicle Weeks 18 & 19

Hello Loves!  I apologize for the sudden absence last week, but I'm back with a two week update and a full blog schedule coming your way!  Now, let me see if I can remember everything that happened over the past two weeks.

Week 18 was the week before Easter.  Not much to write about from that week.  There was supposed to be a nail art contest on April 1st.  Note that date...April 1st...April Fools.  Yeah, Ms. Rhonda thought it would be cute to tell us to expect an Easter and April Fools themed nail art contest only to "fool" us with a pop quiz instead.  That was a sucker punch if I've ever seen one.  lol  Not going to lie...I was kind of relieved.  I've been burning the candle at both ends for so long now that I'm seriously lacking in the creativity department.

So, what else happened that week?  Well, Ms. Donna stopped by and asked me to do a polish change for her - a french polish change.  Oh, I should probably tell you that Ms. Donna is the Director of GCI.  Yeah, no pressure, right?  I'm not going to lie...if she had asked for a gel polish french I could have done some really impressive nails.  But polish?!?!?!  Do y'all have any idea how bad I suck with polish??????  You know that stuff actually dries on it's own, right?!?!?!?!?!  Yeah, so I kinda bombed on that one.  It was fun chatting with her and she's really nice, but this might be the worst french I've done in years.  *sigh*  Sorry for the blurry picture.  She's a busy lady and I was trying to snap a picture while someone else was pulling her away to handle something.

The rest of Week 18 ended in a major migraine and me missing two days of class.  Dang it, I have way too many health issues that are impacted by stress.  I always tell my mother that if she and my Daddy were dogs, they wouldn't have been allowed to breed.  Poor Mama.  I guess if you're not a dog person, that comment might not make a lot of sense...

Moving on to Easter, William's birthday, and food poisoning.  I admit, I'm a short cut mother.  My little one turned 2 last week, and we decided to combine his birthday celebration with Easter dinner.  We don't do large birthday parties for the kids - just small gatherings with family that usually include dinner and cake.  Since we were already planning to have Easter dinner with my family, we threw in a cake and called it a day.  He's two...it's not like he cared.  lol  It was a nice day.  Great to spend time with my family...until I ended up sick about an hour after dinner.  Food poisoning.  Three days worth of horrible food poisoning.  Sheesh.  I can't catch a freaking break.  I'm pretty sure it was the result of my lunch from that day and not my mother's wonderful cooking.  Thankfully Monday was a school holiday, so I only ended up missing two more days of class.  But, that put me even farther behind...which brings me to Week 19.

Week 19 kicked off half way over, but it started with a progress report.  Progress reports are issued monthly and tell us where we are and where we should be.  No biggie.  I knew I was about 80 hours behind.  But, y'all, where in the heck did the time go?  I'm 5 weeks away from my scheduled graduation date!  Sweet mother of manicures, there's no freaking way I can make up 80 hours in five weeks.  It's just not possible when Monday is the only day I can stay over due to Keith's schedule.  Crap!  It looks like I won't be graduating on schedule.  So I have a new goal - May 29th.  Two weeks late, but still not too bad.  Though 7 weeks still isn't a lot of time to get everything done.

But that's only part of my panic.  Making up the hours is going to be tight, but the credits are the biggest issue.  I think I mentioned it in the past, but GA has higher requirements than most states for Nail Technology training.  We have to get 620 hours (clock hours), but we also have to get a slew of credits.  The credits are stressing me beyond belief right now.  I've missed so much time throughout my journey and I've managed to keep from getting too awful far behind by making up hours along the way, but credits are a different story.  Some credits require live clients instead of the mannequin hand, and we don't take clients on Mondays - my only makeup day.  So, how dire is the situation?

Eh, it's not too bad...as long as you don't count those mani and pedi credits.  Yeah, my gut takes a dive every time I look at those numbers.  The acrylic sets don't bother me since I can knock those out on the hand.  Same with the fill-ins and wraps.  Advanced will happen between now and then (gel polish is considered advanced...as is nail art).  It's those mani and pedi credits!  Let's do the math...there are 28 client days between now and my new graduation goal.  I need 67 manicure credits and 41 pedicure credits.  Each mani counts for 1 credit.  Each pedi counts for 1 credit.  I'll need to average 2.5 pedicures and 1.5 manicures each day in order to make my credits by my goal.  Plus have time to finish up the rest of the credits too.  And clients are assigned by rotation through the seniors, so I might get two clients a day on average...yeah, I need a freaking miracle.  :(

And to add to my stress, we have completely reached the end of our budget.  I'm staying the course, but we're robbing Peter to pay Paul and Peter is starting to catch on.  Dang it, I WILL finish this.  I'm just not sure how I'll pull it off without having my car repossessed and an eviction notice from the mortgage company.  We should be hearing from Keith's attorney today about the settlement from his accident.  If you're the praying type, please pray that the insurance company came back with an offer we can work with.  I don't think we can make it another 30 days and it will take at least that if we have to counter. It's killing me to be this close to finished and so close to not making it at the same time.  I'm sorry to problem dump on everyone, but it's really stressing me out and taking a major toll on my health.  I know I haven't posted the link in a few weeks, but my GoFundMe is still active.  I was hoping the settlement stuff would work out in time so that I wouldn't have to share the link anymore, but yeah...let's just say things haven't gone according to plan so far.

So let's move on to happier topics, shall we?  How about "What's on Michelle's Nails Today" for $500?  I'm super loving my current mani.  Want to see it?
Precious Kitties with Messy Mansion MM50 and RevelNail Acrylic Dip System

Ok, so I'm testing out RevelNail's New Acrylic Dip System (press sample).  It's similar to SNS nails and they launched with 65 color choices.  Pretty cool.  This is the first time I've used a dip system on my own nails, but I'm really liking it so far.  The pink is called "Michelle" and the mint green is "Clara".  I'll have a full review for you in a few weeks.  The kitties and paws are from the new Messy Mansion Kitty Plate (MM50) (press sample).  I freaking love this plate!  I completely spaced and forgot to snap a photo of the plate, so here's the preview image from Messy Mansion's site.  So many adorable kittens to choose from!  If you love cats, you NEED this plate.  Heck, even if you're a dog person like me, you still NEED this plate!  lol
The Messy Mansion Kitty Plate - MM50
Image Credit: www.messymansion.com.au

The kitties from MM50 also gave me the perfect mani for my adorable little kitty charms I picked up on Ebay.  Here's a cell phone shot that I snagged earlier today.  It shows the kitty charm a little better, I think.  Quality and color are off, though.
Precious Kitties with Messy Mansion MM50 and RevelNail Acrylic Dip System

That's all for today.  Check back later in the week for some major swatch love!  I swatched just under 20 gel polishes this past weekend!

~Michelle

*The Acrylic Dip System featured in this post was provided by Revel Nail for my honest review.  A full review will be published at a later date.  Messy Mansion MM50 was provided by Messy Mansion for my honest review.  All product links within this post are courtesy links and do not benefit ManicTalons.com. 
Read more ...

Friday, March 6, 2015

Revel Nail Up2You Gel Polish Review

Press Sample Affiliate Links

Revel Nail Up2You Review

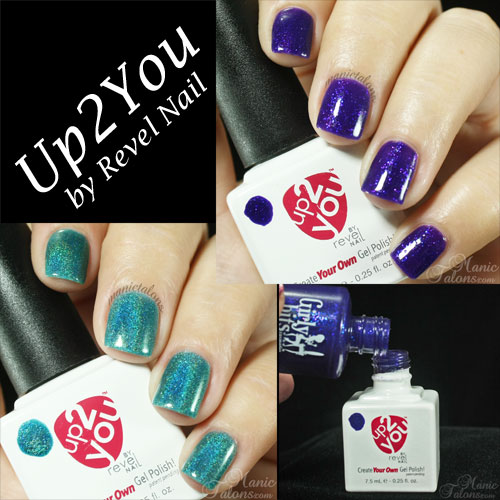
Hello Loves.   I have a new product from Revel Nail to show you today called Up2You.  Up2You converts nail polish to gel polish one bottle at a time.  Up2You is a little different than the other system I reviewed a few months ago.  Instead of mixing a little at a time, Up2You is designed to create a full bottle of gel polish out of your favorite nail polish.  It is also a 2 step system in that it does not require a base coat.

So how does it work?  The bottle of Up2You is a full sized 0.5 fl oz bottle but contains only 0.25 fl oz of mixing solution.  It is a higher viscosity gel than we are used to seeing with gel polish, which allows it to mix with the polish without diluting the color as much.
Revel Nail Up2You

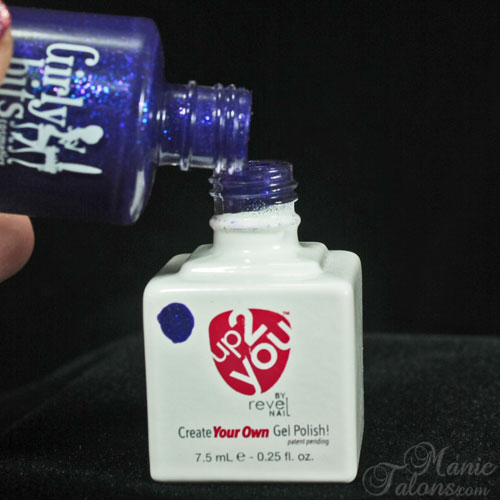
The half filled bottle takes the guess work out of mixing.  Simply add 0.25 fl oz of your favorite polish to the bottle and shake!  (0.25 fl oz of polish will fill the bottle just up to where the neck joins with the base)
Revel Nail Up2You

Sounds easy right?  Yep, it pretty much is.  Now, you might be wondering about the shaking part.  The Up2You bottle has shaking balls inside to help mix the polish with the gel.  And there is a secret to the shake.  Trust me, this part is important.  After replacing the Up2You cap, hold the bottle upside down for 30 seconds to start the mixing process.  Next, roll the bottle for about 45 seconds, gradually increasing the speed.  Now shake it in an X pattern.  Listen for the mixing balls.  If you don't hear them, hold it upside down again and roll it again.  Once the polish starts to mix with the gel, the balls should move freely.  Trust me on this one, if you skip these steps it won't mix right.  Even my Robart Shaker didn't mix it well without the first two steps, and I swear by that thing.  ;)

Check out Revel Nail's Step by Step instruction video below.  It shows exactly how to do each mixing step.  :)


One you have mixed your favorite polish with the Up2You, the rest is basic gel polish application.
  • Gently buff the nail to remove the shine
  • Cleanse the nail with isopropyl alcohol or prep
  • Apply one thin coat of your Up2You mix.  Cure for 30 seconds in LED or 2 minutes in UV.
  • Apply a second coat of your Up2You mix.  Cure for 30 seconds in LED or 2 minutes in UV.
  • Apply a thin coat of Soak Off Gel Top Coat.  Cure for 30 seconds in LED 2 minutes in UV.
  • Wipe the nail with isopropyl alcohol or gel cleanser to remove the tacky layer. 
  • Enjoy your new gel polish mani!

Ready to see her in action?  The most difficult part for me was deciding which of my polishes to convert to gel.  As you know, 90% of my regular polishes are indies.  I stood here looking at my rack for a long time trying to choose which ones to convert.  I finally decided on Girly Bits Seriously Sassy and KBShimmer Up and Cunning.  These are two that I remember thinking "Dang I wish I had this as gel polish!" when I swatched them. 

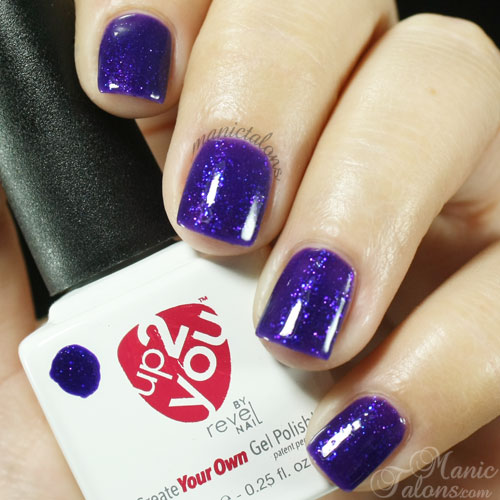
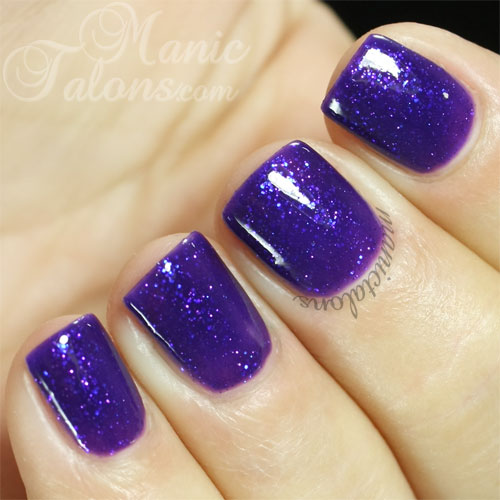
Up first is Seriously Sassy.  Seriously Sassy is a thicker polish and is loaded with chunky shimmer or micro glitter.  It did quite well when mixed with Up2You.
Girly Bits Serious Sassy Converted to Gel Polish with Up2You

But how does it compare to the original Girly Bits Seriously Sassy shade?  I removed the gel polish from two nails and applied the regular polish to show you.  The color is slightly diluted, but only very slightly.  My husband couldn't tell the difference between the gel polish and regular polish nails.  :)
Girly Bits Seriously Sassy and Up2You Comparison

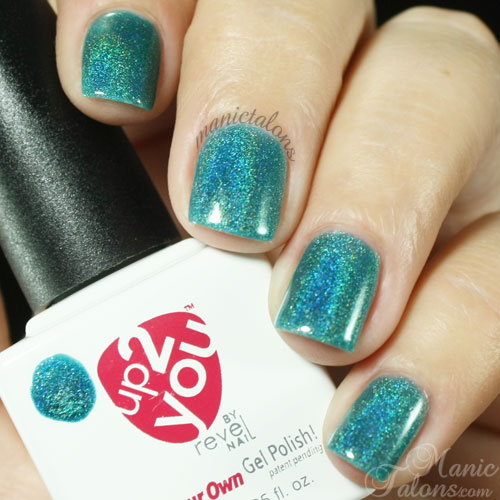
The second color I chose to test is KBShimmer Up and Cunning.  Because, well, you know I had to try it on a holo!  I'm still dreaming of the day one of my favorite brands creates a true linear holographic gel polish.  ;)  The results with Up and Cunning are a bit different than my results with Girly Bits Seriously Sassy.  The formula for Up and Cunning is a little thinner, which is typical for holographic polishes.  The thinner base helps the holo pigments pop.
KBShimmer Up and Cunning Converted to Gel Polish with Up2You

The Up2You version of Up and Cunning still has a nice rainbow, but it is not as strong as the pure KBShimmer version.  The color is also diluted a bit.  Here's the comparison photo.  One more coat of the Up2You version would improve the shade and depth, I think.  But I wanted to stay consistent and used two coats.
KBShimmer Up and Cunning and Up2You Comparison

So, how does it wear?  Well...eh...yeah...I'm not the best person to ask about that one.  We already know from my original Revel Nail Gel Polish Review that the standard Revel Nail base coat doesn't work for me.  So it's not a surprise that this system doesn't wear well for me either.  It does, however, wear beautifully over the custom base that Revel Nail created for my Teflon nails.  So when it comes to wear, it depends on your nails.  If your nails are typically dry and porous, it will likely wear beautifully for you.  If they are super smooth and flexible, you might want to use your favorite base gel under the color mix.

Here's the part I know you've been waiting for - my honest opinion.  Because you know I'm going to give it to you.  ;)  I love that this system is rather fool proof.  If you can pour polish from one bottle to another, you can create the perfect mix.  There's no guessing and trying to judge the size of drops and puddles.  Having it in the bottle also eliminates the issue I found with mix-as-you-go systems of the mix turning goopy half way through your mani.  The bottle keeps the solvents in the polish from evaporating so the consistency of the mix is stable. The addition of the mixing balls was genius!  I know of several gel polish brands that could learn a few things from Revel Nail on that one.

The only thing I'm not sure that I like is the size of the bottle.  This is the one time I find myself wishing for a mini-bottle option.  While there is definitely a need to create a full bottle of some polishes in a salon setting (hello holos!), I don't know that I would need a full bottle of most polishes.  There are so many gorgeous options in gel polish without having to mix.  Revel has 40 amazing gel polish shades of their own with new releases coming soon (and I do adore their gel polish line).  So I see it more as a special occasion thing that might not need a full bottle.  But then again, mixing a whole bottle isn't too big of a deal for the price.  Unless, of course, you're neurotic like me and it breaks your heart to see your bottles of regular polish that you almost never wear because they aren't gel polish sitting half full on your shelf because you converted them.  Yeah, I know...I'm strange.  But it's endearing, right?  lol

So...I did a little thinking.  The bottle of Up2You is filled half way.  That makes the perfect mix 50/50 gel to polish.  I took my third bottle of Up2You and started mixing single servings of color.  It works beautifully, though it does put the guess work back into the mix.  But hey look...options.  :)  Just be sure to label your bottle if you start mixing one off colors.  You wouldn't want to get it confused with a new bottle and mess up a mix later down the road.  I should also note that when mixing a little at a time, you only want to mix enough for one hand (if you're DIY...you could probably mix for a full mani on a client since there's less down time between hands).  The solvents in the polish will start to evaporate as you are applying it and it will get goopy.  
Revel Nail Up2You Single Serving Mix

What do you think?  Do you have a few bottles of polish that you want to convert to gel?  If so, Up2You would be a great new addition to your stash.  Revel Nail offers Up2You in several packages, ranging from one bottle for $6.49 to a 3 pack plus top coat for $22.90 to 18 bottles with 2 bottles of top coat for $109.99.  You can't beat those prices with a stick.  ;)

~Michelle

*Up2You was provided by Revel Nail for my honest review.  This post contains Amazon Affiliate links.  Purchases through those links generate commissions that help fund this site.  All other links are courtesy links and do not benefit ManicTalons.com.
Read more ...