Hello Loves! I officially survived my first week of nail school at Georgia Career Institute. Whoa, what a week! I also have my Thanksgiving mani to show you, so stick around to the end of the post to see it. :)
So, what was the first week like? Fast paced and a little overwhelming, to be honest. Since it's a revolving curriculum, all of the students are at different places in terms of hours. Some have been learning for only a few weeks. Others are nearing graduation. All of my classmates are friendly and my instructor is as well, so that helps. When I walked in, I was handed my books and told to read over the Chapter on Skin and Nail Physiology and Diseases. Whoo Hoo. lol
The next thing I was given was a fake hand that seriously brought back memories of watching the Adam's Family with my Grandma as a child. Yes, I just dated myself, but these dummy hands remind me of "Thing". Come to think of it, my dummy hand will be referred to as "Thing" going forward. After all, every "client" has a name, right? ;) I was also given monomer, polymers, tips, files, an acrylic brush, and quick instruction on overlays. That rapidly moved into blended tips. Yes, my first day jumped head first into working with acrylics. Y'all, I'm no stranger to gel polish, but acrylic scares the crap out of me. Ok, it doesn't really scare me, but it's a completely different animal than gel polish. I feel like I've never picked up a nail brush in my life working with this stuff. The nail program is very heavily weighted in acrylic work, so I need to master it even though gel is my passion. Wanna see my first full attempt at blended tips with an acrylic overlay? It's not very pretty, but I guess it's not horrible. Excuse the poor lighting. The classroom lighting isn't great for photos.
By the third day, I was working on completely sculpted pink and white acrylics. Needless to say, tips are much easier for me. Want to see my first full set of sculpted nails? They're pretty funny. ;) That index nail looks a bit ducky.
Sadly, I don't have my kit yet, so the first week I was working with a hodge podge of materials: monomer from the school, polymers from my personal stash (Thank you to Brenda from Tuff Enough Nails aka T.E.N. for sending me those with the Poly Polish I reviewed last month), an acrylic brush that was included in a press sample as a gift from Thresa from Esther's Nail Center (Thanks Thresa!), and other odds and ends from the school. I did pick up an acrylic starter kit the other day so I could practice at home. Hopefully my kit will be in soon. I should note that it is not the school's fault that I don't have my kit yet. Apparently OPI is behind in supplying them to the schools. :/
So, what else did I learn this week? Let's see...
- Getting up at 5:30 in the morning really sucks. I'm so not a morning person! I much prefer to sleep in and stay up late at night.
- Shaping acrylics by hand is challenging. Apparently I'm not capable of filing someone else's nails without also filing my own. My poor thumb nail on my left hand is missing the corners now.
- I really hope my first real client is double jointed. I find myself moving the dummy hand into positions that just aren't natural for a real client. lol
- Neither Couture Gel Polish or Luxio Gel Polish will continue looking great when constantly assaulted by a 180 grit file, but both stayed on without chipping! (Check in Friday for my full review of Luxio)
- Nail Glue is NOT my friend. I can't even begin to tell you how many times I glued fake nails to my myself on accident. And we're not talking about putting them on my nails. No, we're talking about fake nails affixed to the pad of my finger, the side of my palm, and even on my elbow once.
- Going back to school and reading text books for the first time in over 14 years is quite...um...different. Don't get me wrong, I love to read. But text books aren't exactly my first choice of literature. I can honestly say that I have forgotten how to study. :(
- Nail Diseases and Disorders can be really disturbing. Especially the text book photos. Yet all of the names sound the same. This test next Monday is going to be challenging.
That pretty much sums up my week. Ready to see my Thanksgiving mani? I decided to combine pigments and stamping for a quick and easy mani this week.
I started with a white base and then burnished (or scrubbed) in three different pigments into the tacky layer. The pigments are from the T.E.N. Color Explosion Powders line and remind me of the colors of changing leaves. The colors are Red Ruby, Fired Up Red, and Lil Shot O Orange.
These pigments are awesome. They are super fine and stick to the tacky layer of gel polish with ease. Here are the open pots in the same order as the closed pots above.
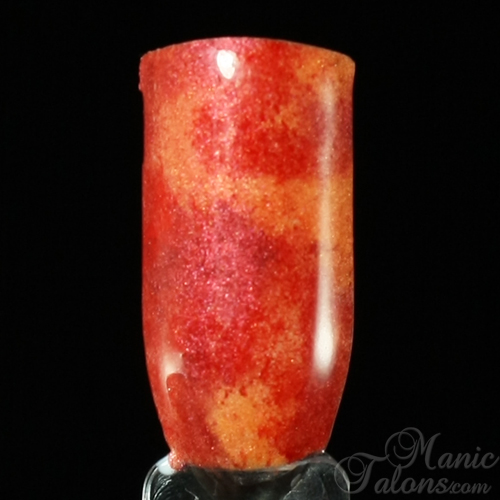
Of course, I forgot to take a picture of the base before stamping over it. I keep doing that! Sorry, I guess I get so into the art that my brain shuts off for a bit. But I do want to show you the base, so I recreated it on a swatch stick. I seriously considered not stamping over it. It's so pretty all alone! To create this look, I burnished the colors randomly over the nail. I started with a swirl of Lil Shot O Orange in the center and then added the Fired Up Red and Red Ruby to create a marbled effect.
For my actual manicure, I used the Pink Gellac Ultra Shine Pearl top coat over the pigments to add a little extra sparkle (I used a regular gel top coat on the swatch above to show you the true colors of the pigments). Then, because I can never leave well enough alone, I stamped over the base with Maybeline Bold Gold and two images from BM-H11 from the Bundle Monster holiday plate set. The ring finger is the pumpkin image, though it's hard to see the photo. The rest of the nails are stamped with the coordinating leaves image. This set is a recent addition to my collection. I don't know why I waited so long to get it. It really is a must have for any holiday. I finished with the regular Pink Gellac Ultra Shine top coat. Both the regular and pearl ultra shines are no-wipe top coats, which I really like. Check in Wednesday for my full Pink Gellac top coat review.
I love the subtle stamping over the colorful fall base. I'm kind of disappointed to know that I'm going to mess it up with that danged file tomorrow at school! lol
I guess that concludes this week's edition of The Nail School Chronicle. Check back next Monday, same time and place, for the next edition. This upcoming week will be a short one thanks to Thanksgiving break, but I'm sure I'll have something fun to report.
~Michelle
*The pigments used in this post were provided by Tuff Enough Nails (T.E.N.) for my honest review. This post also includes Amazon Affiliate Links. Purchases through those links generate commissions that help fund this site. All other links are courtesy links.


"I really hope my first real client is double jointed." - this made me spit out my coffee, and the nail glue section had me laughing hard enough to snort...I'm thankful I was at home reading this. Good luck with nail school!
ReplyDeleteWhat a great story! I can't wait to read more!
ReplyDeleteAs a new DIYer, I just discovered your blog and all the super helpful information here, which is also helping me to answer some questions for myself re how far I want to take this new passion for (almost) all things nails. So glad you're sharing your school adventures with us, we appreciate you so much!
ReplyDelete