Friday, May 29, 2015

Hair Candy Review and a Leap Into Color

Press Sample Affiliate Links

Hello Loves!  I have another off topic review for you today.  I promise, I'll get back to the gel polish and nail art after this post.  But I'm pretty excited about this so I wanted to put it out there.  As you might remember from previous Nail School Chronicle posts, I've been testing a vitamin supplement called Hair Candy for hair, skin and nails.  I'm not usually one to try supplements, but I researched this one a little and after checking with my doctor, I decided to give it a try.

Hair Candy Biotin Vitamins for Hair Skin and Nails

You may be wondering why I decided to try it.  As you can imagine, I'm willing to try anything that my doctor says is safe to combat the damage to my skin and nails from the abuse I put them through.  But I was also pretty curious about my hair.  Before a few weeks ago, I had completely virgin hair!  Never colored at all.  I was always afraid of damaging it, and my hair is prone to breaking anyway.  I don't really do much in terms of styling either.  I wash it, condition it, dry it just enough to keep my shirt from getting wet, and let it go.  No products.  No heat styling.  It just..."is".  Or maybe I should say "was"...but I'll get to that in a minute.

Since Hair Candy is basically a multi-vitamin with added ingredients for hair, skin and nail support, it seemed like a good idea.  I don't really have photos of the results (hard to capture in photos), but my skin feels much better.  Softer and smoother.  And it seems to retain moisture longer.  As for my nails, well...I use a lot of products so I can't say for sure that the vitamins made a major difference.  I can tell a HUGE difference in my hair, though.  It feels stronger.  I've noticed less shedding and breaking too.  Before I show you pictures, let's take a look at the ingredients.  While it isn't a complete multi-vitamin, it does have some good stuff in there.  I've been taking it for almost two months now.
Hair Candy Ingredients

For a breakdown as to why each of the vitamins are included, check out the "What's Inside" page from Hair Candy's website.

Since my hair feels stronger and healthier, I decided it was time for a little color.  Keeping in mind that I have never colored my hair before, this was a huge leap for me.  But considering I do attend a beauty school and I am entering the beauty industry, I decided to just go for it and add some vibrant colors.  So I asked two of the cosmetology students to fix me up.

This wouldn't be a big deal since the color is temporary, but they had to lighten my hair before adding the color.  That kind of freaked me out.  Hello Blonde!  You can see some of the breakage I had from constantly wearing my hair pulled back in this picture.
My journey into color - Blonde!

And now for the color.  They added Joico Vero K-Pak in Cobalt Blue, Amethyst Purple and Magenta to each of the sections above.  I'm not going to lie...they wanted to add more color.  They told me I would want more color.  But I chickened out and made them keep it small.
Vibrant Waterfall with Joico Vera K-Pak in Cobalt Blue, Amethyst Purple and Magenta

The end result was a cute, peek-a-boo look.  I loved it!  LOVED IT!
Peek-a-boo Color

But...it wasn't enough.  They were right.  Within less than a day, I wanted more color.  So I went back the next week and we added more.  I also took off some of my length and added layers so the color from the underside would show a little more.  Of course, I can't really take a picture of the back of my head, so this is the best I could do.  lol
Vibrant Color and Healthy Hair thanks to Hair Candy

I honestly don't think I would have felt comfortable putting any kind of chemical on my hair to lighten or color it before adding Hair Candy as a supplement.  So I guess you can call me a believer.  :)

If you are interested in trying Hair Candy for yourself, you can pick up a bottle from their website here or on Amazon here

~Michelle

*The Hair Candy Biotin Supplmenets featured in this post were provided by Hair Candy for my honest review.  All other products were purchased by me.  This post includes Amazon Affiliate Links.  Purchases through those links generate commissions that help fund this site.  All other links are courtesy links and do not benefit ManicTalons.com.
Read more ...

Wednesday, May 27, 2015

Lemongrass Spa Nail Balm Review

Press Sample


Hello Loves!  I have a slightly different type of review for you today - Lemongrass Spa Nail Balm.  I don't usually review balms, creams or oils, but I decided to accept this one for review for one reason and one reason only.  I was desperate!  lol

If you are a regular reader of my little blog here, you know that I struggle with the condition of my hands.  I swatch A LOT of gel polish.  Some weeks I might swatch over two dozen gels over the course of two days.  Add nail school on top of the swatching, and you have the recipe for disaster.  My nails are in really bad shape (don't judge) and my skin was awful.  How awful?  Well, I've always been very open about the fact that I edit my photos to remove hangnails and imperfections in my skin that might distract from my swatches and nail art.  I never alter the polish itself, but I do clean up my skin.  It had gotten to the point that I was spending about 8 hours a week just editing photos.  Crazy, right?  Needless to say, I don't have time for all that.  I needed help.  Major help.  And since my husband refuses to learn photoshop and edit my swatches for me, I had to go a different route. ;)

Lemongrass Spa is a direct sales company that offers all natural and organic skin care items.  I won't go into all the company details, but you can check it out here if you're interested.  Chinwe is a Lemongrass Spa rep, and when she contacted me about reviewing this balm, I had my doubts.  I'm not going to lie, I'm not really into the whole organic movement.  Organic is nice and all, but I don't specifically shop for organic products.  It's not that I doubt them because they are organic.  I just doubt everything at this point.  I have tried so many oils, lotions and balms with little to no results over the years.  Photoshop has been the only product that never lets me down.  But, as I said, I was desperate.  So I accepted the review. 


Now that you know the back story, what exactly is Lemongrass Spa Nail Balm?  If the label in the photo above isn't clear, the label defines it as a "Deep Treatment for brittle nails and tender cuticles."  Yep, that describes my nails.  Or did a few weeks ago.  The label continues with the following instructions: "Apply twice daily, massaging until absorbed.  Heals cuticles and softens dry nails in just a few treatments.  Use at bedtime for excellent results as it will absorb while you sleep."  That sounded easy enough.  But what is it?  The other side of the label shares a little more.  "Handmade in Colorado with the following ingredients: Organic olive oil, organic apricot kernel oil, organic avocado oil, organic beeswax, horsetail oil, vitamin E oil and organic grapefruit seed extract.  90% organic, 100% all-natural."  Yep, so that's what the company has to say about it.  Ready to hear what I have to say?

It comes in a 2 ounce pot, which is a ton of product.  While it is technically a balm, it's more like a cuticle oil in solid form.  When you touch it, the heat from your fingers transforms it to an oil that is easily applied to and absorbed by your skin.  You can see the oil (balm) on my fingertip in this shot.  All I did was gently touch the balm with my finger.  That small amount is enough for three nails!

Here's a shot in the pot.  As you can see, I've barely made a dent in it and I've been using it for three weeks now.  I should note that I have been using it on my hands - not just my cuticles and nails.  So the indention is from my knuckle...I hate getting products under my nails.  lol

Now is probably a great time to mention that none of the photos in this post have been retouched.  I only cropped them and added my watermark.  You can clearly see where I over-thinned my nails when I first started playing with acrylic at school.  And you can see where I stopped that craziness and the damage is growing out.  You can also see that my cuticles are not perfect, but they're a thousand times better than they were!  If I were to retouch this photo, it would take me less than 5 minutes including cropping and watermarking.  That's a huge improvement over the 20 minutes I was spending on each and every photo.

Here's a full shot of my naked nails immediately after applying the Nail Balm.  Again this photo is completely untouched other than cropping and watermark.

And this photo is after I massaged it in and waited about 10 minutes for it to absorb a little.  I admit, it is very oily at first, but it absorbs quickly and the greasy feel goes away.  You can see in the photo below that I do still have some rough spots, but they aren't horrible like they were.  By the way, showing you my untouched nails is a big deal for me.  Sheesh...I would rather show my fat butt in a swimsuit than show you macro shots of my hands without photoshopping them.  But look!  They really aren't that bad!  I have a few rough spots still, but considering what I put my hands through, they look fantastic!

Ok, so I'm sold on this product.  The Lemongrass Spa Nail Balm has completely transformed my hands and reduced the amount of time it takes for me to blog.  You may have noticed I've been doing some pretty large collections lately.  Those would have taken me a week to edit in my spare time (no, I really don't have spare time between school and my family...so "spare time" is code for that time I would usually spend sleeping).  Now I'm knocking collections out from swatching to editing in a day!  Whoo Hoo!

Oh, I forgot to mention that it is unscented.  That's a huge plus for me too.  I can't stand when my cuticle treatments clash with my perfume.  ;)  If you are looking for a great treatment for beaten cuticles, you can pick up a jar from Chinwe's website here.

Finally, after falling in love with the Nail Balm, I spent some time checking out the other skin care items available from Lemongrass Spa.  That's when I ran across something that absolutely warmed my heart!  Lemongrass Spa has an ongoing campaign called Freedom Feet

What is Freedom Feet?  You can purchase a Freedom Feet Kit and Lemongrass Spa will send it to a service member overseas!  The kit includes a 4 oz foot soak, 4 oz foot scrub, and 4 oz foot cream inside a red and white gift box.  You know walking in combat boots day in and day out is hard on a gal's feet, and every woman deserves a little pampering.  Especially those women who are fighting for our freedom.  I have purchased a kit and hope it makes the day a little brighter for one of our brave military women.  :)

Note:  If you decide to follow my lead and donate a Freedom Feet Kit, the cart will ask for your shipping information at checkout.  The store system doesn't recognize that the kit is a donation, so it just goes through the motions.  The kit will be flagged and shipped to a service member and not show up on your door step.  If you want a kit for yourself or a service member at home, you can purchase one of the domestic kits and have it shipped to a specific person.

Be sure to follow Chinwe's Lemongrass Spa page on facebook for special offers on all natural and organic products!  If the rest of the line is anything like the Nail Balm, you won't be disappointed.  :)

~Michelle

*The Nail Balm featured in this post was provided by Lemongrass Spa Rep Chinwe Idigo for my honest review.  All links are courtesy links and do not benefit ManicTalons.com.
 
Read more ...

Monday, May 25, 2015

Light Elegance P+ Glitter Gel

Light Elegance P+ Glitter Gels

Hello Loves.  I have a few of the Light Elegance P+ Glitter Gels to show you today.  I've wanted to try these for a while now but never got around to ordering any.  So when a friend offered to loan me her bottles to swatch, I jumped all over it. Thanks Joanna!

Ok, so the Light Elegance P+ Glitter Gels are from the Light Elegance Soak Off line.  Light Elegance products are professional products and are a little difficult to find for those without a license.  I have a few of their hard gels, but this is my first experience with their soak off products.  They offer a large range of colors in addition to the glitters, but I haven't had a chance to try their non-glitter finishes yet either.  Ready to see a few of the glitters and hear my thoughts?

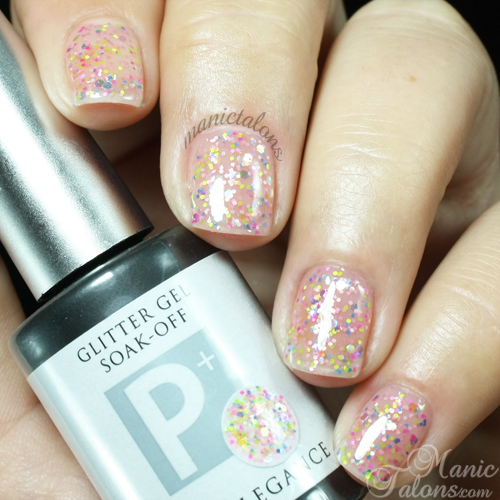
First up is a really fun, confetti inspired glitter topper called Sprinkles.  She consists of a slightly pink jelly base that is loaded with multi-color iridescent glitter in varying sizes.  It's like a birthday cake on your nails.
Light Elegance P+ Glitter Gel Sprinkles Swatch

Sprinkles is very densely glittered.  The result is an extremely thick polish that can be difficult to apply.  I found that wiping the majority of the gel off of the brush, then applying a glob in the center of the nail and dabbing it into place over the nail.  I did this for two coats in these swatches.  I did find that if the gel ended up too thick on the nail, it didn't cure properly in my weaker lamps (the Harmony 18G cured it without issue but the smaller lamps had trouble unless it was very thin).  
Light Elegance P+ Glitter Gel Sprinkles Swatch

Since the amount of glitter freaked out my camera a little, I decided to try for a few macros of these.  This is Sprinkles up close and personal.
Light Elegance P+ Glitter Gel Sprinkles Swatch

The next polish I have to show you is Ice Breaker.  This one is a clear base that is loaded with blue and purple glitters.
Light Elegance P+ Glitter Gel Ice Breaker Swatch

Since the glitters are smaller in Ice Breaker than in Sprinkles, it was a little easier to apply.  I did find that I had to dab and spread, but it was much easier to keep the coats thin and avoid curing issues.  These swatches are two coats.  I personally feel that the end result is well worth the effort.  :)
Light Elegance P+ Glitter Gel Ice Breaker Swatch

Here's the Macro shot of Ice Breaker.  You can see the purple glitters a little better here.
Light Elegance P+ Glitter Gel Ice Breaker Swatch

Lagoon is similar to Ice Breaker in terms of glitter size, but it consists of teal and green holographic glitters with a scattering of dark blue glitter.  Of course, my camera failed to capture the teal as well as it could have.  The greens are more obvious in person.  This is two coats.
Light Elegance P+ Glitter Gel Lagoon Swatch

Application of Lagoon is much like Ice Breaker.  It was easier than Sprinkles but still requires a little effort to keep the layers thin and prevent curing issues.
Light Elegance P+ Glitter Gel Lagoon Swatch

I can't help but love the teal and blue combo.  Especially in this macro shot.
Light Elegance P+ Glitter Gel Lagoon Swatch

Finally, Gumdrop is another iridescent glitter combo.  The jelly base is pink and the glitters are various sizes shades of pink and purple.  I love this one in concept, but in application I'm just not feeling it.
Light Elegance P+ Glitter Gel Gumdrop Swatch

Gumdrop was the most difficult to apply of the four.  The larger glitters wanted to cling to each other and were very difficult to separate.  Getting it thin enough was also a beast.
Light Elegance P+ Glitter Gel Gumdrop Swatch

Gumdrop is definitely best used as one thin coat with glitter placement over a solid base.
Light Elegance P+ Glitter Gel Gumdrop Swatch

What do you think of these Light Elegance P+ Glitter Gels?  I personally love the first three, despite the tricky application.  While they could be replicated with loose glitter, I feel that having the glitter suspended in the base gives the glitter depth that you just don't get with loose glitter scrubbed into the tacky layer.  If you're interested, you can find these and others on the Light Elegance Website here.

Thank you again, Joanna, for the loaners!

~Michelle

*The Polishes Featured in this post were borrowed from a readers who purchased them herself.  All links in this post are courtesy links and do not benefit ManicTalons.com.  

Read more ...

Wednesday, May 20, 2015

Madam Glam Chameleon (Thermal) Gel Polish

Press Sample

Madam Glam Chameleon Thermal Gel Polish Swatches and Review

Hello Loves!  Madam Glam recently added some fun new thermals to their gel polish line.  I have the full collection of Madam Glam Chameleon Gel Polish to show you!  Yep, all twelve of them.  Since I have a lot of photos for you, I'm going to try to keep this post on the shorter side.  (Stop laughing.  I'm not ALWAYS long winded.)
These are a little different than the regular Madam Glam Gel Polishes.  How?  Well, they're thermal, of course, but they are also in slightly smaller bottles.  The regular Madam Glam Gel Polish bottle is 15 ml.  The Chameleons are 10 ml.  They also don't have the color preview on the top, but that makes sense if you think about it.  The preview would never be accurate since it would keep changing based on the temperature of the room.  lol

Ready to see them?  Of course you are.  I'm happy to say that most of them are quite unique to my collection.

First up is a sweet mauve to purple shifter called Man Eater.  Man Eater also has silver micro glitter that spices it up a little.  Below is three thin coats.
Madam Glam Chameleon Man Eater Swatch

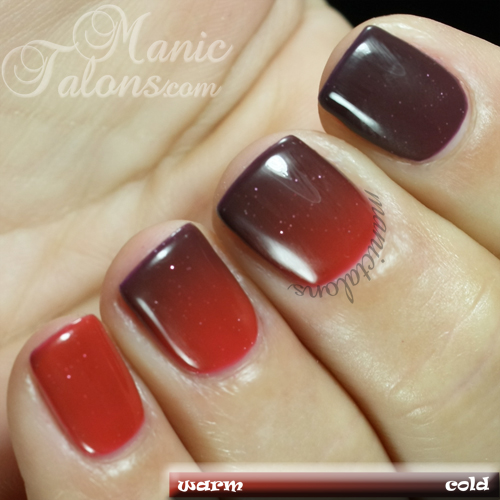
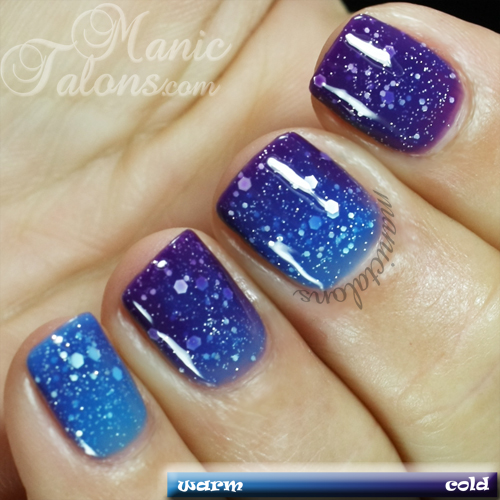
Since there are so many polishes in this collection, I decided to change up the way I do my warm/transition/cold shots.  Instead of three separate photos in a collage, I decided to do all of the phases in one shot.  For all of the non-bottle shots in this post, the index finger is cold, the middle and ring fingers are in transition, and the pinky finger is warm.  Let me know in the comments if you like this new format or if I should stick to the old way.  :)
Madam Glam Chameleon Man Eater Swatch

Voulez-vous is an earthy, rusty orange in the warm phase and a deep plum toned brown in the cold phase.  This one also has the silver micro glitter for a touch of sparkle.  I'm not sure why, but it makes me think of Mars.  This one is opaque in two coats.  Pretend you don't see the finger prints on the polish.  Oops.  lol
Madam Glam Chameleon Voulez-vous Swatch

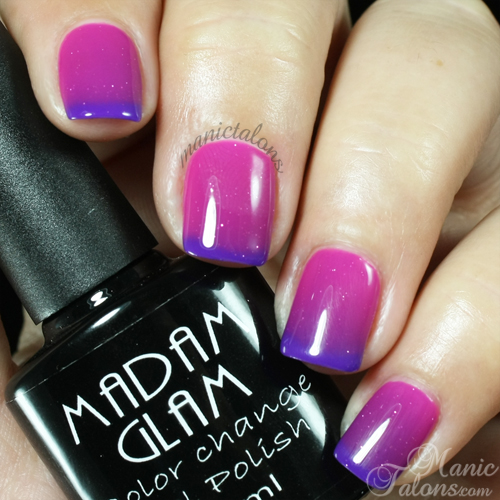
Heaven is a fun magenta leaning purple when warm and transitions to a deep purple that is borderline blurple in the cold phase.  Look, there's that silver micro glitter again.  I used three coats in this swatch as I found it was a tad sheer in the warm phase in two coats.
Madam Glam Chameleon Heaven Swatch

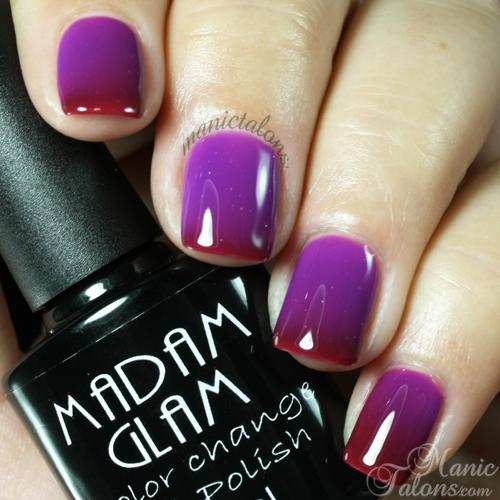
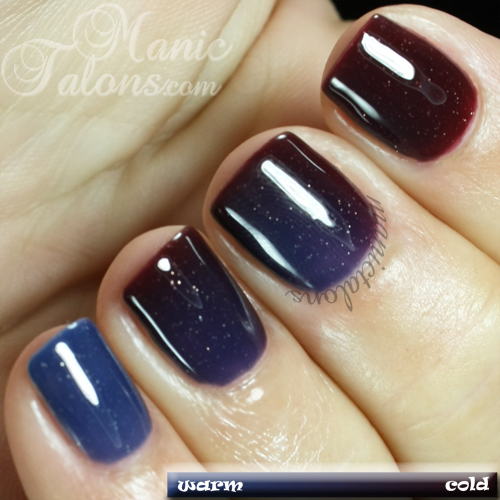
Do You Really Know Me? is another with the silver micro glitter.  This one is a blue toned purple when warm and transitions to a deep burgundy (or is it maroon?) when cold.  Three coats again.  It was almost opaque in two for me, so it might be a two coater for you.
Madam Glam Chameleon Do You Really Know Me? Swatch

What Color Is The Dress? is one of my favorites of the dozen polishes in this post, but I admit I groaned at the name.  lol  This one transitions from a medium blue when warm to a deep burgundy when cold.  In the transition phase, the blue appears more navy.  She is a nice two coater for me.
Madam Glam Chameleon What Color Is The Dress? Swatch

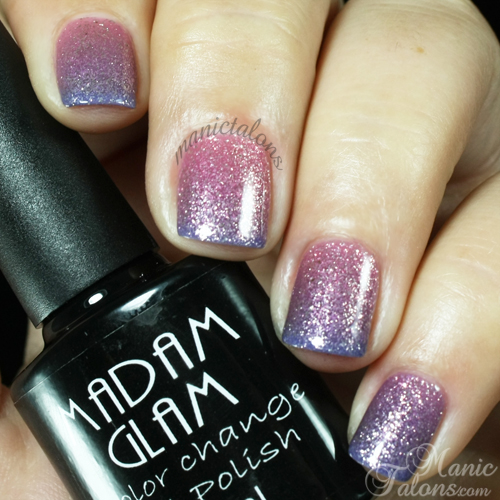
We move away from the micro glitter with Dancing In The Moonlight.  Dancing in the Moonlight transitions from a dusty pink when warm to a medium purple when cold, but it has a chunky silver shimmer that gives it an awesome metallic look.  I'm still wearing this one. I just couldn't bring myself to take it off!  Good thing I swatched it last, right?  I did use three coats in the swatch below.  It was opaque in two, but I'm a little heavy handed with my brush and needed a third super thin coat to even out the shimmer.
Madam Glam Chameleon Dancing In The Moonlight Swatch

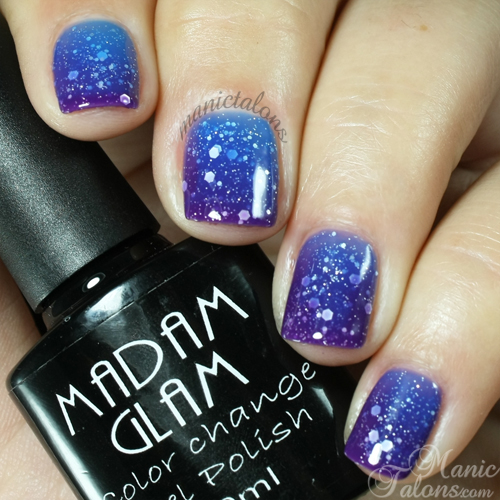
Pop Goes My Heart might look a little familiar.  ;)  This blue to purple thermal is packed with varying sizes of silver glitter.  The consistency is very nice and the glitter was easy to distribute.  This is two coats.
Madam Glam Chameleon Pop Goes My Heart Swatch

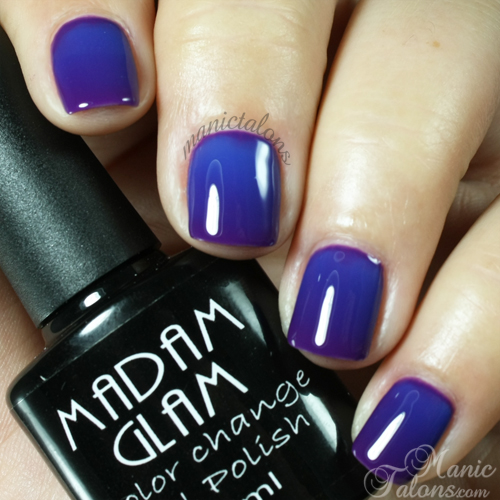
My Boo is like Pop Goes My Heart but without the glitter.  My Boo is a squishy, royal blue when warm and transitions to a royal purple when cold.  Yeah, so it really does go completely blue.  I decided to skip the water for the shots in this post and opted for my A/C and hair dryer to get them to transition.  By the time I made it to this shot, it was so freaking cold in my house that I could barely keep it warm long enough to take a picture.  lol  Oh yeah, I needed three coats for it to be fully opaque in the warm phase.
Madam Glam Chameleon My Boo Swatch

I can't remember if I've seen Hot Hot Hot before, but it is unique to my collection.  Hot Hot Hot has the same multi-sized silver glitter as Pop Goes My Heart.  In the warm phase, she has a nice yellow-orange base and when cold she transitions to a deep red-orange.  This is two coats and applies nicely.
Madam Glam Chameleon Hot Hot Hot Swatch

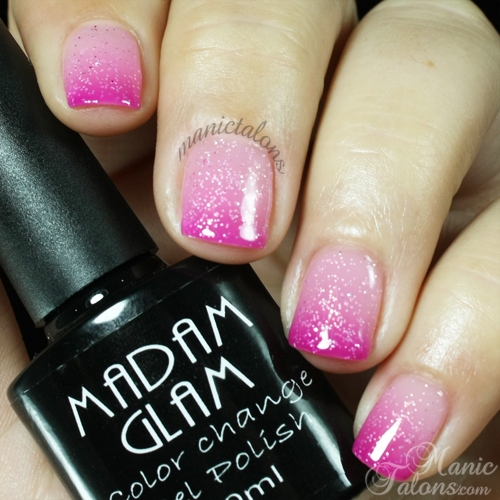
Glamorous Me starts as a soft, milky pink and transitions to a hot pink with purple undertones.  There's that silver micro glitter again, but this time there is a lot more of it in the bottle.  I swatched three coats, but you'll notice the milky pink is still a little sheer in the warm phase (second photo).  As much as I hate VNL, I found that I really like this one when warm.  It's soft enough that the VNL doesn't bother me.
Madam Glam Chameleon Glamorous Me Swatch

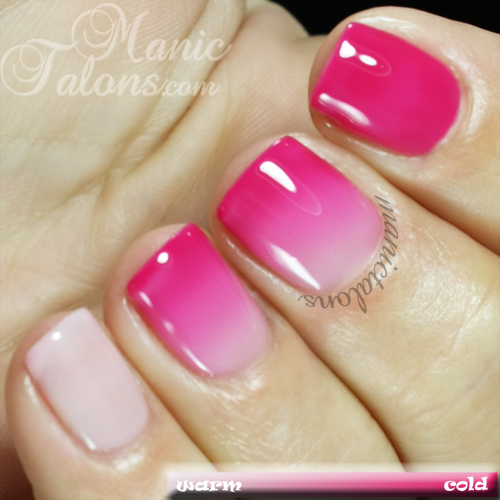
Love me Crazy is like a pinker version of Glamorous Me without the micro glitter.  She starts as a milky white with pink undertones and transitions to a nice hot pink.  She is completely opaque in three coats in the cold phase and just a little sheer in the warm phase.  I know it doesn't look opaque in the photos, but that's  the result of warming my house up a little too much.  I had trouble keeping it cold.  Sheesh...I'm going to regret this swatch session when I see my power bill this month!  But at least my fingers aren't waterlogged.  ;)
Madam Glam Chameleon Love Me Crazy Swatch

I'm super surprised by how much I love Sunshine.  I'm not usually a fan of bright yellows, but the yellow to orange transition in this cream based thermal is just stunning.  Coverage and application are superb for a yellow.  I swatched three thin coats but I really could have gotten away with two.
Madam Glam Chameleon Sunshine Swatch

So, there they are!  The entire Madam Glam Chameleon Collection.  :)  I count four color combos that I have seen in other lines, but even then two of them have different finishes.  Are any of them screaming your name?  Tell me which ones!  And don't forget to let me know in the comments if you like the new format for the phases or if I should stick to the collages.

You can pick up any of these gorgeous polishes from the Madam Glam Chameleon line here.  Also, be sure to sign up for Madam Glam's email list.  They send out amazing offers that drop the prices of their gel polishes dramatically.  ;) 

~Michelle

*The Chameleon Gel Polishes featured in this post were provided by Madam Glam for my honest review.  All links in this post are courtesy links and do not benefit ManicTalons.com.  

Read more ...