Press Sample Affiliate Links
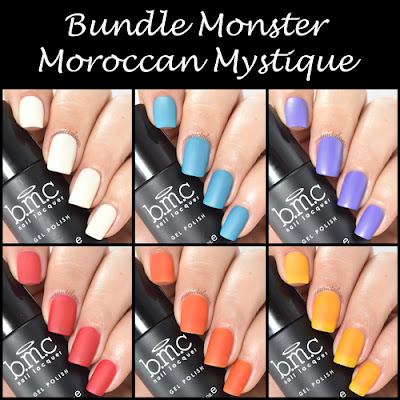
Hello Loves! I have the BMC Moroccan Mystique Gel Polish Collection to show you today. This one has been out for a little while. Yeah, I know...I'm way behind on my reviews. Anyway, this is another unique collection from Bundle Monster. Moroccan Mystique consists of 6 two-step gel polishes. By two step, I mean they don't need a top coat. Just a base gel and two-three coats of color. They cure to a beautiful, satin matte finish! Let's take a look at the colors first, and I'll follow up with my thoughts on application, wear and removal.
The first color is called Casablanca. Casablanca is a soft, pistachio green with a beautiful matte finish. Unfortunately, it just looks like a cream color on me. I promise, the hints of green are there. This is three thin coats.
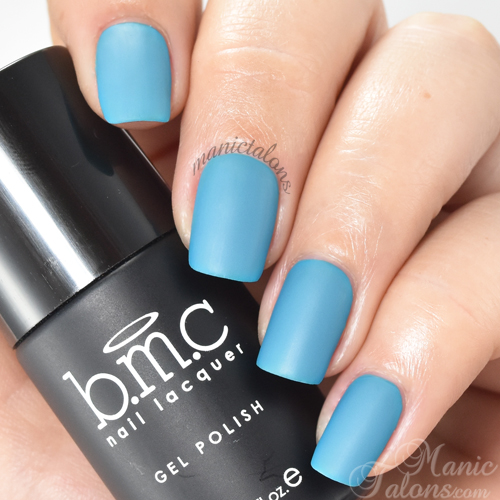
Next up is Jardin Bleu. This is a slightly teal leaning blue cream with a satin matte finish. My photos might look a little blue depending on your monitor. On my phone (Galaxy) they are dead on accurate. On my laptop, the green tone is missing. I swatched two coats here.
Spellbound is a gorgeous purple cream with a satin matte finish. I love the shade of purple on this one. Not too light, not too dark. Not too bright, red or blue. It's just...purple. :) This is two coats. I want you to take note of the index nail in these swatches. I'll explain why in a few minutes, but take a look now. ;)
Arabesque Ceramic is a slightly pink toned red cream with that same satin matte finish. It is opaque in two coats.
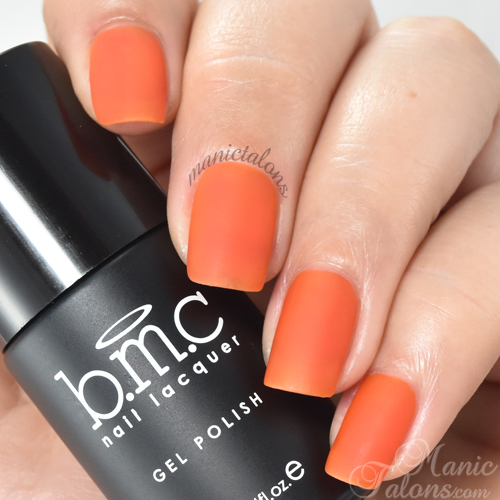
Tangier-ine is a classic orange cream. Again, with the satin matte finish. This is also two coats.
Finally, Saffron Gold is a gorgeous gold toned yellow. This one is a little more transparent than the others. I swatched three coats here. Four might be opaque for someone with weaker VNL, but I'm not sure. I kind of like the sheer matte look, though. There are tons of nail art possibilities here.
Now that you've seen them, let's talk a minute about application. First things first, these need a good shake every time you use them. The pigment or additive that makes them matte will settle fast. I had one on its side and it settled around the neck of the bottle. Freaked me out for a second. lol A good shake restores them without issue. One they are mixed well (and you've applied and cured a base gel), apply one thin coat. Now pay attention. This is important. Don't go back and stroke over the nail too much before you cure. The pigment/additive that makes them matte also allows them to dry a little on their own. If you stroke over them, you end up with the drag marks like I pointed out in the swatch of Spellbound. Here, let me show you that picture again so you don't have to scroll back up.
Got it? Ok. So let's talk about curing. I don't know how to say this gracefully, so let's just go with "Holy Heat Spike!!!!". Yeah, so the heat spike with these is super intense. If you use a stronger lamp like the Gelish 18G or Cuccio Max Pro 5, you're going to have a spike. I'm not sure about weaker lamps, but I suspect by the intensity I felt that they will spike in weaker lamps as well. But that's no biggie. You just have to know how to deal with heat spikes. :)
If you're using a polish that is prone to heat spikes, you have to start the chemical reaction slowly. There are a few ways to do that.
Ok, so now that we've touched on heat spikes, let's go back to the gels themselves. Before they cure, they all appear to have jelly finishes and will be less opaque. Surprise! Once they cure and the matte effect occurs, the opacity pops up. :) The color also changes due to the matte finish, so don't be surprised if the uncured gel in the bottle looks different than the color on your nails when you're finished.
So, how do they wear? I found wear to be average. Well, as average as it can be for me these days. I destroy my gel polish while working on clients at the salon, so nothing still looks good after a week. But based on that week, it held up as well as three step systems for me.
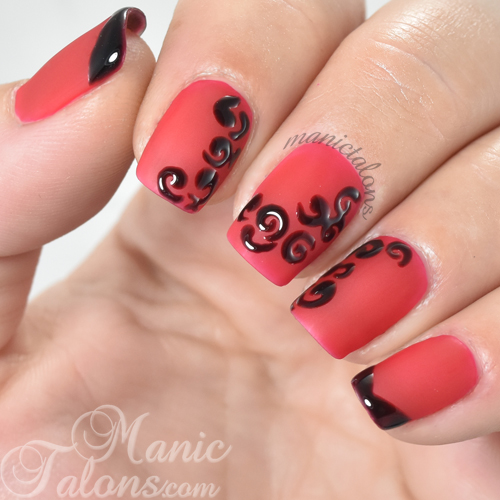
Finally, I have a nail art look to show you. I decided to play with matte and glossy. I needed a polish that doesn't need a top coat for the art so as not to wreck the matte finish. Bundle Monster Speed Gel in Cocktail Dress was perfect! So I added a few black french tips and random swirls with Cocktail dress. I love how it turned out! The glossy art makes the matte finish look almost velvety. :) Oh, the base is Arabesque Ceramic. :)
If you want to give the Moroccan Mystique collection a try, you can order the individual colors or the full set on Bundle Monster's website here or on Amazon here. :)
~Michelle
*The Bundle Monster Gel Polishes featured in this post were provided by Bundle Monster for my honest review. This post includes Amazon Affiliate Links. Purchases through those links generate commissions that help fund this site. All other links are courtesy links and do not benefit ManicTalons.com
Hello Loves! I have the BMC Moroccan Mystique Gel Polish Collection to show you today. This one has been out for a little while. Yeah, I know...I'm way behind on my reviews. Anyway, this is another unique collection from Bundle Monster. Moroccan Mystique consists of 6 two-step gel polishes. By two step, I mean they don't need a top coat. Just a base gel and two-three coats of color. They cure to a beautiful, satin matte finish! Let's take a look at the colors first, and I'll follow up with my thoughts on application, wear and removal.
The first color is called Casablanca. Casablanca is a soft, pistachio green with a beautiful matte finish. Unfortunately, it just looks like a cream color on me. I promise, the hints of green are there. This is three thin coats.
Next up is Jardin Bleu. This is a slightly teal leaning blue cream with a satin matte finish. My photos might look a little blue depending on your monitor. On my phone (Galaxy) they are dead on accurate. On my laptop, the green tone is missing. I swatched two coats here.
Spellbound is a gorgeous purple cream with a satin matte finish. I love the shade of purple on this one. Not too light, not too dark. Not too bright, red or blue. It's just...purple. :) This is two coats. I want you to take note of the index nail in these swatches. I'll explain why in a few minutes, but take a look now. ;)
Arabesque Ceramic is a slightly pink toned red cream with that same satin matte finish. It is opaque in two coats.
Tangier-ine is a classic orange cream. Again, with the satin matte finish. This is also two coats.
Finally, Saffron Gold is a gorgeous gold toned yellow. This one is a little more transparent than the others. I swatched three coats here. Four might be opaque for someone with weaker VNL, but I'm not sure. I kind of like the sheer matte look, though. There are tons of nail art possibilities here.
Now that you've seen them, let's talk a minute about application. First things first, these need a good shake every time you use them. The pigment or additive that makes them matte will settle fast. I had one on its side and it settled around the neck of the bottle. Freaked me out for a second. lol A good shake restores them without issue. One they are mixed well (and you've applied and cured a base gel), apply one thin coat. Now pay attention. This is important. Don't go back and stroke over the nail too much before you cure. The pigment/additive that makes them matte also allows them to dry a little on their own. If you stroke over them, you end up with the drag marks like I pointed out in the swatch of Spellbound. Here, let me show you that picture again so you don't have to scroll back up.
Got it? Ok. So let's talk about curing. I don't know how to say this gracefully, so let's just go with "Holy Heat Spike!!!!". Yeah, so the heat spike with these is super intense. If you use a stronger lamp like the Gelish 18G or Cuccio Max Pro 5, you're going to have a spike. I'm not sure about weaker lamps, but I suspect by the intensity I felt that they will spike in weaker lamps as well. But that's no biggie. You just have to know how to deal with heat spikes. :)
If you're using a polish that is prone to heat spikes, you have to start the chemical reaction slowly. There are a few ways to do that.
- Hold your hand just inside the glow from the lamp, but not inside the lamp. Pass your nails in and out of the glow a few times. This allows the reaction to start slowly. You can then place your hand into the lamp and cure as usual.
- Turn the lamp on with your hand inside for 1 second and turn it back off. Wait a few seconds and repeat but leave it on for 2 seconds. Repeat one more time for 3 seconds. Then you should be able to cure the full time as usual.
Ok, so now that we've touched on heat spikes, let's go back to the gels themselves. Before they cure, they all appear to have jelly finishes and will be less opaque. Surprise! Once they cure and the matte effect occurs, the opacity pops up. :) The color also changes due to the matte finish, so don't be surprised if the uncured gel in the bottle looks different than the color on your nails when you're finished.
So, how do they wear? I found wear to be average. Well, as average as it can be for me these days. I destroy my gel polish while working on clients at the salon, so nothing still looks good after a week. But based on that week, it held up as well as three step systems for me.
Finally, I have a nail art look to show you. I decided to play with matte and glossy. I needed a polish that doesn't need a top coat for the art so as not to wreck the matte finish. Bundle Monster Speed Gel in Cocktail Dress was perfect! So I added a few black french tips and random swirls with Cocktail dress. I love how it turned out! The glossy art makes the matte finish look almost velvety. :) Oh, the base is Arabesque Ceramic. :)
If you want to give the Moroccan Mystique collection a try, you can order the individual colors or the full set on Bundle Monster's website here or on Amazon here. :)
~Michelle
*The Bundle Monster Gel Polishes featured in this post were provided by Bundle Monster for my honest review. This post includes Amazon Affiliate Links. Purchases through those links generate commissions that help fund this site. All other links are courtesy links and do not benefit ManicTalons.com
Read more ...

