Showing posts with label One Step Gel. Show all posts

Tuesday, January 12, 2016

Madam Glam One Step Gel Polish - Swatches and Review

Press Sample

Madam Glam One Step Gel Polish Swatches and Review

Hello Loves!  I'm back with a new review.  Whoo Hoo!  I know I've been MIA for about a month.  Sorry about that.  Check my last post for the quick and dirty on why I've been gone.  ;)

So, Madam Glam released a new line of One Step Gel Polishes not too long ago.  I had the chance to swatch them all and put them through a mini wear test.  The One Step gels come in smaller, 10 ml bottles compared to the regular Madam Glam gel polishes and their 15 ml bottles.  Want to see them?  Let's start with the swatches.  I'll comment on application throughout and finish on wear and removal.

First up is your basic black called Black is the One.  Application was quite nice and I found it offers full coverage in two easy coats.  I love that this is a true black and doesn't lean red or blue.  Whoo Hoo!
Madam Glam One Step Black is the One Swatch

This next color is a funny and flirty raspberry called Glitter Lady.  Application was similar to the black above, though it did shrink a little on the first coat.  I was too lazy to flash cure, but the second coat stayed where I put it.  ;)
Madam Glam One Step Glitter Lady Swatch

Hubby's Favorite is a soft, peachy pink cream.  This one is not MY Hubby's favorite.  He prefers blues.  I love the application and coverage, though.  It went on smooth, no streaky layers that are common with lighter shades, and full coverage in two coats.  The shine is nice too.
Madam Glam One Step Hubby's Favorite Swatch

Pastel Lilac is a very soft purple cream.  Again, application was great with two coat coverage.  I did have to shoot this one a little dark to get the color right - my camera kept wanting to blow it out and make it look lighter than it is.  
Madam Glam One Step Pastel Lilac Swatch

Pink & Holo is a really fun polish.  This pink base is packed with silver and silver holographic shimmer.  Unfortunately, my camera refused to pick up the scattered holo effect.  Imagine if you put a very thin coat of fairy dust over what you see in the photo.  That's what you would see in person. 
Madam Glam One Step Pink and Holo Swatch

Rise & Sky is a really pretty, light blue jelly base with silver shimmer.  I love the idea of this one, but it definitely needs undies.  As you can see, it is still a bit sheer after two coats.
Madam Glam One Step Rise and Sky Swatch

Reddy or Not is a gorgeous dark blood red cream.  Application was a little trickier with this one.  I found it wanted to apply thinner in some spots (as you can see in the middle of my index nail).  But two coats provides beautiful coverage.
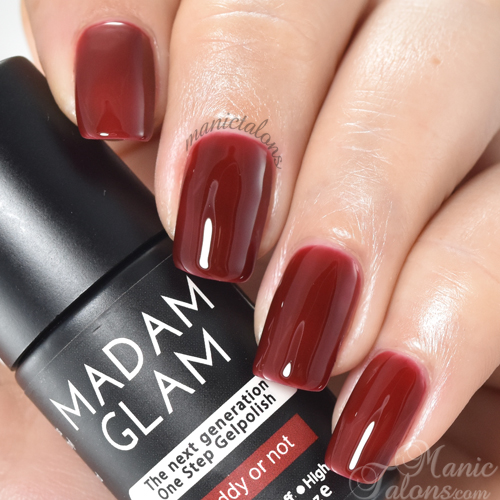
Madam Glam One Step Reddy or Not Swatch

Perfect Plum is my favorite of the darks.  This deep, plum toned purple applies beautifully and covers in two coats.  I love the almost black but still definitively purple color.
Madam Glam One Step Perfect Plum Swatch

Moving on to a really fun polish, Blue Fiesta is a frosty, metallic-ish (yes, I made up a word) blue that leans a little purple in some light.  But the "fiesta" is made up of a scattering of multi colored glitter.  Application is flawless and it covers in two coats.
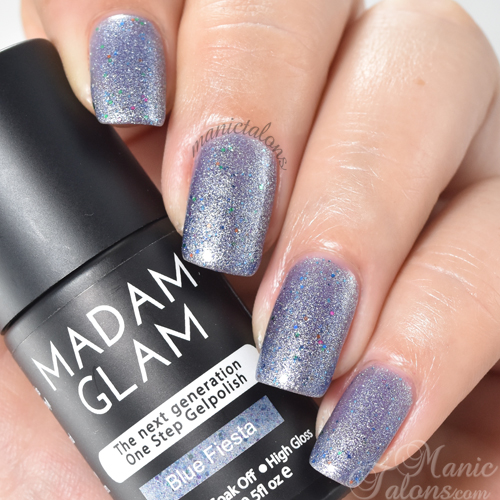
Madam Glam One Step Blue Fiesta Swatch

Here's a closeup that shows the glitter better.  I see blue, green, teal, pink, orange...and a few others.  Like party confetti.  :)
Madam Glam One Step Blue Fiesta Swatch

Believe it or not, I saved my absolute favorite for last.  I usually hate polishes that show the natural nail line, but Baby Girl is the perfect mix of pinky nude sheer coverage.  It provides a very soft, natural look.  This is two coats.
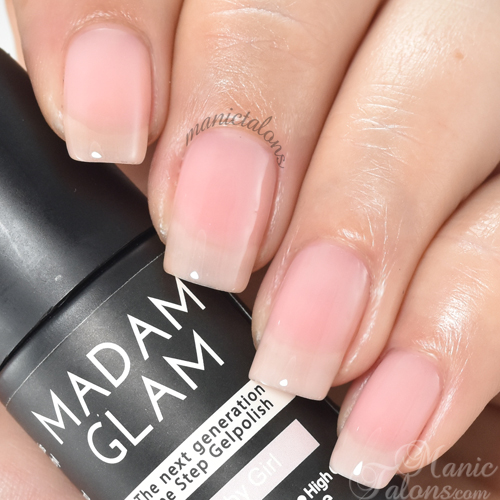
Madam Glam One Step Baby Girl Swatch

I love Baby Girl so much that I decided to use it as a base for some freehand sugar designs.  I attempted to do a sweater pattern, but I'm not sure I hit my mark.  To create this look, I applied and cured two coats of Baby Girl.  Then I used a dotting tool to draw the designs with Baby Girl and sprinkled white acrylic polymer over the design before curing.  One Step Gels are the best for this type of art!  They lock in the powder beautifully since they don't have a tacky layer to deal with.
Sugar Nails with Madam Glam One Step Baby Girl

Here's another look that shows the texture a little better.  I love this design, but it sadly didn't love me.  Never again!  Textured white is not my friend.  It became dingy pretty quick.  Especially with all the filing I do at work.  It also grabbed nail dust like a magnet.  And don't even get me started on my foundation in the mornings.  ;)
Sugar Nails with Madam Glam One Step Baby Girl

Ok, so I'm not a good blogger these days.  Of course, you knew that based on my absence.  I wore the sweater nails for a full week before I had enough.  I soaked them off at the salon and forgot to take pictures.  I will say that they wore perfectly - even my thumb nail that I constantly bump with the e-file.  Removal was a breeze too.  Unlike many one step gels, these actually flaked off instead of going chalky.  I'm impressed!

If you need any of these colors for your collection (Blue Fiesta!), you can pick them up on Madam Glam's website here (or click on any of the color names throughout the post to go directly to that color).  Remember, if you're between sales, just wait a day or two and Madam Glam will offer a special.  They are awesome about sales and specials that help save us addicts money!

~Michelle

*The Madam Glam One Step Gel Polishes featured in this post were provided by Madam Glam for my honest review.  All links within this post are courtesy links and do not benefit ManicTalons.com.  


Read more ...

Wednesday, July 22, 2015

BMC Speed Gel Ain't No Basic B!tch Collection

Press Sample Affiliate Links

BMC Speed Gel Ain't No Basic B!tch Collection Swatches and Review

Hello Loves!  I have a sassy little collection from Bundle Monster to show you today.  These six gorgeous shades in the Ain't No Basic B!tch Collection are the newest releases in the BMC Speed Gel line.  The Speed Gels are one step gel polishes that include the base, color and top in one bottle.  What exactly does that mean?  Two coats and you're done!  No base, no top, no cleanse.  In case you missed my full review with wear and removal results of the first BMC Speed Gel collection, you can check it out here.

You might also notice I'm sporting yet another new shape.  Yep, I took off my long almonds after wearing them for only a week and went with a shorter acrylic set instead.  I couldn't resist after a crash course on acrylic with Brenda Anderson while I was at the Nail Tech Event of the Smokies (recap of the event is coming soon, I promise!).  Sure, I had lots of training with acrylic while at school, but Brenda was able to clear up some confusion and help me trouble shoot a few things.  Whoo Hoo!  So I had to give it a go...and this collection was just screaming for a sassy shape to go with it.  ;)  Enough about that.  Ready to take a look?  Of course you are!

First up is a light pink with a pearl shimmer called Pink Wednesdays.  The shimmer is soft so I had no issues with major streaking and coverage was perfect in two coats.
BMC Speed Gel Pink Wednesdays Swatch

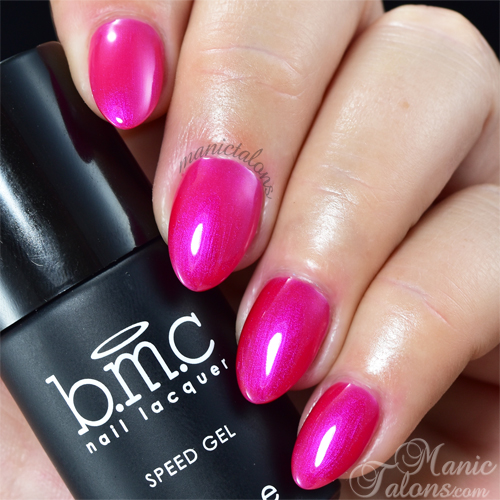
Next up is Can't Sit Here.  Can't Sit Here is a bold pink with a purple pearlescent flash.  Application was a breeze and two coats are perfect.  I absolutely love this color.  I didn't think to grab a picture of it, but layering it over black really makes the purple flash pop.  ;)
BMC Speed Gel Can't Sit Here Swatch

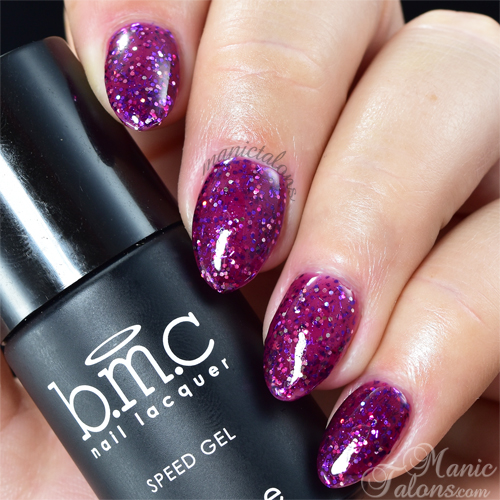
For my glitter lovers, check out Drama!  This jelly purple base is loaded with holographic pink glitter.  In the pictures, it looks multi-colored, but I promise the glitter is a dark pink holo.  Application was a little trickier than the others because of the glitter, but I found it applied nicely and the second coat easily filled in any glitter gaps from the first coat.  Just look at her!  She's fabulous!
BMC Speed Gel Drama! Swatch

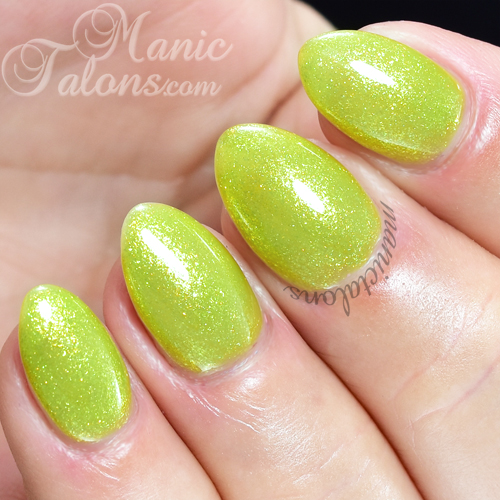
Cheeky is a shimmery lime green with a golden flash.  I found it to be opaque in two coats over my acrylic nails, but you might need three thin coats if you have strong VNL over a natural nail.  I should also note that I found her very hard to photograph.  My cool skin tone doesn't work very well with this color since it brings out the yellow more and the golden flash amplified the effect.  So here's how it looks on me.
BMC Speed Gel Cheeky Swatch

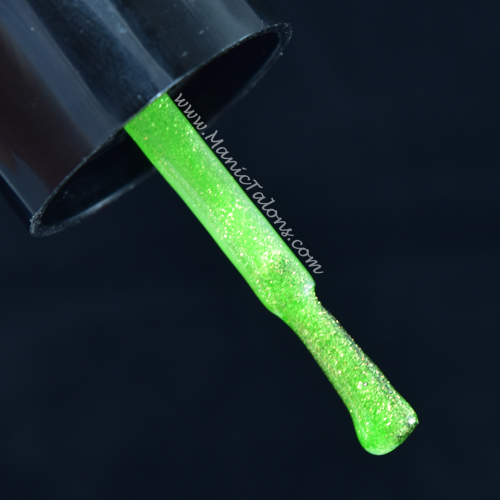
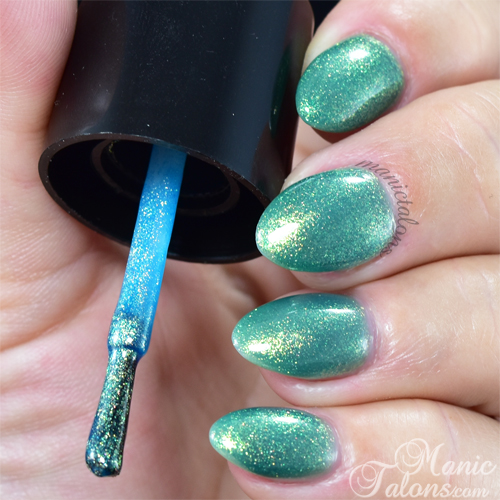
And here's a brush shot to show the true color of Cheeky without my skin ton throwing it off.  As you can see, it is much more lime green in the bottle. :)
BMC Speed Gel Cheeky Brush Shot

So Fetch! is Cheeky's Blue sister.  This bright blue base is packed with a greenish golden shimmer.  Application is similar to Cheeky in that it is opaque in two over my acrylic nails but might require three thin coats over a natural nail.
BMC Speed Gel So Fetch! Swatch

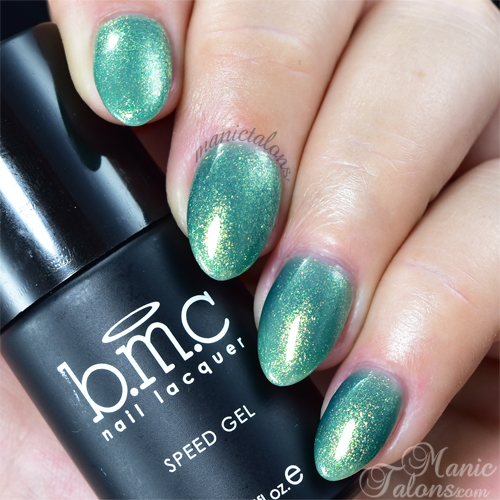
So Fetch! really messes with my head.  Why?  Well, in the bottle she is blue.  On my nails, she looks more teal.  I can't decide if the color changed when it cured or if the shimmer is throwing me off, so I took a shot with my nails and the brush.  The polish looks much more blue on the brush, I think, but the shimmer is strong and I really can't say for sure if the color changed or if the shimmer just flattened out on my nails and is obscuring the blue base.
BMC Speed Gel So Fetch! Brush Shot

Finally, my absolute favorite color in the collection is called So Tragic!  So Tragic is a black beauty with a fine iridescent shimmer.  My pictures failed to capture the shimmer quite as well as my eyes, but this polish is the black I have been desiring for years!  It is almost unnatural how much I love this black.  How much do I love it?  Well, I wore it when I graduated.  I wore it to the Nail Tech Event of the Smokies.  And I'm still wearing it as a base for nail art (check back Friday to see what I'm wearing).  Yeah, I'm really digging this color.  Oh, and she's opaque in two coats!
BMC Speed Gel So Tragic! Swatch

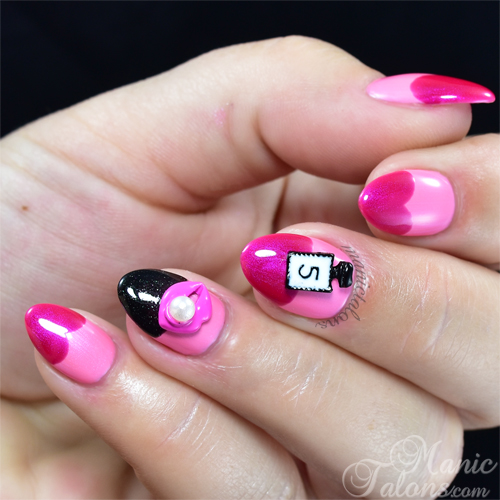
You know, a post about a collection with a name like Ain't No Basic B!tch just isn't complete without a little nail art.  Bundle Monster also sent me the High Maintenance Fashionista 3D Nail Charm set.  I couldn't resist pairing Pink Wednesdays, Can't Sit Here, and So Tragic! with heart shaped tips and a few of the charms.
BMC Speed Gel Ain't No Basic B!tch Nail Art
Bundle Monster High Maintenance Fashionista Charms

Here's a shot of the entire set of charms.  Aren't they precious!?!?!
Bundle Monster High Maintenance Fashionista Charms

So there you have it - a BMC Speed Gel collection for the unique b!tches out there (like me! lol).  I adore this collection...well, except for Cheeky but it's not her fault that my skin tone won't play nice.  The colors are great, the application is perfect, and that black!  Be still my fluttering little heart!

If you need the Ain't No Basic B!tch Collection in your life, or even just a color or two, you can pick them up on Bundle Monster's website here or on Amazon here.

~Michelle


*The polishes and 3D Nail charms featured in this post were provided by Bundle Monster for my honest review.  This post uses Amazon Affiliate links.  Purchases through these links generate commissions that help fund this site.  All other links are courtesy links and do not benefit ManicTalons.com.  

Read more ...

Friday, April 17, 2015

GelMoment One Step Gel Polish Review

Press Sample

GelMoment Gel Polish Swatches and Review

Hello Loves!  There is a new kid on the gel polish block called GelMoment, and I have a full review for you today.  You may have caught my post about this company a few weeks ago.  If you missed it, you can check it out here.  For today, I'll give you a quick recap and then we'll jump right into the review.  Sound good?

Ok, so how many of you have sat through a Tupperware, Mary Kay, Thirty-One, Avon, Jamberry, etc party and thought to yourself 'Gee, I wonder why no one has come up with a gel polish party yet'?  I know I've thought it and I can't be alone in that.  Well, now there IS a direct sales company for gel polish in Canada and the US.  GelMoment is a new, one step gel polish line with a direct sales platform.  They are also in the process of launching in Australia, so sales opportunities and products will be available there very soon.  If you would like to know more about that side of the company, I'll post some more info at the end of this post.  For now, let's take talk about the products.

GelMoment is a one step line - no base or top required - with easy application and a high shine finish.  There are currently 16 colors available and I suspect more colors will be added soon.  GelMoment offers everything you need for a gel polish manicure - a file/buffer, cuticle pusher that doubles as a remover tool, cleansing wipes (for prep), one step gel polish colors, an LED lamp, and the coolest remover packets I've ever seen.  Founding Gel Manager, Karma Kristufek, was kind enough to send me some samples of each of the products.  I'm going to focus on the gel polish and touch on the lamp and remover packets today.  I have the rest of the products that are offered as well, and there's nothing wrong with them.  They are simply your basic supplies that don't cause me much excitement.  lol

Sheesh...I can feel y'all thinking 'dang, is she going to shut up and show us the pictures or what?' so let's jump right into some swatches.  First up is a gorgeous, pinky peach coral shimmer called Flamingo Blossom.  Application was quite nice.  This is two coats.  The brushes are narrow and allow for great control of the product.  I was able to use a basic three stroke application on all of my nails except for my thumbs.
GelMoment Flamingo Blossom Swatch

Edit:  By request, I'm adding a shot of the brush.  Note:  This photo is not color accurate.


The next color I have to show you is a deep, wine toned plum cream called Satin Princess.  Application is similar to Flamingo Blossom.  Actually, they all apply the same so I'll stop mentioning application with each color.  ;)
GelMoment Satin Princess Swatch

Midnight Walk is a super dark, almost black Navy Blue.  I have a few blues similar to this in my collection, but the depth on this one is unmatched so far.
GelMoment Midnight Walk Swatch

Finally, Stroll in Paris is medium grey cream.  This is my least favorite of the four simply because I don't like it on my skin tone, but it is a beautiful color right out of the bottle.
GelMoment Stroll in Paris Swatch

Now that you've seen the swatches, scroll back up and take a close look at the light reflections.  That is the one step finish!  None of these swatches use a separate top coat.  They are simply two coats of color and done.  No cleansing needed either.

I want to show you one more swatchy style photo before we move on to wear test and removal.  Why?  Well, because these polishes are quite opaque and I can prove it.  In the photo below (you may remember it from my previous post), I applied two coats of Midnight Walk on my ring finger.  I then used a nail art brush and freehanded the chevrons and dots with Satin Princess.  Yep, you read that right.  The BASE is that super dark navy blue and the design is one coat of Satin Princess.  That's impressive, y'all. 
GelMoment Nail Art

GelMoment Nail Art

Ok, moving on...so how does it hold up?  I have no complaints.  I wore Satin Princess on my dominant hand (aka the hand I neglect and abuse the most) for two weeks.  During those two weeks, I was a student, a mother, and a blogger.  What exactly does that mean?  Simply stated, I put this polish through more than any other wear test I have ever done.  It was doused with acetone (polish removals at school), scuffed by files (and other random, abrasive objects in my kit), subjected to frequent hand washing, slathered in oils and lotions, the works.  Want to see how it held up?
GelMoment 2 Week Wear Test

Sure, there are scuff marks and the shine is dulled a little.  That's to be expected with my routine.  No polish ever stands up to 180 and 240 grit files.  You can see that I had a good bit of tip wear, but again, no polish ever stands up to 180 and 240 grit files.  Not to mention this is a one step polish that is lacking that extra protective barrier of a top coat.  So, keeping the abuse in mind, I'm giving it two thumbs up for wear.  On the average user, I suspect it would be flawless after 2 weeks.

Let's talk removal.  I started by buffing to remove the shine...sort of.  I admit, I didn't do a very good job with the buffing.  Then I slipped my fingers into the GelMoment Remover packs.  These little things are awesome.  Simply genius, really.  They are individual, foil lined packets with pre-moistened pads inside.  They look a little like individually wrapped alcohol wipes, except they have a little tab on the outside that you remove to reveal a sticky strip.
GelMoment Remover

So removal is as easy as buff the polish, rip the top off of the remover packet, slip your finger inside with the nail against the pad, remove the tab to expose the strip, fold the sides so they stick to the strip, fold the top down, and wait.  Are these not the coolest?
GelMoment Remover

Now that I've geeked out over the remover packets, how does the polish soak off?  Well, it IS a one step gel polish, so soak off heavily depends on application.  That first coat needs to be thicker than you would apply with a traditional three step gel.  Even so, one steps soak off weird.  After 10 minutes, I removed the wrap and found the gel was soft but still intact.  Pretty standard for a one step.  I then used the thumb nail on my other hand to push the gel off of the nail.  Not scrape, push.  It kind of disintegrates and flakes off like chalk.  If you've ever worn a one step gel, you know what I mean.  I should probably add a slight disclaimer - I have some damage going on from being my own guinea pig at school, so there are spots where the gel bonded a little too strongly to my nails (the damaged spots).  After lightly buffing those, the removal was clean.
GelMoment Removal Results

In case you're wondering what I mean by disintegrates and flakes off like chalk, I took an in progress shot while pushing the gel off of my thumb.

Finally, let's talk about the GelMoment two finger LED lamp.  I'm actually pretty impressed with this little lamp.  It's powered by USB, which makes it very portable.  It also has an open design so it can easily be used for pedicures too.  It has a one minute timer (the amount of time needed to cure GelMoment Gel Polish) and shuts off automatically when it is finished.  I tested it with a few other brands and it appears to cure them without issue - as long as you adjust your times accordingly.  The only drawback that I found is the placement of the LEDs.  They are side by side for a two finger cure, which works great for some of my fingers but not so great for others.  My instinct was to cure my index and middle nails together, then my ring and pinky nails together.  Yeah, that didn't work so well.  My pinkies stop a full fingertip below my ring fingers, which puts them at an odd placement inside the lamp.  No worries, though.  I found that all I needed was a little creativity.  I ended up curing my middle and ring fingers together, my two index fingers together, and then my pinkies with the opposite thumbs.  Worked out great.  :)  Of course, I figured that out AFTER I took the photo below.  lol  It is my opinion that this would be a great little travel lamp or even just one to have on hand for simple repairs.
GelMoment LED Gel Lamp

So, there you have it.  I am in love with the remover packets, the lamp passes my inspection for a travel lamp, and the gel polish held up really well even under my abuse.  The only drawback is the bottle size (8 ml), but that may not be a drawback to those who are more rational than I am.  I mean, really, do I NEED a full size bottle for personal use to add to my 400+ full sized bottles that have only been worn once or twice each?  lol

If you would like more information on GelMoment products or the direct sales opportunities, check out Karma's GelMoment facebook page here.  You can also visit Karma's GelMoment website or shoot her an email at gelnailgirl@gmail.com and she'll be happy to help you!  Be sure to sign up for Karma's GelMoment email updates as well for special offers and announcements.

~Michelle

*The GelMoment products featured in this post were provided by Karma Kristufek, Founding Gel Manager for GelMoment, for my honest, unbiased review.  All links within this post are courtesy links and do not benefit ManicTalons.com. 

Read more ...