Friday, December 5, 2014

Akzéntz Luxio Gel Polish Review

Press Sample

 Akzéntz Luxio Gel Polish Review

Hello Loves!  I have another Akzéntz product to show you today - Luxio Gel Polish.  Akzéntz is a Canadian based company that supplies high quality gels to the professional market world wide.  The Luxio line is made up of over 100 beautiful shades of LED/UV Soak Off Gel Polish. When I learned that Luxio recently won an award in Russia for 2014 Best Professional Manicure Product, I knew I had to try it.  I have five colors to show you today along with my usual wear test and removal.  Let's start with application and then move on to the swatches.  :)

Application

I am beyond impressed with the Luxio line.  I don't even know how to describe how these gel polishes apply.  They glide easily over the nail without shrinking or pooling.  It really is the perfect consistency.  The only thing I can think to compare it to is that silky feeling when you slide under your sheets right after shaving your legs.  And the coverage!  The creams are nearly one coaters and the glitters can easily go as one, two or three depending on the look you want.  This is a line I am seriously considering for my own clients down the road.

Swatches

The first color is one you've seen before as part of my Akzéntz Gel Play review.  Classy is a classic red cream.  This shade is simply flawless.
Luxio by Akzéntz Classy Swatch

The next shade is a gorgeous dark burgundy shimmer called Seduction.  Seduction has that awesome, glows from within look that I just love.
Luxio by Akzéntz Seduction Swatch

If nude is more your thing, you'll want to see Whisper.  Whisper is a light cream or beige nude.  This one is also opaque in two coats and applies perfectly.  This is quite uncommon for me - I find most light colors need three to four coats and tend to be streaky, but not Whisper.
Luxio by Akzéntz Whisper Swatch

Rose-Gold is a lovely golden rose micro glitter with a rose shimmer in a clear base.  The shimmer and glitter combination gives it crazy dimension with a metallic look.  Application was nice - there is more than enough glitter in the bottle to get full application without having to fish or fight with it.
Luxio by Akzéntz Rose-Gold Swatch

I couldn't resist pairing Rose-Gold and Whisper in a glitter fade.  They were just made for each other!  I love this nude look with a little bit of sparkle for fall.
Glitter Fade with Luxio Whisper and Rose-Gold

Finally, Silver is a silver micro glitter in a clear base.  Like Rose-Gold, application is nice with a good amount of glitter in the bottle.  I swatched two coats here, but it could easily be used as a topper with one coat or completely opaque in three to four.
Luxio by Akzéntz Silver Swatch

Top Coats

In addition to the five colors, I also received the base gel and three top coats - Matte, a traditional top coat called Gloss, and a high shine no-wipe top coat called Shine-On.  I used Shine-On for all of the swatches above.  As you can see, Shine-On has an impressive shine, which is rare for a no-wipe.  It also stays glossy even with extended wear.  I swatched all three top coats side by side so you can see how they compare.  Both Gloss and Shine-On have impressive shine, but I think Shine-On might be a little shinier than Gloss.  As for Matte, it might be the best matte gel polish top coat I have seen to date.  It gives a true matte finish instead of the more satin look we have been seeing from other brands.
Luxio Top Coats - Matte, Gloss and Shine-On

Wear Results

I've already talked about application, so let's move onto wear.  Before I get into the details, I should point out that I started this wear test the week before I started classes.  So this manicure started receiving major abuse and assault from files and buffers on day 8 of the wear test.  How did I wear?  The results are incredible.  You can see where I hit my nails with files and dulled the shine, but the tips are still fully covered except for one spot where I filed my length on accident.  *sigh*  One of these days I'll learn to file the nails of others without filing my own at the same time.  But I digress.  Wanna see the photographic evidence of 16 days of wear?
Luxio Two Week Wear Test Results
Hey look, you've seen this mani before.  ;)  I should note that I removed the tacky layer before adding the design with Gel Play directly onto the last color coat.  I then finished with Shine-On.  I think it's safe to say that Luxio passes the wear test with flying colors.

Removal

Since it wears like iron, I'm sure you're wondering about removal.  My soak off took 15-20 minutes.  As usual, I buffed to remove the shine from the top coat, then saturated a few foil wraps with Akzéntz Soak Off remover.  After 10 minutes, the gel had released on several of the nails but not on others.  I think I may have buffed some of the nails a bit deeper than the others, thus the difference in soak off.  I soaked for another 7 minutes and the rest of the gel pushed off without issue.
Luxio Removal Results
(Note:  The staining is NOT from Luxio Classic.  It is left over from my Kiara Sky wear test)

Final Thoughts

Akzéntz Luxio Gel Polish passes my tests and impressed the socks off of me.  This is definitely a top quality gel polish that I would expect to see in high end salons.  I have yet to test anything quite like it.  The way the brush glides over the nail just screams luxury.  If you're searching for an ultra high quality product, this is it.

Akzéntz products are only available through licensed distributors.  To find the distributor in your area, check out the Distributor Locator on the Akzéntz website.

~Michelle

*The Luxio Gel Polishes featured in this post were provided by Akzéntz for my honest review.
Read more ...

Wednesday, December 3, 2014

BMC Raspberry Rush with Snowflake Stamping

Press Sample Affiliate Links

Hello Loves.  As promised in my previous post, here's my mani for the week.  This one is a bit different than anything I've worn before for a few reasons.  First, you'll notice my nails are much shorter.  I'll explain why in a few.  Second, I usually don't stamp with gold.  I figured since I'm already out of my comfort zone with the length, I might as well push the limits.  ;)  Finally, these babies have a layer of acrylic under the gel polish (Please don't hate me!  I promise, I'm not turning my back on my one true love.  It was simply a good opportunity to practice what I'm learning.  lol).

BMC Raspberry Rush with Snowflake Stamps

If you read my last Nail School Chronicle update, you know I have been really hard on my hands the past few weeks and developed a few low splits.  In an attempt to save my nails, I filed down my length and added an acrylic overlay.  Sadly, my attempts failed.  I ended up breaking my middle nail while buckling Bryant's car seat this morning.  I swear, I hate that freaking car seat!  So now that finger is sporting a sculpted acrylic nail.  I'll show it to you at the end of the post.  Let's talk about the gel polish and nail art that I'm wearing.

The base color is Raspberry Rush from the Bundle Monster Fruit Cocktail Collection.  The collection is made up of three new thermals including Raspberry Rush (I'll show you the others soon).  Raspberry Rush is basically the cream version of Lady Incognito.  In the warm phase, it is a soft, neutral pink cream.  When cold, it shifts to a darker, more vibrant pink cream.  I absolutely love this color combination!  I'm also happy to report that Raspberry Rush is not as thick as it's glitter packed counterpart and applies nicely.  It is also very shifty.  I find that it is constantly changing, even with the shorter length and the warm snap we are experiencing.  Wanna see her without the stamping?  Please disregard the length difference.  I swatched this one before I took down my length.
BMC Gel Polish Raspberry Rush Swatch

I then stamped over Raspberry Rush with the snowflake full nail image from BM-H02 from the Bundle Monster Holiday Collection.  The stamping polish is Maybeline Bold Gold.  I honestly can't decide if I like this manicure more in the warm, transition or cold phase!  Which do you like best?
BMC Raspberry Rush Warm with Snowflake Stamping
BMC Gel Polish Raspberry Rush with Snowflakes in Transition
BMC Gel Polish Raspberry Rush with Snowflakes Cold

Finally, I mentioned that my acrylic overlay didn't save my middle nail.  I was so freaking bummed!  Thankfully, I was able to sculpt a half way decent nail to make up for it.  I used clear acrylic so that it won't impact the color of my swatches while I'm waiting for the nail to grow out.  You can see that it actually broke below the free edge.  This seems to happen to me around this time every year.  If you've been following my blog for a while, you might remember my super shorties from Christmas last year.  :(
Sculpted Nail Attempt with Clear Acrylic

As I said, it's not perfect but it will work as a base for gel polish swatches.  It has bubbles and I didn't completely remove the acrylic from the overlay - I simply buffed it close to the nail plate and sculpted over it.  It's also a little thicker on one side so it bulges out a little.  lol  Hey, I'm still learning.  ;)

That's all for today.  I promise I'll get the rest of the BMC Fruit Cocktail collection up for you soon.  I also have one of the BMC Speed Gel collections and the BMC Red Carpet Collection (aka the Metallics) to show you too.


~Michelle

*The Gel Polish featured in this post was provided by Bundle Monster for my honest review.  All other products were purchased by me.  This post uses Amazon Affiliate Links.  Purchases through these links generate commissions that help fund this site.  All other links are courtesy links and do not generate commissions.
Read more ...

Monday, December 1, 2014

The Nail School Chronicle: Week 2

The Nail School Chronicle: Week 2

Hello Loves.  It's time for another Nail School Chronicle entry.  Last week was week 2 of nail school at GCI, and it was a short week thanks to Fall Break (aka Thanksgiving).  Since it was a three day week, we spent a few days working on nail art and practicing the acrylic methods we learned previously.  But before we get to all that, I have a personal update (aka whine fest) and my Nail School Observations.

Let's start with the personal.  First, I sincerely apologize for the lack of a post on Friday.  The past 5 days have been absolute hell.  If you missed in on Facebook and Instagram, my husband was in a bad wreck Wednesday evening.  He was t-boned by a much larger truck.  It was a freak thing.  The guy in the other truck was unfamiliar with the area and the road he was traveling has a blind stop sign.  If you don't know the road, the stop sign will sneak up on you with no warning.  That's exactly what happened at the exact moment Keith was driving past the intersection.  The guy hit him at full speed (around 50 mph).  The full impact was on Keith's driver's side and it pushed him into a ditch where he rolled head over end.  By the grace of God, he was able to climb out of the wreckage and literally walked away.  Of course, not without injuries.  He had a concussion, a large contusion on his left foot, a possible bruised heart (tachycardia), and 9 broken ribs on his left side.  He spent one night in the hospital but was thankfully released Thursday morning.  Needless to say, he's pretty much out of commission for a while and I'm playing single mother and nurse for the duration on top of being a student.  I'm going to try to stay on top of blogging, but I may fall behind a bit while he's recovering.

This is the wreckage that was Keith's work truck.  It had a camper top on it that was ripped off during the wreck.  He found his brief case 30 yards away in the woods and we are still missing a lot of his stuff like his personal key ring.  The door was ripped from the frame and Keith woke up with his lower half still in the truck and his upper half hanging out the door with the seat belt holding him it.  We still can't believe he wasn't more seriously injured or worse, but we thank God that he is still with us.

This is the truck that hit him.  Needless to say, that little Toyota Tacoma didn't stand a chance.  Thank God for side impact air bags!

On top of Keith being injured, both of my kids have been sick.  William popped up with a fever on Thanksgiving and a trip to the walk in clinic revealed a double ear infection.  He's been a whining mess for days.  Then Bryant started complaining of a headache Saturday night and spent the night sick to his stomach and running a fever.  Needless to say, I haven't gotten anything done.  Matter of fact, William is currently cramming books in my lap and screaming because I'm writing this post instead of reading them to him.  *Sigh*  Thus is life with a 19 month old.

And to top it all off, I ended up with 5 low splits on my swatching hand and a major break on my right hand.  Apparently I forgot to moisturize with everything else going on.  I shortened all of my nails to relieve the stress on the splits and saved the swatch hand with an acrylic overlay.  I know, blasphemy, but a girl has to do what a girl has to do.  The right hand was too far gone, so I'm sporting a nubby.  I thought about adding a tip, but I'm not even going to pretend that my acrylic application skills are ready to attempt using my non-dominant hand for application.  I'll show you the final mani in a later post.  I still have to edit those pictures.

Onto the Nail School Update and observations:
  • My kit came in last Tuesday.  Lots of fun products inside.  I'll take photos and show you the contents next week.
  • The polishes at the school for nail art practice SUCK!  They are made up of bottles that can't be used on clients anymore and have been rescued a million times with polish thinner.  Plus the color selection is horrible.  I attempted two wheels of nail art on Monday with the school polishes.  I'll show them to you below.  No joke, I used a striper straight out of the bottle and ended up with a sugar spun look.  lol
  • I brought some of my personal polishes and acrylic paints on Tuesday and used those instead of the school polishes.  Trust me when I tell you that quality polishes and paints are CRUCIAL when it comes to nail art.
  • I have my first test today and I am SOOOO not ready for it.  I'm super nervous.  I had planned to use the long weekend to study, but you know how that turned out.  I'm crossing my fingers and praying for a passing grade.  When I made my study cards, I ended up with over 100 index cards.  Sadly, I only feel confident that I know about half of them.  All these terms that start with O are killing me.
  • I'm struggling hard with acrylic application.  I can't seem to get the right consistency in my balls.  They're either too dry or too wet.  And ball size is killing me too.  (Holy crap, did I really just say that?  I never in my life thought I would be posting about the size and consistency of balls on here!)  The hardest part for me is getting the cuticle area right.  You'll see it in my overlay attempt later this week.  Getting the acrylic thin and smooth at the cuticle is a challenge.  I started watching youtube videos last night and I think I "get it" now but I'll have to try it and see.  Of course, I didn't think to youtube BEFORE doing my own overlay.  These nails are seriously jacked up.  I'm waiting for them to grow out so I can smooth the cuticle area.  lol
  • I would give anything if this class was mostly gel with a hint of acrylic.  I'm so far out of my element here, I feel like I've never touched a nail in my life!

Wanna see my work from this past week?  Let's start with the nail wheels from Monday using the school's polishes.  I'm actually embarrassed to even post these!  Seriously, what is this hot mess???  That yellow nail is the sugar spun look straight from the bottle.  And look at my poor dots.  Y'all know dots are my thing and they are usually perfect.  These are FAR from perfect.  You can tell where I kind of gave up and started slapping polish on the nails just to finish the wheel.

And here's the wheel from Tuesday.  These are much more in line with my usual work.  They're a bit messy in some places, but I can accept that.  After all, I'm used to working with gel polish, not regular polish.  The only one that I'm scratching my head over is the blobbish flower at the top of the photo.  No clue what I was thinking on that one.  lol
Winter Themed Nail Art Wheel

I pulled out a few of my favorites.  Wanna see them?

These little blue rose buds are done in acrylic paint.  The bow could use a little work, but I like how the roses turned out.
Simple Blue Rose Buds Nail Art

Of course, you can't have a winter themed nail wheel without a Cardinal.  My birdie is a little short, but I think he turned out cute.  I used acrylic paints for the art over a base of Girly Bits Accidental PPV for this one. 
Cardinal Nail Art

Anyone care for a little ice skating?  This one is acrylic paints as well.  She's not as clean as I would like, but honestly if anyone is looking that closely at a nail, they need to learn about boundaries and personal space.  ;)
Ice Skating Girl Winter Nail Art

Finally, this snow covered tree might be my favorite.  The birds are a little wonky, but I adore how the tree came together (acrylic paint again) and KBShimmer White Here White Now makes a perfect snowy covering.
Winter Tree Nail Art

Finally, I attempted another set of sculpted acrylic nails on Wednesday.  These turned out better than the set from the first week, I think.  They still need a lot of work and you can see where I struggled at the cuticle.  They are also pink and white french under the nail art, but my smile lines were more like grimace lines so I added some polish and art.  I still have a little duckiness going on too - especially on the ring finger nail.  Shame I don't like duck nails.  It looks like I might be pretty good at them.  lol
Nail School Week 2 - 2nd attempt at sculpting acrylic

That's all for this week.  I'm sure there are things I forgot to tell/show you, but my brain is fried.  If I have any major typos in this post, just laugh at me and ignore them.  I'm off to edit photos for the rest of the week.  Check back later to see my current mani with acrylic overlay and a full review of Akzentz Luxio Gel Polish.  :)

~Michelle
Read more ...

Wednesday, November 26, 2014

Pink Gellac Ultra Shine Top Coats and Foil Effects Review

Press Sample Affiliate Links

Pink Gellac Ultra Shine Top Coats and Effect Foils Review

Hello Loves!  I have four fun products to show you today by Pink Gellac.  These are brought to you by Chickettes and I have had the opportunity to play with them for over a month now.  I have the Ultra Shine Top Coat, Ultra Shine Pearl Top Coat, Effect Gold Foil and Effect Silver Foil for review.  Wanna see them?

Let's start with the Pink Gellac Ultra Shine Top Coat.  I have used this one with almost every mani I have done since Andrea sent it to me to try.  That right there tells you how much I like it, but let's talk about the details for a minute.  The Ultra Shine Top Coat is a no-wipe top coat.  That means it doesn't have a tacky layer to cleanse at the end of the mani.  I absolutely LOVE no-wipe top coats.  Not having to cleanse at the end saves one more step that is drying to my skin.  The Ultra Shine Top Coat requires a 1 minute cure in LED, which is a little bit of a bummer, but it has amazing shine.  The shine, in my opinion, is stronger than my regular gel top coats by leaps and bounds.  What's more, it doesn't dull over time like some other no-wipe top coats will and it cures to a hard, protective finish.  Let's take a look over a black base.
Pink Gellac Ultra Shine Top Coat Review

The reflections are amazing.  You can see the shade around my lamp!  With that said, there is one thing I should mention.  The top coat is quite thick and tends to leave small gaps or pits when you first apply it.  The more you try to fix them, the worse it gets.  I quickly discovered that the trick is to apply it and leave it alone.  The gel will level and fill in the gaps beautifully.  Here's another shot.  You can see the spiral in the actual bulb on the index and middle fingers in this one.
Pink Gellac Ultra Shine Top Coat Review

Finally, here's a closeup.  Please disregard the noise in the photo and focus on the reflection.  Beside the glare reflection from the light, you can actually see the distorted reflection of my camera and tripod!  I have a lot of top coats in my arsenal, and none of them compare when it comes to shine - not even my beloved Couture top coat!
Pink Gellac Ultra Shine Top Coat Review

Moving on, the Ultra Shine Top Coat also comes in a shimmer version called Ultra Shine Pearl Top Coat.  I have shown it to you in a few nail art pieces previously, but let's take a look over black.  This one is also a no-wipe top coat and applies like the regular Ultra Shine Top Coat.  The difference is the Ultra Shine Pearl Top Coat has a silver and scattered holographic shimmer.  It performs beautifully over nail art to add that extra shimmer without obscuring even the most delicate designs.
Pink Gellac Ultra Shine Pearl Top Coat Review

The shine isn't quite as reflective as the regular Ultra Shine Top Coat since the shimmer breaks up the reflection, but the shine is still quite strong.  In the picture below, you can still see the shade around my lamps on the index and middle nails.
Pink Gellac Ultra Shine Pearl Top Coat Review

Here's a closeup of the pearl.  I soft focused this one just a tad to show the scattered holographic shimmer mixed in with the silver.
Pink Gellac Ultra Shine Pearl Top Coat Review

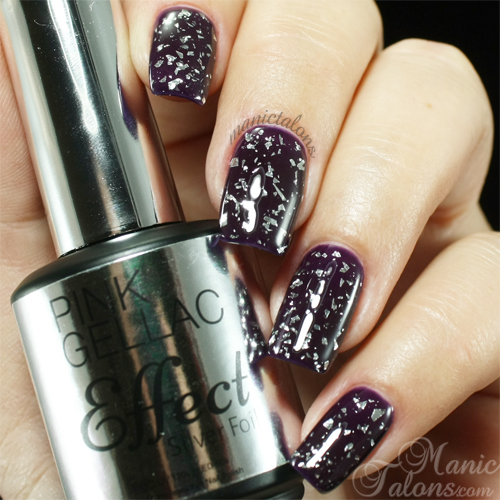
Next, I have the Effect Silver Foil topper.  The Effects are not stand alone top coats, but rather they are glitter style toppers that can be applied between the final color coat and top coat layers.  The Effect Silver Foil is, well, silver foil flakies in a clear base.  The base is average consistency but it is loaded with the flakes.  Application is nice for a flaky.  I applied one stroke down the center of the nail and then used the brush to move the pieces around until I was happy with the coverage.  Oh, and the flakes don't stick up like some of the flakies we have seen lately. *coughGelishcough* *coughFingerPaintsGelcough*  I have swatched it here over a dark purple.
Pink Gellac Effect Silver Foil Swatch

Here's a closeup that shows the flakes a bit better.  Or maybe not...but look at that shine from the Ultra Shine Top Coat.  lol  By the way, the Effect Silver Foil would look awesome over a black base for a quick and easy New Years mani.
Pink Gellac Effect Silver Foil Swatch

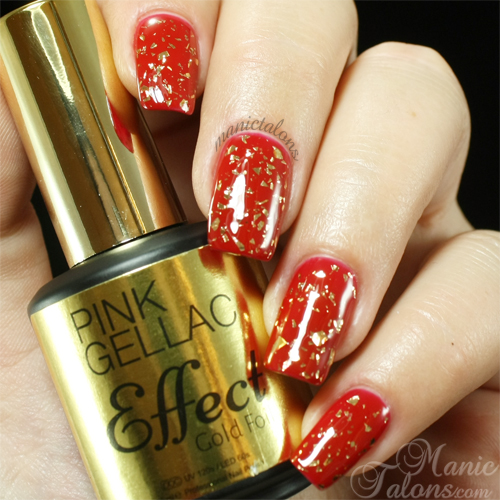
Finally, I have the Effect Gold Foil to show you too.  This one is exactly like the Effect Silver Foil, just gold.  So there isn't really much I can say that you haven't already heard.  I swatched it here over Pink Gellac Lipstick Red.  Lipstick Red is a classic red cream.
Pink Gellac Effect Gold Foil Swatch

As I mentioned previously, these are available for purchase via the Chickettes Boutique or on Amazon.  Chickettes is also having an awesome Black Friday sale with 20% off everything in the Boutique and free shipping on orders over $50.  :)

~Michelle

*The polishes featured in this post were provided by Chickettes for my honest review.  This post uses Amazon Affiliate Links.  Purchases through these links generate commissions that help fund this site.
Read more ...
Monday, November 24, 2014

The Nail School Chronicle: Week 1

Press Sample Affiliate Links

The Nail School Chronicle: Week 1

Hello Loves!  I officially survived my first week of nail school at Georgia Career Institute.  Whoa, what a week!  I also have my Thanksgiving mani to show you, so stick around to the end of the post to see it. :)

So, what was the first week like?  Fast paced and a little overwhelming, to be honest.  Since it's a revolving curriculum, all of the students are at different places in terms of hours.  Some have been learning for only a few weeks.  Others are nearing graduation.  All of my classmates are friendly and my instructor is as well, so that helps.  When I walked in, I was handed my books and told to read over the Chapter on Skin and Nail Physiology and Diseases.  Whoo Hoo.  lol

The next thing I was given was a fake hand that seriously brought back memories of watching the Adam's Family with my Grandma as a child.  Yes, I just dated myself, but these dummy hands remind me of "Thing".  Come to think of it, my dummy hand will be referred to as "Thing" going forward.  After all, every "client" has a name, right? ;)  I was also given monomer, polymers, tips, files, an acrylic brush, and quick instruction on overlays.  That rapidly moved into blended tips.  Yes, my first day jumped head first into working with acrylics.  Y'all, I'm no stranger to gel polish, but acrylic scares the crap out of me.  Ok, it doesn't really scare me, but it's a completely different animal than gel polish.  I feel like I've never picked up a nail brush in my life working with this stuff.  The nail program is very heavily weighted in acrylic work, so I need to master it even though gel is my passion.  Wanna see my first full attempt at blended tips with an acrylic overlay?  It's not very pretty, but I guess it's not horrible.  Excuse the poor lighting.  The classroom lighting isn't great for photos.
My First Full Attempt at Blended Tips with Acrylic Overlay

By the third day, I was working on completely sculpted pink and white acrylics.  Needless to say, tips are much easier for me.  Want to see my first full set of sculpted nails?  They're pretty funny.  ;)  That index nail looks a bit ducky.
My First Full Attempt at Sculpted Pink and White Acrylics

Sadly, I don't have my kit yet, so the first week I was working with a hodge podge of materials:  monomer from the school, polymers from my personal stash (Thank you to Brenda from Tuff Enough Nails aka T.E.N. for sending me those with the Poly Polish I reviewed last month), an acrylic brush that was included in a press sample as a gift from Thresa from Esther's Nail Center (Thanks Thresa!), and other odds and ends from the school.  I did pick up an acrylic starter kit the other day so I could practice at home.  Hopefully my kit will be in soon.  I should note that it is not the school's fault that I don't have my kit yet.  Apparently OPI is behind in supplying them to the schools. :/

So, what else did I learn this week?  Let's see...

  • Getting up at 5:30 in the morning really sucks.  I'm so not a morning person!  I much prefer to sleep in and stay up late at night.
  • Shaping acrylics by hand is challenging.  Apparently I'm not capable of filing someone else's nails without also filing my own.  My poor thumb nail on my left hand is missing the corners now.
  • I really hope my first real client is double jointed.  I find myself moving the dummy hand into positions that just aren't natural for a real client.  lol
  • Neither Couture Gel Polish or Luxio Gel Polish will continue looking great when constantly assaulted by a 180 grit file, but both stayed on without chipping!  (Check in Friday for my full review of Luxio)
  • Nail Glue is NOT my friend.  I can't even begin to tell you how many times I glued fake nails to my myself on accident.  And we're not talking about putting them on my nails.  No, we're talking about fake nails affixed to the pad of my finger, the side of my palm, and even on my elbow once.
  • Going back to school and reading text books for the first time in over 14 years is quite...um...different.  Don't get me wrong, I love to read.  But text books aren't exactly my first choice of literature.  I can honestly say that I have forgotten how to study.  :(
  • Nail Diseases and Disorders can be really disturbing.  Especially the text book photos.  Yet all of the names sound the same.  This test next Monday is going to be challenging.

That pretty much sums up my week.  Ready to see my Thanksgiving mani?  I decided to combine pigments and stamping for a quick and easy mani this week.

I started with a white base and then burnished (or scrubbed) in three different pigments into the tacky layer.  The pigments are from the T.E.N. Color Explosion Powders line and remind me of the colors of changing leaves.  The colors are Red Ruby, Fired Up Red, and Lil Shot O Orange.
Tuff Enough Nails Pigments

These pigments are awesome.  They are super fine and stick to the tacky layer of gel polish with ease.  Here are the open pots in the same order as the closed pots above.
Tuff Enough Nails Pigments

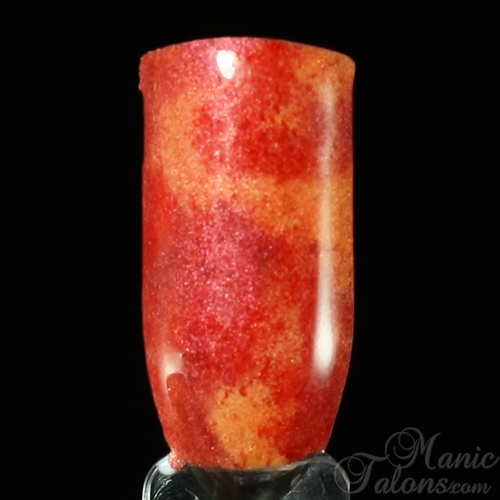
Of course, I forgot to take a picture of the base before stamping over it.  I keep doing that!  Sorry, I guess I get so into the art that my brain shuts off for a bit.  But I do want to show you the base, so I recreated it on a swatch stick.  I seriously considered not stamping over it.  It's so pretty all alone!  To create this look, I burnished the colors randomly over the nail.  I started with a swirl of Lil Shot O Orange in the center and then added the Fired Up Red and Red Ruby to create a marbled effect.
Pigment and Gel Polish Marbled Base

For my actual manicure, I used the Pink Gellac Ultra Shine Pearl top coat over the pigments to add a little extra sparkle (I used a regular gel top coat on the swatch above to show you the true colors of the pigments).  Then, because I can never leave well enough alone, I stamped over the base with Maybeline Bold Gold and two images from BM-H11 from the Bundle Monster holiday plate set.  The ring finger is the pumpkin image, though it's hard to see the photo.  The rest of the nails are stamped with the coordinating leaves image.  This set is a recent addition to my collection.  I don't know why I waited so long to get it.  It really is a must have for any holiday.  I finished with the regular Pink Gellac Ultra Shine top coat.  Both the regular and pearl ultra shines are no-wipe top coats, which I really like.  Check in Wednesday for my full Pink Gellac top coat review. 
Thanksgiving Manicure with Pigments and Stamping

I love the subtle stamping over the colorful fall base.  I'm kind of disappointed to know that I'm going to mess it up with that danged file tomorrow at school!  lol

I guess that concludes this week's edition of The Nail School Chronicle.  Check back next Monday, same time and place, for the next edition.  This upcoming week will be a short one thanks to Thanksgiving break, but I'm sure I'll have something fun to report.

~Michelle

*The pigments used in this post were provided by Tuff Enough Nails (T.E.N.) for my honest review.  This post also includes Amazon Affiliate Links.  Purchases through those links generate commissions that help fund this site.  All other links are courtesy links.

Read more ...