
Hello loves! As you know, gel polish is seriously lacking in some of the fun finishes that are currently being produced by Indie makers. Thankfully, we can combine traditional lacquer with gel polish to calm that craving! When Pam from Girly BitsCosmetics asked me to do a post on combining Soak Off Gel and Girly Bits Nail Lacquer, I ran into a huge problem – choosing which of these gorgeous polishes to show you! Gah! I did manage to narrow it down, so today I’m going to show you two ways to combine Girly Bits polish with your favorite gel polish brand (in this case, I’m using Couture).
Let’s start with the easiest method, shall we?
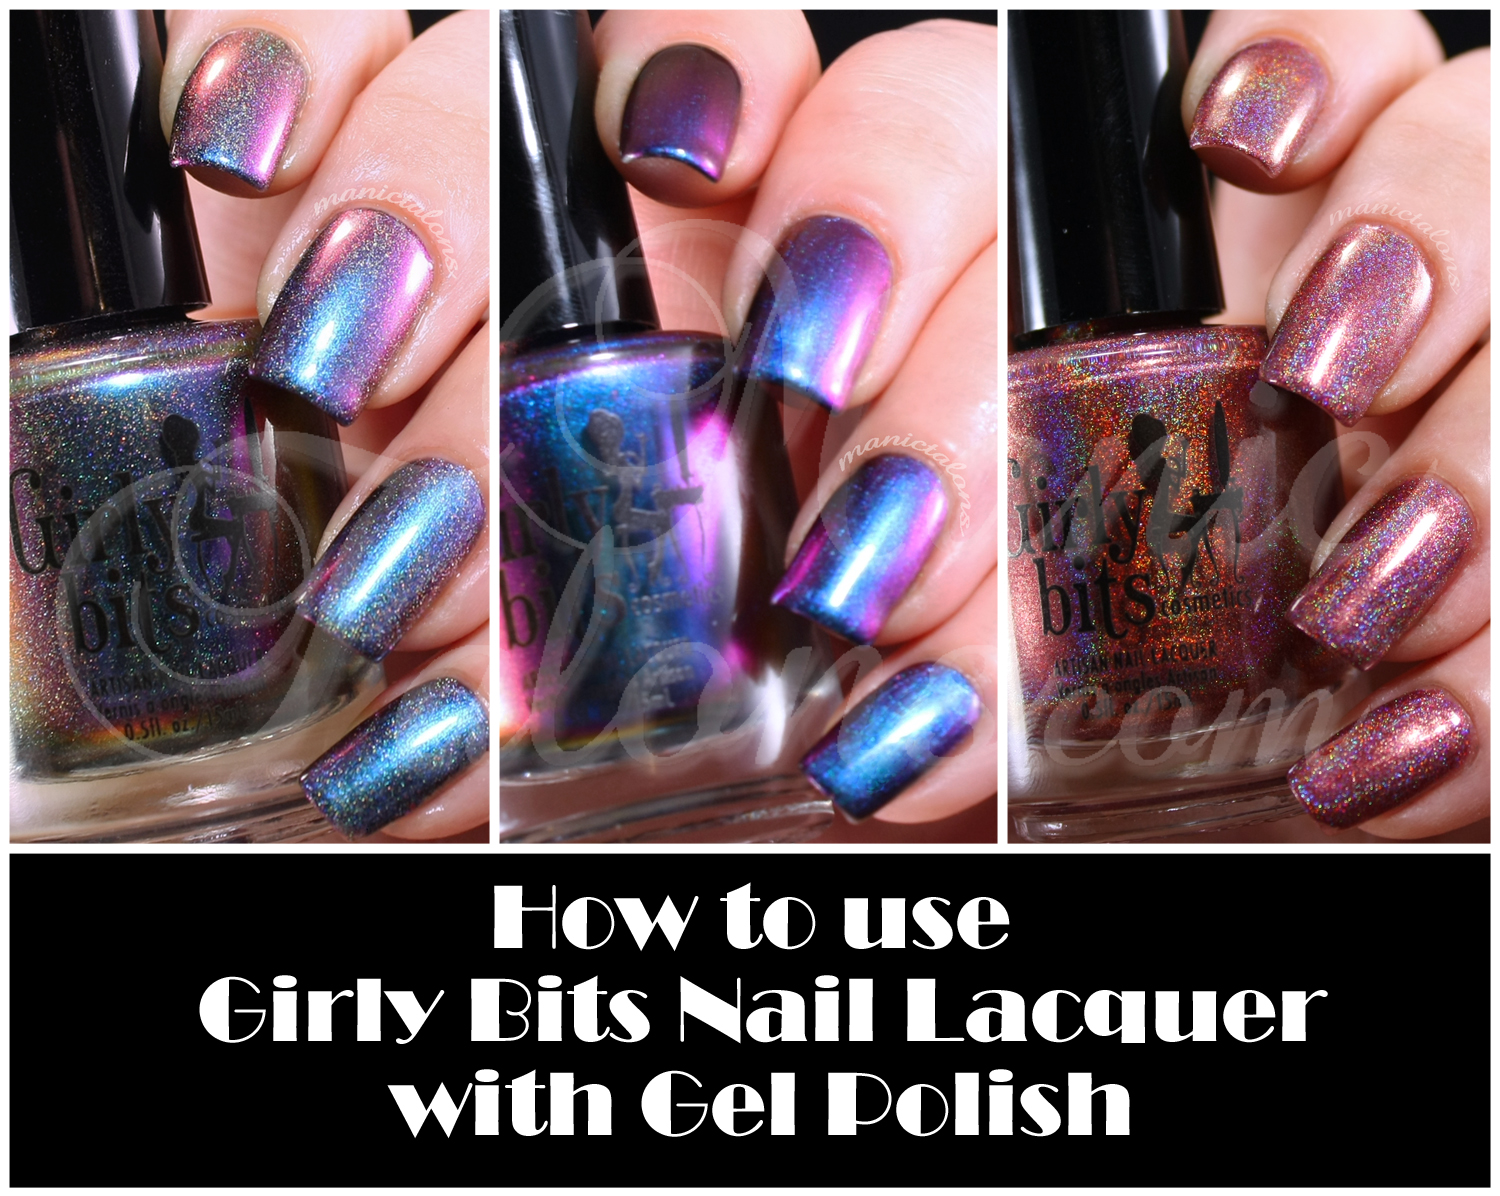
Polish on Top of a Gel Manicure
The first way to combine traditional polish with gel polish is to do a complete gel manicure and polish on top of it. In this case, I did a complete gel manicure in black. Once I removed the tacky layer from the top coat, I applied 1 coat of this amazing holographic multi-chrome called Go and Shake a Tower. I then topped it off with a coat of fast dry top coat. One great thing about this polish is it was designed to be opaque in 3 coats on its own but can also be layered over black without impacting the color. So you can just as easily apply three coats of Go and Shake a Tower over a clear gel manicure if you don’t want to use black as the base.

Layering polish over a soak of gel manicure with this method is awesome for two reasons. First, polish wears like iron over soak off gel so it will likely last over a week. Second, if you get tired of the color, you can easily remove it with non-acetone polish remover without damaging the gel manicure underneath!
Want to see another shot of this beauty? Yeah, I thought so. Excuse the excess cuticle oil. I got a little carried away.

The RNP Sandwich
The second way to combine gel polish with regular nail polish (RNP) is to sandwich the regular polish between layers of gel. There are a few tricks to successfully sandwiching RNP between layers of gel. The most important trick is patience! As gel users, we are not accustomed to waiting for polish to dry. This will be your biggest hurdle when it comes to RNP sandwiches. ;)
Before I get into the technical stuff, how about a little eye candy? This is a RNP sandwich mani using a black gel polish mani for the base and one thin coat of this amazing multi-chrome beauty called Wave the Sails. As you know, I’m a sucker for a multi-chrome, and this one absolutely blows my mind.

You have to see it from all angles to fully appreciate the gorgeousness. I have been wearing this combo on my right hand for the past week. Fair warning: this polish is not a safe choice for driving in cloudy weather! It is extremely hard to keep your eyes on the road and off of your fingers.


Ok, ok…so back to the process. I’ll break it down in steps with pointers.
Step 1: Apply your base/foundation gel, being sure to fully wrap the free edge of the nail. I usually let mine overflow to the underside of the tip. This allows a margin of gel for the final top coat layer to grab so that the RNP layer is fully encased in gel. If your nails aren’t long enough to wrap the gel that far, wrap it as much as you can without getting the gel on the skin under the nail. Cure as usual. (Check out this post for more info and a photo of how I wrap my tips.)
Step 2: If you are wearing a coordinating base color under the RNP, apply it now and wrap it under the nail the same way you did the base in step 1. Cure as usual and repeat for a second coat if necessary.
Step 3: Apply your gel top coat, again wrapping the tip as described in Step 1. Cure and remove the tacky layer. Do not oil your cuticles yet!
Step 4: Apply a thin coat of RNP on top of the gel manicure. Cover the free edge, but try not to let the polish overflow onto the underside of the nail (remember, you want that gel on the underside free of RNP so that the top coat can grab it). If you need another coat of RNP, allow the first coat to dry before applying the second coat.
Step 5: (option): Apply a fast dry top coat to speed things along, again being careful to leave that gel margin under the tip of the nail clear
Step 6: Now we wait. I’m serious. Wait. The RNP has to be COMPLETELY dry before you can apply the gel top coat. Do Not Rush This Step! If the RNP isn’t completely dry, it will cause the top coat to chip off in less than a day. Or worse, the RNP can wrinkle under the gel top coat, and there’s no fixing it when that happens. If you used only 1 thin coat of polish, 2-3 hours should be sufficient to ensure the RNP is dry. If you used two or more coats, better make it 4-6 hours.

Step 7: Now that your RNP is completely dry, quickly wash your hands with an oil fighting soap (I use dish detergent) to remove any oil from the nail that you may have picked up while waiting. This step is important! You likely picked up oils from your skin or hair during the wait, so if you skip this step the top coat will chip.
Step 8: Dry your hands completely and wait 5-10 minutes to be sure they’re dry. Don’t touch your skin or hair during this time. ;)
Step 9: Apply a layer of gel top coat, being sure to wrap the tips as described in step one so the top coat bonds to the exposed gel under the tip of the nail. Cure as usual. You may choose to do another layer of gel top coat at this point. I usually do, but it is completely optional. Remove the tacky layer and enjoy your longer lasting RNP mani with a gel shine!
I usually get anywhere from 7 to 10 days wear from RNP sandwich manicures. I could likely get even longer wear, but I'm usually tired of a manicure and ready for a change after 10 days, so I haven't tried to go longer. One other thing to note - when soaking off a sandwich mani, you may encounter staining from the RNP.
I usually get anywhere from 7 to 10 days wear from RNP sandwich manicures. I could likely get even longer wear, but I'm usually tired of a manicure and ready for a change after 10 days, so I haven't tried to go longer. One other thing to note - when soaking off a sandwich mani, you may encounter staining from the RNP.
Want to see another RNP sandwich mani? This wine colored holographic beauty is GirlyBits Auld Langs Wyne. I opted to use a clear soak off gel base for this one. My soak of gel base consisted of one layer of base gel and two layers of top coat (for added strength). I then applied 3 thin layers of Auld Langs Wyne and waited 5 hours for it to completely dry before adding 2 layers of soak off gel top coat.

Since I had some time to kill while waiting, I snagged a shot of this incredible polish without the gel top coat. Look at the fire in that holo!

Finally, here’s a similar shot after adding the gel top coat. The angle is a bit off, but you can see on the thumb nail that adding the gel top coat doesn’t impact the holographic shift as much as most RNP top coats. There’s still a considerable amount of fire in this one!

Ok, so now you’re probably wondering where you can get your hands on these beautiful polishes, right? Don’t worry, I have you covered there too. Girly Bits Nail Lacquer is available through several authorized distributors around the world. Click here to find the GirlyBits Distributor closest to you.
Also, be sure to follow Girly Bits Cosmetics on Facebook and @girlybitscosmetics on Instagram to see more gorgeous swatches and learn of new collections.
Oh, and did I mention these polishes are hand blended, hand poured, B3 free and cruelty free? Whoo Hoo!
Ok, ok, I’ll stop rambling now and go stare at my hands again. :) But before I do, I have one more picture to show you. Check out Wave the Sails stamped over Couture Little Black Dress! Yes, my stamping friends, you NEED this polish! The image is from Messy Mansion MM04.

Do you love Girly Bits Lacquer? Which is your absolute favorite? I think I need a few more of these beauties in my collection!
~Michelle
*The polishes featured in this post were provided by Girly Bits Cosmetics for the purpose of this tutorial. All descriptive statements and general reviews are my honest, unsolicited opinions of the products.
Great post, thank you for the detailed step by step :)
ReplyDeleteI LOVE THIS!!!! I'm going to do this!!!
ReplyDeleteDROOL. Soooo pretty!
ReplyDeleteMichelle, I think this is your best post ever! I love the pictures and the way you've written it.
ReplyDeleteP.S. I need to get some of these Girly Bits polishes ;)
DeleteWow, those are great! I thought you stamped the last one with black and not the other way around. That polish is amazing! :-) I've found that if I only use one coat of RNP, I've not had to wait long at all to finish it with gel topcoat. But, maybe that's because I live in a really dry climate. Anyway, it's awesome that we can combine gel with rnp! :-)
ReplyDeleteI need to look into Girly Bits polish! Fabulous manicures and terrific ideas you shared today!
ReplyDeleteSo pretty, im absolutly in love with this manicure :D
ReplyDeleteMélissa Marcoux
llarowe.com has a line of "holo gels" by JOSS. Only the silver has a swatch on their site, and although it doesn't appear linear, the holo effect doesn't appear too wimpy. Has anyone tried them? I purchased the crimson color, but haven't gotten around to using it yet.
ReplyDeleteHowever, since I do the RNP sandwich, I will be looking into Girly Bits.
Cool post! Yes, I noticed that the NRP last very long over gel polish following your first method. Yet to try the second one.
ReplyDeleteWell done Michelle. I'm with Tracey this reads like your best post ever. You broke it down very succinctly.
ReplyDeleteThat stamping is awesome!
ReplyDelete