Purchased by Me Affiliate Links
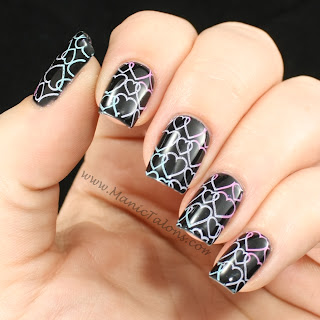
Hello loves. I decided to try a new stamping technique this evening called gradient stamping. I don't know who came up with this technique, but I seriously love it! I have been wanting to try it for a while now and just got around to it tonight.
I'm pretty sure this exact design has been done before - same image and all, but I don't remember where I saw it. If you recognize it, please let me know in the comments so I can give credit. :) I am completely head over heels for the finished look, although it does remind me of those crazy laser photo backgrounds that were so popular in school pictures in the 80s.
I started out with a base of Ink Blackout. I didn't do a swatch picture of this one because my bottle is one of the manufacturer flaws floating around. Blackout should be a pure black creme. Mine has silver shimmer. I love that I have one of the flawed bottles, though. It makes it unique to my other blacks.
I then chose three of my pastel Mundo de Unas stamping polishes for the gradient and the interlocking hearts image from Pueen 41. The polish colors are Pink, Lilac and Pastel Blue. Mundo de Unas polishes are amazing. When I ordered, I chose only colors that stamp well over black and I don't regret that decision one bit. Not only are they super opaque, but I also love that they are slower to dry than many other stamping polishes so I have a little more time to position the stamp.
I then applied stripes of each color to the image. I usually only paint half of the image with stamping polish to reduce waste, but in this case painting the entire image gives you more control of where each color ends up.
Scrape in the same direction you applied the stripes to keep the colors from mixing too much.
I used my XL Squishy stamper for this manicure, but it was really hard to see the colors on the white pad. So I picked up the image with the darker pad on my Magno stamper to show you how it looks before being placed on the nail. Please excuse the skips in the image as I haven't prepped this pad yet. But you can see the subtle gradient between each of the colors.
Here's another shot of the finished mani. This is a technique I will definitely try again, and hopefully I can move a bit quicker next time. You can see a few blank spots in the lines in this shot. This is the result of waiting a little too long between scraping, picking up the image, and transferring it to the nail.
What do you think of gradient stamping? Do you love it as much as I do?
~Michelle


I like! Looks fantastic! I want to try this, but I need to get a large stamper.
ReplyDeleteLove it !!!
ReplyDeleteVery nice :)
ReplyDeleteOoh, yes. Another fantastic tip I didn't think of!
ReplyDelete