Hello Loves. I apologize for the late post. We had a bit
of a plumbing issue that dominated my day yesterday.
Today’s post is a little different than my usual. Instead
of showing you more swatches or my own nail art, I’m going to introduce you to
someone who has been very inspirational to me in my journey with gel polish. When
I first discovered gel polish, I joined a group of ladies online and quickly
made a few friends. Gail is a lady who simply leaves a lasting impression on
everyone she meets – both online and in her daily life. As a nurse and mother
of 5, it absolutely amazes me that she not only has time to dedicate to her own
nails, but also does manicures for her friends, family and coworkers on a
regular basis free of charge!
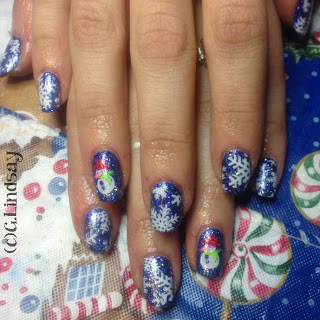
Look at this adorable wintery mani. As
usual, details to follow the picture.
Base Color: OPI Eurso Euro with
ArtsyFartsy Crafts Ultrafine Blue Holographic Glitter scrubbed into the tacky
layer.
Stamping Images: Snowflakes – MoYou
Christmas Collection plate #3. Snowman: Bundle Monster BM 316.
Stamping Polish: Mundo de Unas white
Additional touches: Gail added color to the snowman by
adding various gel colors with a dotting tool. Then for a touch of added
sparkle, she finished each nail with a layer of Shellac VIP Status before the
final top coat.
I picked a few more of her recent manicures to show you,
but before I do, I want to tell you a little about her and how she got into
gel.
Gail grew up on a small dairy farm in
Michigan as is the oldest of 4 children. She says she never had a lot growing
up and was usually "making something crafty out of otherwise junk". She sewed her
first outfit at only 7 years old. So the DIY way of life is very much a part of
who she is. She is a mother of 5 and a works full time as a nurse in the peri
unit of a local hospital.
Like many of us, Gail had weak, bendy
nails and traditional polish just wouldn’t stick. She always wanted nice,
beautiful nails, but her polish would always dent and chip. As a nurse, she is
not allowed to wear acrylic nails. When soak off gel was starting to become
popular, a coworker came in with a gel mani and it immediately got Gail’s
attention. The coworker was wearing a Geleration mani and had the entire system
that she received as a birthday gift from her sister. Gail says she was amazed,
but also skeptical. She found The Purse Forum and started reading everything
she could about application, products available, and which system to buy. She ended
up choosing Gelish due to availability, color selection, and price. Unlike many
of us who dive in head first, Gail took it an extra step. She booked two
appointments to have a SOG manis done in a salon to see how it is applied and
removed. They had only 12 Shellac colors to choose from, were using a generic
UV light, and the tech was running behind schedule, but she stuck it out in the
name of research. After seeing the application and removal in person, she was
convinced she could do it herself and ordered the supplies. She spent less than
$100 getting started – which was only slightly more than the 2 gel manis she
had done in the salon ($40 each). Of course, she has branched out into other
brands now, but it all started with Gelish.
Gail’s first DIY mani was a french with a
base of Gelish Vegas Nights with Up in the Blue tips to match her light blue
scrubs at work. She was addicted!!! She only did her own gel manicures for a
while, but eventually started doing her mother’s nails too. It then turned into
a family gathering staple with Gail doing manicures for all the girls in the
family. She told me that every time one of her sons brings home a new
girlfriend, she grabs her up and does her nails, learning a lot about them in
the process. (Such a great tip! I’ll have to remember that one for when my boys
are older.) As she continued to do nails for others, her confidence grew. She
honed her skills and tried new techniques, often going to work with manicures
that used techniques others had never seen before. Before long, she was doing
nails for her coworkers too. Gail also noted, “By the way, I don't charge
money- never have. It’s about boosting self confidence and moral. Its funny how
something as simple as manicured nails can make someone feel. This is why I
Iove it so much! Now that being said, people do provide donations that get put
right back into it - new polishes, new supplies, stamping supplies, glitter,
etc.”
So, now that you know a little about
Gail, let’s take a look at some of her work.
This next one is her entry in the MoYou London DecemberPinterest Contest. If you like what you see, please feel free to follow thislink and like or repin her entry. Gail noted that this is the first contest she
has ever entered. She attempted this manicure with freehand a year ago at
Christmas and was not happy with the result. The stamping made it so much
easier and she is happy with the result this time.
Base Color: Shellac Wild Fire
Stamping Images: Moyou Christmas Collection plate #3
Stamping Polish: Mundo de Unas White
Additional touches: she traced the white stripes and
swirls with Ink Frosted Flakes for added depth and enhanced some of the red
stripes with Shellac Ruby Ritz. She then finished each nail with a coat of
Shellac VIP Status before the final top coat.
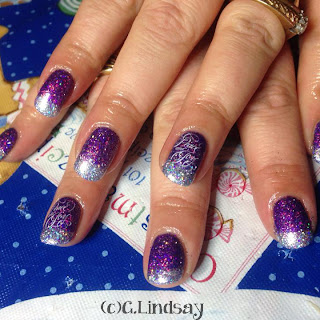
The final mani I chose to show you today is this gorgeous
non-traditional Christmas glitter fade. Gail noted “I love
doing the glitter fades. Every time I do this on someone new, I love seeing
their face when I start applying the glitter. Smiles galore!!!”
Base: LeChat Our Secret Eden over the
entire nail with Orly Shine on the tips. She then scrubbed Artiglio’s Jules
glitter over the Orly Shine at the tips and Artsy Fartsy Crafts Ultrafine
Purple Holo glitter over the rest of the nail.
Next layer: Shellac Iced Vapor (to lock
the glitter into place)
Stamping Image: Chez-Delaney Xmas 001
Stamping Polish: Mundo de Unas
A few tips and tricks: Gail notes that
she cleans up the glitter by running a cleanup brush along the cuticle and side
of the nail to pull any excess glitter away from the cuticles before locking
the glitter into place. Prior to top coating, she lightly files the free edge
to smooth any roughness left behind by the individual glitter pieces.
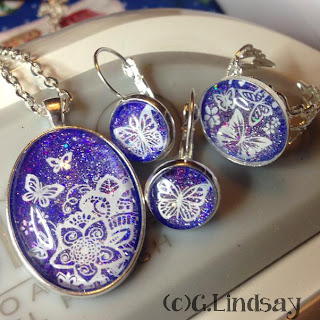
Gail has also started making nail polish
jewelry with her gel and stamping supplies. Take a look at these! So creative! I
swear, if I had just an ounce of her DIY creativity, I could put Martha Stewart
to shame. ;)
So, here’s the bummer. Gail is not a
blogger! Shame, right? With a full time job, husband, and 5 children, she
simply doesn’t have time. I did introduce her to instagram, so hopefully she’ll
find time to share her creations with us there. Her Instagram is Lindsaymomof5
if you would like to follow her.
And that’s all for today. Thank you, Gail, for being such
an inspiration to me over the years and for sharing your knowledge and talent. J
~Michelle


This is a great article that I'm just seeing now. You're a good interviewer. :) Thanks for sharing Gail's info and her supply list. Really like those MoYou plates.
ReplyDelete