Press Sample Affiliate Links

Hello Loves! It's time to get back into the swing of the The Nail School Chronicle after Winter Break from class. Sadly, my first week back was a short one. Yep, sick kid yet again. I swear, it seems to be a never ending struggle around here these days. As a friend recently pointed out, little kids are like petri dishes. But I digress. This week's post is going to be all over the place. Even though I only made it to class three days, I have tons to share! I'm not even sure where to start!
So, I had another test this week. I'm so mad at myself. I broke my perfect score streak. Y'all aren't going to believe the question I missed! The question was on polishing technique. Seriously! I apply polish close to a hundred times a month just for this blog alone. I know the proper technique for applying polish! Heck, I'm sure all of you know it too. Middle, side, side (then cap, but that wasn't part of the answer). Would you believe I answered side, middle, side? So freaking careless. Grrrrr. I really have to remember to slow down. I tend to fly through the tests because I feel so confident with the subject. To add insult to injury, I even added "cap" after the list of steps in the WRONG answer that I circled. So, just for fun...

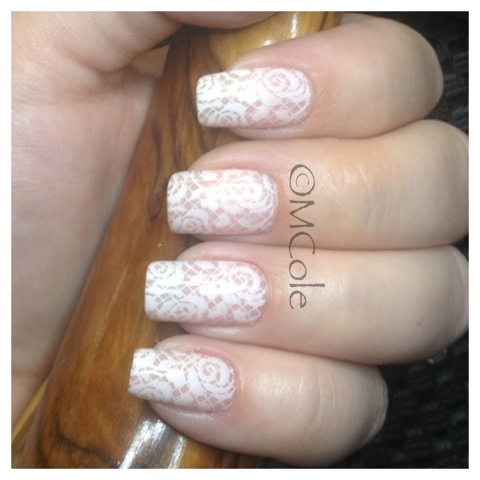
But wait. Let me tell you WHY I missed it. I spent last weekend swatching the Bundle Monster Red Carpet gel polish collection. The Red Carpet Collection is made up of 6 incredible metallic foil effect shades. These are like nothing I have ever worked with before. Very finicky but totally worth it. You can't allow the strokes to overlap at all so I found applying them side, middle, side was key. I'll have those swatches for you on Wed (trust me, you don't want to miss them) with application tips. Here's a little sneak peek. This is Hollywood and Ivy. ;)

Let's jump away from nails for a second...so there's a fun perk to attending classes at Georgia Career Institute. GCI is a well rounded school that offers training in Cosmetology, Nail Technology, Massage Therapy, and Esthetics. One of the perks of attending here is that the other departments always need people to assist with training. In the Nail Technology department, we have mannequin hands for practice in addition to other students and clients. In Cosmetology, they have mannequin heads. Things are a little different for Massage Therapy and Esthetics, though. They need real people for practice. You see where I'm going with this, right? A few weeks ago, I received a spa facial from a student in Esthetics. It was nice! This past week, I had my eyebrows waxed. Another free service score. But that's just the beginning. I received another service this week too...
Allow me to introduce you to David Koonce (I hope I'm spelling that right). David is well known around GCI for being a super friendly guy. He's not exactly hard on the eyes either. ;) He recently finished his training in Massage Therapy and came back to do the Esthetics course. So David comes over looking for someone to allow him to do an algae/seaweed body wrap. On the coldest day of the freaking year so far. It was in the teens! I wasn't exactly thrilled by the idea, to be honest. Don't get me wrong, I'm all for helping out another student, but getting naked and letting a stranger smear green stuff all over me when it is freezing outside wasn't exactly my idea of fun. Seriously, I haven't even been seen in public in a swimsuit in over 4 years. Talk about pushing me out of my comfort zone! Seeing as I was the only nail student who wasn't tied up in a manicure at the time, I decided to suck it up and help him out. Want to see a pic of David? He was kind enough to let me take his picture just for you.

Now, I confess, I'm a total stranger to spa services. The extent of my personal relaxation before starting my training at GCI amounted to a bubble bath with a glass of wine. And we aren't talking good wine either. I'm talking about the fruity stuff with a twist-off cap. Needless to say, I was nervous and had no clue what to expect. But seriously, spas all over Atlanta should be fighting to employ this guy. He was so nice and really put me at ease.
As for the service, whoa. Let me break it down: You select a fragrance, undress, lay under a huge towel while he applies a green detox paste (aka a seaweed/algae mask) to your arms, legs, belly and back (only the part he's working on at the time is exposed). Then you get wrapped up in a bunch of towels and what looked like a solar blanket for 15 minutes. While laying there burrito style, you get a really nice facial massage. He then and washes off the goop. Not going to lie...kinda odd being bathed by a stranger! You then move to a dry area where you get a moisturizing massage. I know, I make it sound so luxuriously glamorous, right? lol In all honesty, it was really relaxing. And David has incredible hands. I think I'm most impressed, though, by the way he was able to make me relax even though it was a very strange experience for me.
If y'all are in the Conyers, GA area, stop by the school and ask for David. You won't be disappointed. If you're not familiar with Conyers, it's right off I-20 just South East of Atlanta. I have no clue where David will end up after school, but I'll be sure to update when I do. I'm telling you, this man is a jewel.

In other news, I decided to ditch the acrylic sculpts on my own nails. The acrylic just couldn't stand up to the number of gel polish changes I put them through. The constant filing off caused them to lift every time. So I broke down and bought the Brisa Lite Sculpting Kit. So far, I really like it. The results look natural and it stood up to 16 (yes, 16) gel polish changes this weekend. I love that it is a soak off product too. Kind of a pain that I can't use my LED lamp, but I guess it's a fair trade off. I am looking into the removable gel line from NSI since it is LED compatible. Wanna see my Brisa Lite sculpts? This gel is super easy to work with. I do have a few bubbles in them, but that's more me than the gel itself. I could have removed the bubbles, but I'm going to keep them covered with gel polish so I was lazy. lol And look! My index nail is almost as long as the sculpt now. It won't be much longer before I'm able to skip the enhancements and go back to my natural nails. Whoo Hoo!


I also broke down and got myself a Nail Trainer style hand. The little latex(?) hand that came with my kit was driving me insane. I need something that is more life like in terms of movement. I love that it clamps to the table and has full range of movement. I do have to confess, this thing is more than a little creepy though. My 4 year old won't even touch it. lol I can't wait to give it a whirl in class. I was hoping I would have time to play with it this weekend, but swatching got in the way. ;)

That's it for this week. Be sure to check in on Wed to see the rest of those amazing BMC Metallic Gels!
~Michelle
*The Bundle Monster Gel Polish featured in this post was provided by Bundle Monster for my honest review. This post uses Amazon Affiliate links. Purchases through these links generate commissions that help fund this site. All other links are courtesy links and do not benefit ManicTalons.com.
Hello Loves! It's time to get back into the swing of the The Nail School Chronicle after Winter Break from class. Sadly, my first week back was a short one. Yep, sick kid yet again. I swear, it seems to be a never ending struggle around here these days. As a friend recently pointed out, little kids are like petri dishes. But I digress. This week's post is going to be all over the place. Even though I only made it to class three days, I have tons to share! I'm not even sure where to start!
So, I had another test this week. I'm so mad at myself. I broke my perfect score streak. Y'all aren't going to believe the question I missed! The question was on polishing technique. Seriously! I apply polish close to a hundred times a month just for this blog alone. I know the proper technique for applying polish! Heck, I'm sure all of you know it too. Middle, side, side (then cap, but that wasn't part of the answer). Would you believe I answered side, middle, side? So freaking careless. Grrrrr. I really have to remember to slow down. I tend to fly through the tests because I feel so confident with the subject. To add insult to injury, I even added "cap" after the list of steps in the WRONG answer that I circled. So, just for fun...
But wait. Let me tell you WHY I missed it. I spent last weekend swatching the Bundle Monster Red Carpet gel polish collection. The Red Carpet Collection is made up of 6 incredible metallic foil effect shades. These are like nothing I have ever worked with before. Very finicky but totally worth it. You can't allow the strokes to overlap at all so I found applying them side, middle, side was key. I'll have those swatches for you on Wed (trust me, you don't want to miss them) with application tips. Here's a little sneak peek. This is Hollywood and Ivy. ;)
Let's jump away from nails for a second...so there's a fun perk to attending classes at Georgia Career Institute. GCI is a well rounded school that offers training in Cosmetology, Nail Technology, Massage Therapy, and Esthetics. One of the perks of attending here is that the other departments always need people to assist with training. In the Nail Technology department, we have mannequin hands for practice in addition to other students and clients. In Cosmetology, they have mannequin heads. Things are a little different for Massage Therapy and Esthetics, though. They need real people for practice. You see where I'm going with this, right? A few weeks ago, I received a spa facial from a student in Esthetics. It was nice! This past week, I had my eyebrows waxed. Another free service score. But that's just the beginning. I received another service this week too...
Allow me to introduce you to David Koonce (I hope I'm spelling that right). David is well known around GCI for being a super friendly guy. He's not exactly hard on the eyes either. ;) He recently finished his training in Massage Therapy and came back to do the Esthetics course. So David comes over looking for someone to allow him to do an algae/seaweed body wrap. On the coldest day of the freaking year so far. It was in the teens! I wasn't exactly thrilled by the idea, to be honest. Don't get me wrong, I'm all for helping out another student, but getting naked and letting a stranger smear green stuff all over me when it is freezing outside wasn't exactly my idea of fun. Seriously, I haven't even been seen in public in a swimsuit in over 4 years. Talk about pushing me out of my comfort zone! Seeing as I was the only nail student who wasn't tied up in a manicure at the time, I decided to suck it up and help him out. Want to see a pic of David? He was kind enough to let me take his picture just for you.
Now, I confess, I'm a total stranger to spa services. The extent of my personal relaxation before starting my training at GCI amounted to a bubble bath with a glass of wine. And we aren't talking good wine either. I'm talking about the fruity stuff with a twist-off cap. Needless to say, I was nervous and had no clue what to expect. But seriously, spas all over Atlanta should be fighting to employ this guy. He was so nice and really put me at ease.
As for the service, whoa. Let me break it down: You select a fragrance, undress, lay under a huge towel while he applies a green detox paste (aka a seaweed/algae mask) to your arms, legs, belly and back (only the part he's working on at the time is exposed). Then you get wrapped up in a bunch of towels and what looked like a solar blanket for 15 minutes. While laying there burrito style, you get a really nice facial massage. He then and washes off the goop. Not going to lie...kinda odd being bathed by a stranger! You then move to a dry area where you get a moisturizing massage. I know, I make it sound so luxuriously glamorous, right? lol In all honesty, it was really relaxing. And David has incredible hands. I think I'm most impressed, though, by the way he was able to make me relax even though it was a very strange experience for me.
If y'all are in the Conyers, GA area, stop by the school and ask for David. You won't be disappointed. If you're not familiar with Conyers, it's right off I-20 just South East of Atlanta. I have no clue where David will end up after school, but I'll be sure to update when I do. I'm telling you, this man is a jewel.
Back to the nails. Class this week was really more of the same. Repetitions, Repetitions, Repetitions. Silk wraps, blended tips, acrylic overlays and sculpting. I'm not going to lie...I was getting a little bored with repetitions so I decided to have a play with sculpting stiletto nails and creating 3D acrylic flowers. I definitely need more practice on the flowers (sculpts too), but I'm super happy with how they turned out for a first attempt. Oh, and we have a mock nail art competition next week to prepare for the Bronner Bros. Beauty Show at the end of February. They have a nail art competition at the show and I'm thinking about entering. I don't think I stand a chance at winning, but it would a great experience and ice breaker into the competition world. Either way, the mock competition this week should be fun! Wanna see a pic of my brain scratchers? They aren't really a set as much as they are the result of me trying to figure this 3D thing out. I had a blast creating them.
In other news, I decided to ditch the acrylic sculpts on my own nails. The acrylic just couldn't stand up to the number of gel polish changes I put them through. The constant filing off caused them to lift every time. So I broke down and bought the Brisa Lite Sculpting Kit. So far, I really like it. The results look natural and it stood up to 16 (yes, 16) gel polish changes this weekend. I love that it is a soak off product too. Kind of a pain that I can't use my LED lamp, but I guess it's a fair trade off. I am looking into the removable gel line from NSI since it is LED compatible. Wanna see my Brisa Lite sculpts? This gel is super easy to work with. I do have a few bubbles in them, but that's more me than the gel itself. I could have removed the bubbles, but I'm going to keep them covered with gel polish so I was lazy. lol And look! My index nail is almost as long as the sculpt now. It won't be much longer before I'm able to skip the enhancements and go back to my natural nails. Whoo Hoo!
I also broke down and got myself a Nail Trainer style hand. The little latex(?) hand that came with my kit was driving me insane. I need something that is more life like in terms of movement. I love that it clamps to the table and has full range of movement. I do have to confess, this thing is more than a little creepy though. My 4 year old won't even touch it. lol I can't wait to give it a whirl in class. I was hoping I would have time to play with it this weekend, but swatching got in the way. ;)
That's it for this week. Be sure to check in on Wed to see the rest of those amazing BMC Metallic Gels!
~Michelle
*The Bundle Monster Gel Polish featured in this post was provided by Bundle Monster for my honest review. This post uses Amazon Affiliate links. Purchases through these links generate commissions that help fund this site. All other links are courtesy links and do not benefit ManicTalons.com.
Read more ...